Bagel Baking

Click here to view recipe.

A Beautiful Bagel!

I like to think I am not of the herd mentality – or perhaps I just want herd immunity.  Those of you who know me realize that is the truth – I don’t like to go along with a crowd until I think things through for myself, which makes me somewhat of an independent unicorn I suppose.  My need to be my “own person” translates into most things I do – how I dress, where I travel, and especially what I cook.

Let me back up.  The other evening during our 2-hour zoom sisters call, I knit while visiting with my sisters.  Kay was knitting too and Susan was….making bagels.  She completed the mixing and even cleaned her kitchen before we hung up.  Nothing like multitasking.  

I was intrigued, curious, and if I’m being honest, jealous about the bagels.  How hard could it be if she makes them countless times and could do it while talking to us?  AND she raved about how great these bagels were.  OK, I needed to be part of this herd.  We Klass girls have a need to join each other’s virtual lives – books we read, blankets we knit, and recipes we share.  Susan sent me the annotated recipe but by the time I opened her scanned copy, I had already reviewed the original recipe, made my tweaks (which were oddly similar to Susan’s!) and my bagels were already in the oven. 

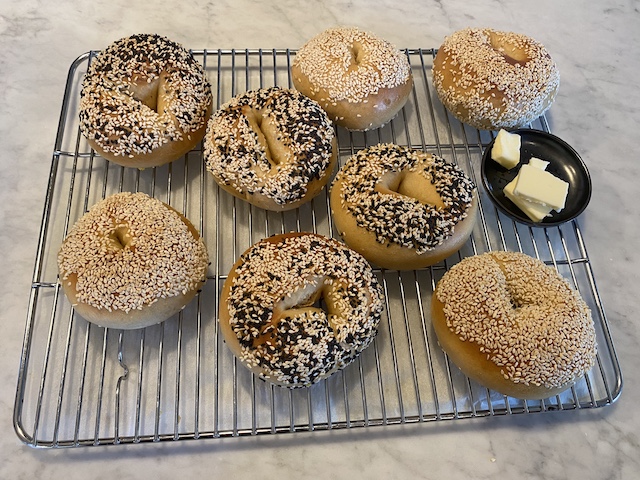
Bagels – Boiled, Baked & Ready to Eat

So bagels it was for my next daily baking adventure.  Susan had used a mash-up of two recipes from the Washington Post that required Barley Malt Syrup. It just so happened our PCC Coop had the Syrup in stock and brought it to me via Instacart, nice people that they are.

At 4 o’clock in the afternoon, I rolled up my sleeves, called Susan to see if I could use regular yeast (yes) and in less than 15 minutes I had the dough made and formed and in the fridge.  The next day at 6:30 a.m. I was preheating my oven and boiling the water and getting ready for the final step. In less time than it took for my oven to preheat I had the bagels boiled and coated with black and white sesame seeds!  16 minutes after they went into my oven they were ready and after resting while I took a shower I sampled THE best bagels I have eaten ever.  Ever.  I am not a New Yorker but I truly believe these could give those highly-lauded bagels a run for their money.

I have to say this wasn’t even a messy project.  It does call for a heavy duty stand mixer with a dough hook (I have that and don’t get to use it much these days) ) and a kitchen scale (which I have). And King Arthur Bread flour – I have stockpiled that as well.  You need space in your fridge for a cookie sheet to stay overnight.  The only problem is that it makes just eight bagels and two days later, after gifting just two of them, I am sadly out of bagels.  No worries, I’ll make more dough tonight.

If you are a bagel fan or just curious, try these.  They will not disappoint! I highly recommend you read the recipe through a few times to get it right.  You might like to look at the original recipe because I tailored mine for what I had in the house and for the way I like to bake. (see footnote).  

Homemade Bagels-adapted from the Washington Post with changes

Yields 8 bagels, about 4+ ounces each

pf-icon2


Ingredients 
  • 1 ½ tsp active dry yeast (I had Red Star on hand)
  • 337 grams warm water (scant 1 ½ cups)
  • ½ tsp granulated sugar
  • 1 Tbsp plus 1 tsp barley malt syrup (this is in several stores in Seattle)
  • 623 grams King Arthur bread flour (about 4 cups)
  • 2 tsp fine-grained sea salt
  • 3 Tbsp cornmeal for dusting the baking pan
  • About 1/4 cup sesame seeds (black or white or a combo) to sprinkle if you prefer sesame bagels like me)
Instructions

Measure the water and add the yeast and sugar in a 2-cup glass measuring cup.  For those of you challah bakers, this is the same way I start making my own challah!   Let it sit until it foams a bit then add the barley malt syrup and stir. 

In the mixer bowl of a stand mixer, combine the flour and salt.  Put on the dough hook and add the liquids.  Mix on low for about four minutes until the dough comes together, then turn the speed to medium-low and continue beating for 7-10 minutes or until the dough is formed, smooth and stiff.  It is stiff and that is why you can’t do this by hand!

Evenly spread the cornmeal on the bottom of a rimmed cookie sheet.  Turn the dough onto your counter and divide it into eight equal pieces, about four ounces each.  I weighed my total mass of dough then divided the ounces by eight so they would be equal. A little compulsive but…I like my baked goods to look professional. I then smoothed each ball of dough and covered them with Saran Wrap for five minutes at room temperature.  Full disclosure-a silicone mat works well for forming and resting the bagels. 

This is where I digressed big time from the original recipe, which had me rolling 11-inch snakes out of each ball and attaching ends together with water.  Halfway through this, I decided just to punch my finger into each ball and form a bagel shape, making sure the middle hole was at least 1 ½ inches in diameter and that the dough around the hole was even and smooth. Put each bagel onto the cornmeal-dusted cookie sheet as you finish shaping until all eight are done.  Be sure to leave as much space as you can between them as then rise a bit – it will seem crowded but you will be fine.  Cover the rimmed sheet with lightly oiled or sprayed Saran and find space to overnight these in the refrigerator for 12-18 hours.

The next day when you are ready to boil and bake, put a regular cookie sheet in the oven (so it heats too) and preheat the oven with the rack in the middle to 450 degrees.  Have 1/4 cup of sesame seeds ready to sprinkle on top (if you like sesame seeds).

Meanwhile, bring a large soup pot filled with four inches of water to a boil.  Get ready by having a cookie cooling rack ready and a piece of parchment that fits the cookie sheet (which is now in the oven) on the counter.  Carefully put four raw bagels in the boiling water at a time and let them boil for 30 seconds, taking a slotted spoon or a metal skimmer and submerging them gently into the boiling water.  Carefully remove the dough rings to a wire cooling rack and do the same 30-second boil for the next batch. Do not keep the bagels in the water longer than 30 seconds or you will get holes in the inside of the bagel.  Remove these to the rack.  While they are still damp, sprinkle one side (the rounded side) of the boiled bagels with sesame seeds, gently press down place each bagel seed side up on the parchment paper.  Be sure the bagels are spaced evenly on the parchment. Finally I grind some coarse salt onto the top of each bagel-just a bit.
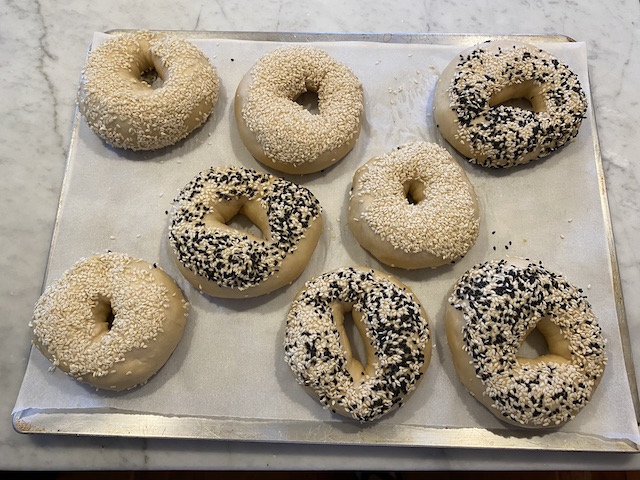
Ready for the Oven!

When all the bagels are coated with seeds and the oven is preheated, remove the hot cookie sheet from the oven and carefully slide the parchment and bagels to the hot cookie sheet.  They will sizzle!  Put the hot cookie sheet back into the oven and bake for 14-16 minutes until the bagels are brown and crisp.  

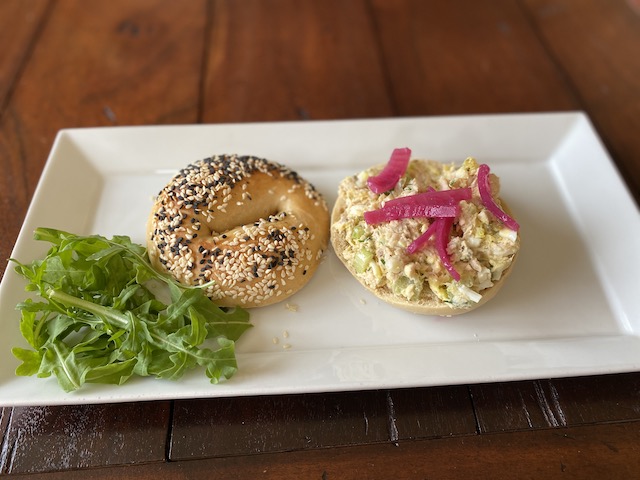
Use kitchen tongs to move the bagels to a wire rack to cool.  Wait for 10-15 minutes to slice in half.  

*  Note: you might enjoy reading the original recipe from the Washington Post. There was a video as well that included the way they want you to form ropes when making the bagels. But my way is easier, trust me!

I have recently been using caraway seeds too.  My next adventure will be to substitute some rye or whole wheat flour in these.

Share
Posted in Breads | Tagged , | 1 Comment

Black Bean & Sweet Potato Salad

Click here to view recipe.

The Best Black Bean & Sweet Potato Salad

And…drum roll…I seem to be making a lot of salads sans lettuce this summer.  When people ask me what I most love to cook, I always say creative salads and soups.  Of course, I love baking but truthfully I prefer savory dishes.

This recipe I am sharing is a hybrid between two dishes from a few of my favorite recipe writers…Deb Perelman and Mark Bittman.  Mark is my age (well, maybe a little younger but not much) and Deb is a LOT younger and writes cookbooks and a fantastic blog.  If I were 30 or 40 something, I would want to be her yet I jumped on the blog bandwagon a little late in life.  But I digress…

This salad is so good, so tasty and so beloved.  If you are searching for a good dish to bring to a socially distanced picnic (sniff sniff) or just to have in the fridge, this might just fit the bill.  

Simple & Colorful Ingredients

Black Bean & Sweet Potato Salad

Serves 4-6

pf-icon2


Ingredients
  • 3 medium peeled sweet potatoes (I don’t use yams although they are more colorful, but sweet potatoes hold up better for me)
  • 3 Tbsp extra virgin olive oil
  • 1 ½ tsp sea salt
  • 25 grinds fresh black pepper
  • ¼ cup raw pumpkin seeds + 2 Tbsp extra virgin olive oil
  • Pinch dried pepper flakes
  • 1 ½ cups black beans (15 oz  can or freshly cooked.  Don’t hate me, but I always have fresh black beans in my fridge or freezer)
    ⅓ cup chopped fresh cilantro
  • 2 Tbsp chopped pickled red onions 
  • 1 large avocado
  • 1 cup crumbled feta cheese (I love Valpreso)
  • Wedges of lime to serve
Instructions

Heat oven to 400 degrees.  Peel and cut potatoes into half-moons.  Coat the sweet potato slices with the olive oil.  Sprinkle with sea salt and pepper and roast for 15 -20 minutes until slightly brown.  Turn the potatoes and bake for another 15 minutes or until they are soft and brown.

Meanwhile, combine pumpkins seeds with two tablespoons of olive oil in a skillet and warm.  Let the pumpkin seeds cook until they are a little brown, about two minutes.  Remove from the heat and season with salt and red pepper flakes.  Put aside while you wait for the potatoes to cook

Rinse the cooked black beans (freshly cooked or from a can).  Add this to the cooked potato along with cooked pumpkin seeds, cilantro, and red onions.  Cut the avocado into cubes and add last.  Gently mix and top with feta cheese.  Taste and add more salt, pepper and pass a dish of lime wedges to squeeze on top of the salad.  This is great slightly warm or at room temperature.  

Share
Posted in Salads & Dressings | Tagged | Leave a comment

Peanut Butter Chocolate Chip Oatmeal Cookies

Click here to view recipe.

Note: this post has been in my queue since February, but I made these cookies last night for a change because I didn’t want more raisin oatmeal or oatmeal chocolate chippers.

PBCCO (minus a bite or two)

I don’t usually like or even lust after cookies in a bakery case.  That all changed one weekend shortly before Covid hit (I can barely remember before Covid) when, for some crazy reason, I started to crave oatmeal cookies with dark chocolate chips.  I had just arrived back in Seattle for a blink before heading  to Guatemala, and hadn’t even gone to the grocery store, so I stopped at a fine shop near my house, Macrina Bakery.  There in the case were oatmeal peanut butter chocolate chip cookies calling my name.  I bought one which set me back three dollars.  For ONE cookie. Holy smokes!  It’s a good thing I don’t do this often and it always bothers me to spend a lot of money on things I can make myself.
I got home and Googled “Macrina Bakery oatmeal peanut butter chocolate chip cookie” to see if I could hunt down a recipe that matched what they sell.  Lo and behold there were a lot of riffs of the cookie, so I did my own…ahem…adjusting.  Double the chocolate (naturally) and of course I only use bittersweet. And I subbed in a little more peanut butter than suggested.  And less granulated sugar.  I did stay true to Macrine and made mine huge just like the bakery.  I seem to be stuck on making giant cookies.

Why NOT Make ‘Em Huge?!

They are salty, sweet, and crunchy yet chewy in the middle.  For me they make a satisfying breakfast on the go.  They got two thumbs up from the other person living in my house and from my extended Seattle family, my most honest critics.

Peanut Butter Chocolate Chip Oatmeal Cookies (what a mouthful to say and to eat!)

Yield 23-25 large 4-inch in diameter cookies
pf-icon2


 Ingredients
  • 14 Tbsp salted butter (1 ¾ stick) – leave at room temperature to soften a bit
  • 1 cup commercial peanut butter (Jif or Skippy, smooth or chunky)
  • 1 cup packed dark brown sugar
  • ¾ cup granulated sugar
  • 1 large egg, room temperature
  • 1 Tbsp pure vanilla extract
  • 1 ½ cups regular unbleached flour
  • 1 ½ cups rolled oats, old fashioned (do not use quick-cooking oats)
  • 1 ½ teaspoons baking soda
  • 10 ounces bittersweet chocolate chips
 Instructions

Preheat oven to 325 and line two cookie sheets with parchment paper. Position the oven racks mid oven. 

Cream the butter, peanut butter, salt, and both sugars for six minutes, scraping down the sides of the mixer.  Add the vanilla and egg and mix.  Dump in the flour rolled oats, soda, and mix briefly until combined.  Finally, add chocolate chips.

The raw batter is pretty soft.  Scoop about ¼ cup batter (I oil my scoop) and place the cookies on a  parchment-lined cookie tray.  I put six cookies per sheet since they spread out.  Cover the raw dough balls with waxed paper or parchment and use a smooth circular glass bottom or measuring cup to smoosh them down so that the cookies are about three inches in diameter.  When you have two cookie sheets filled, slide them into the oven, bake 10 minutes then switch the bottom sheet to the top shelf and the top shelf cookie sheet to the bottom shelf.  Bake another 5-7 minutes until the cookies lose their gloss and are brown around the edges.  Remove from the oven, and let the baked cookies rest on the cookie sheets for 20 minutes, then remove them from the cookie sheets to a cooling rack.  

Cook’s notes:

I love to cool these and freeze them, then I take a few cookies out at a time and briefly reheat them in my toaster oven at 300 degrees for about five minutes.  OR you can form the raw dough balls and freeze them, then take out a dough ball or two, defrost for a half hour then bake on the spot. Add a glass of milk or a cup of tea and enjoy!   

My last go around I ground a bit of coarse sea salt on top before baking.  I loved this addition!  


Finally, I have tried these with fancy peanut butter but I wouldn’t waste the money on high quality peanut butter for these since there are so many other flavors and textures.

Share
Posted in Cookies | Tagged | Leave a comment

BEST Pressure Cooker or Instapot Pinto Beans

Click here to view recipe.

Perfect Pinto Beans

I love beans, as a side dish and as a main course.  I am not in love with beans out of a can and try my best to start from dried. That said, I do use canned beans in a pinch if I don’t have time to make my own.

This recipe is my favorite way to prepare pinto beans – they are flavorful, saucy and delicious in a bowl with grated cheese and condiments. I also like to pour them over any type of rice or as part of a lunch bowl for something heartier.  Plus – they’re lickity split easy and fast – only ten minutes of prep and 22 minutes to cook. 

Right Before Cooking

Pressure Cooker or Instapot Pinto Beans 

Yields 8 large servings

pf-icon2


Ingredients 
  •  1 pound dry pinto beans
  • ½ large brown-skinned onion, peeled but kept whole  
  • ½  good-sized yellow or red bell pepper, seeded but kept whole 
  • Large chunks of 1 carrot + 1 celery + 1 parsnip (optional)
  • 4 large cloves peeled garlic
  • A handful of fresh cilantro if you have it (optional)
  • 3 ½  cups water with a tablespoon of chicken stock, (I like Better Than Bouillion)
  • 1 teaspoon of tomato paste (I use my always ready tube)
  • 2 tablespoons chili powder
  • 1 tablespoon yellow mustard (the kind you put on hamburgers)
  • 1 teaspoon cumin 
  • 1 teaspoon dried basil 
  • 1 teaspoon fresh ground black pepper
  • 2 bay leaves
  • 1 tsp molasses
  • 1 tsp neutral oil such as grapeseed or avocado

SUCH Simple Ingredients

Instructions
  • Place beans in the Instant Pot or pressure cooker and add enough water to cover by 2″ to 3″. Allow to soak overnight or for at least six hours. Alternatively, bring the beans to a boil before soaking and let them simmer away for two minutes, then remove the pot from the heat and let the beans sit in the hot water, covered, for at least an hour.  After the soaking time, drain off and discard the soaking water and rinse the beans with fresh cool water, draining well. Set aside.
  • Add everything above to the soaked and rinsed beans and stir well.
  • Lock the lid in place, let the pressure cooker or Instapot come to full pressure and cook 22 minutes from when it reaches full pressure.  
  • When the time is up, allow the steam pressure to naturally release which should take 15 to 20 minutes. Sometimes I leave the beans in the pot after turning off the heat and go to do errands, returning two hours later.  Fine. After the natural release, remove the lid. Remove the onion, carrot, celery, and herbs with kitchen tongs.
  •  Stir, taste and season with salt as desired. You shouldn’t need much, or any, salt.
  • Sometimes I package the beans into smaller containers and freeze them.  And while the beans are cooking I often make some type of rice, which also freezes well.  

Notes: I usually do a quick soak rather than overnight just because when I get a hankering for beans, I don’t want to wait for the long soak  Also, as these sit after cooking they thicken up quite a bit, so don’t panic if they seem soupy.  Give them a couple of hours and you’ll be skurprised by how much the liquid becomes much less liquidy, if that is a word!

Share
Posted in Side Dish | Tagged | 2 Comments

Peachy Lemon Pound Cake

Click here to view recipe.

Lovely Peachy Lemon Pound Cake

Worry not – I’m back to my Corona baking! This week, I chose this recipe for two reasons.  #1: it makes two loaves of dessert or breakfast bread and #2: during our video chat the other week, my sisters talked about peaches and a peach bread recipe in the New York Times.  I found the recipe of which they spoke and intended to make it too – after all, the three of us are not very independent thinkers when it comes to trying recipes.  However, I Googled Peach Pound Cake and found a recipe in the Washington Post that originated from a peach grower in Tennessee.  Peaches?  Southern baking?  OK, I’m in.

I switched ingredients because I don’t go to the store often these days, so I used what I already had in my kitchen.  I changed other instructions too — just because that is how I rock and roll.  What I ended up with is a personalized version of a pound cake that is more lemony than peachy, but very moist and delicious.  I highly recommend you try this. I ate two pieces before lunch. No shame.  

Glazed and Good to Go!

Peachy Lemon Pound Cake

Makes 2 loaves

pf-icon2


Pound Cake Ingredients

(Note: I always love weighing ingredients when possible so you can use either method!)

  • 1 ¾ cups all-purpose flour (219 grams)
  • ½ cup medium ground cornmeal (75 grams)
  • 2 teaspoons baking powder, sifted because mine always clumps
  • ¾ teaspoons fine sea salt
  • Grated zest from two average-sized lemons
  • ½ cup plain kefir (shake before measuring) – you could also use buttermilk but I didn’t have any
  • ¼ cup whole or 2% milk
  • 1 teaspoon pure vanilla extract
  • 2 sticks of salted butter (room temperature)
  • 1 ¼ cups granulated sugar
  • 4 large eggs (room temperature)
  • 2 medium-sized peaches, peeled* and chopped finely – about ⅓ inch cubes  
Glaze Ingredients
  • 1 ½ cups powdered sugar, sifted
  • 3 tablespoons fresh-squeezed lemon juice
Instructions

Preheat the oven to 350 degrees and place the rack in the middle.  Spray two 8×4 inch loaf pans with Pam, line the bottoms of each pan with a piece of parchment paper to fit the bottom, and respray the bottom.

Whisk the flour, cornmeal, baking powder, and salt together in a bowl and set aside

Combine the lemon zest, kefir or buttermilk, milk, and vanilla in a glass measuring cup.

Using a hand mixer or stand mixer, cream the butter and granulated sugar for three minutes, stopping twice to scrape down the bowl.  Add the eggs one at a time and continue beating until each egg is incorporated.

Turn the mixer to medium and add the dry ingredients a third at a time.  After the flour mixture is well combined, add about half of the liquid ingredients from the glass measuring cup.

Beat for about a minute once all the flour mix and liquids are in the bowl.  Turn off the mixer and fold in the cubed peaches.

Divide the mixture between the two prepared loaf pans and smooth the tops with an offset spatula.  Bake for 50 minutes or until a toothpick comes out clean.  Put the pans on a wire rack to cool for 45 minutes.  Gently shake the loaf pans to release the cake edges from the pan and turn out onto the wire rack to finish cooling for another 15 minutes.  

While the loaves are cooling the final 15 minutes, whisk together the lemon juice and sifted powdered sugar.  The mix should be fairly thick, more than maple syrup – kind of like cake frosting.  Add more powdered sugar or lemon juice if needed.

At the end of the 15 minutes, while the cakes are on the rack, they will be warmish but ready for the frosting.  I put a piece of waxed paper under the rack to catch dribbles then divide the glaze in half and spread evenly on top of the loaf.  Let everything cool completely and don’t wrap or store until the frosting is hardened.  

This would be good with a dollop of whipping cream or plain yogurt and some fresh peach slices or raspberries on the side.  Best of all, you have another loaf to give away! Or … just eat yourself.  

*PS: To peel peaches – I bring a saucepan of water to the boil, make a shallow X cut in the bottom of each peach and lower the peaches into the water. Let them simmer for a few minutes, then remove from the hot water to a bowl filled with iced water.  The skin then peels off easily and quickly, and you won’t have to struggle to peel your peaches or lose any peach flesh.

Share
Posted in Breads | Tagged | Leave a comment

Wild Rice Salad with Apricots and Herbs

Click here to view recipe.

Wonderful Wild Rice Salad

Just so you don’t think I am only baking during this pandemic…I am sharing a concoction I have made twice in the last two weeks.  I’m finding that these days, I like to have room temperature salads or easy soups available and ready to eat at home mid-day.  I’ve never been one to enjoy restaurant food very often so the lack of being able to stop and grab a snack or lunch really is not a problem for me.   What I do miss is sharing my creations with friends, though. So here I am – sharing this with you!

This wild rice salad is delicious served warm or at room temperature.  I try to make a large amount of this when I begin because I never tire of eating it a few days in a row.  To add more oomph, you could add shredded roasted chicken or fried tofu – although I do enjoy it as a simple vegetarian dish.  It has all the flavors and textures I adore – savory, sweet, crunchy, and comforting – and it is one of those side dishes that gets better the following day.  An added bonus is that it looks pretty and colorful as well. 

Here goes, easy and yummy.

Wild Rice Salad with Apricots and Herbs

Serves 4-6

pf-icon2


Ingredients
  • 1 ¼ cups wild rice
  • ¼ cup extra virgin olive oil
  • ¼ tsp sea salt 
  • About 25 grinds of fresh black pepper
  • 1 medium white or red onion, peel and dice ¼ inch
  • 2 teaspoons fresh coriander seeds
  • ½ cup roughly diced ruby dried apricots (a pantry staple for me)
  • Grated zest of one lemon
  • 2 Tbsp fresh squeezed lemon juice
  • ¼ cup chopped fresh cilantro (you can use both leaves and tender stems)
  • 2 Tbsp fresh chopped mint leaves
  • 2 Tbsp fresh chopped Italian parsley
  • 1 cup toasted chopped pecans, reserve to top the dish
Instructions

Make the wild rice according to package directions but do not overcook it.  I do this in my pressure cooker but the stovetop takes about a half an hour.  Drain and cool

Meanwhile, heat a large saucepan over medium-high heat for a minute, and add olive oil.  When it is warm, add onion, pepper, and salt.  Reduce to low and keep stirring the onions occasionally so they become soft and brown.  Once the onions are soft, add coriander seed and stir on the heat for a minute.  Add the apricots and lemon zest and continue to cook for another two minutes.  

Take the pan off the heat and add the cooked drained rice to the onion mixture in the pan so the flavors combine.  Add the lemon juice and chopped fresh herbs.  Taste and add additional salt, black pepper, lemon or olive oil as needed.  Top each serving with the toasted pecans.  Serve warm or refrigerate for the next day or eat at room temperature.  


Share
Posted in Salads & Dressings | Tagged | Leave a comment

Whole Wheat Raspberry Ricotta Scones

Click here to view recipe.

Isaiah Max Kopelovich, editor & eater extraordinaire!

**The draft of this blog post was edited (and improved!) by my oldest grandson and culinary student, Isaiah Max Kopelovich.

Here is yet another scone and baking recipe my sister Kay bragged about on our weekly sisters Zoom call.  The three “Klass girls” virtually talk every Sunday night for two hours.  Sadly, our annual Sisters trip and several family weddings have been canceled this year, so this is the best we can do. Our husbands are all perplexed about what we could possibly say during this time, but we never seem to run out of conversation.  And topics during these virtual gab sessions include recipes, food, phases of reopening, books we have read, political stunts, grandchildren, cousins…you can see that we never run out of small talk. 

Food and menus and new recipes are always at the top of the agenda since all three of us cook incessantly.  When Kay raved about these scones, I poo-pooed them, but a few weeks later when she mentioned that these were her favorites, I caved and tried them.  At this moment in time, this recipe just happens to be my favorite as well. 

The original recipe recommended keeping your hands and the counter floured well, so the scones are able to be transferred from bowl to cookie sheet, but I formed a ball of the dough then plopped it down without adding any flour onto my trusty silicone mat, made the scones there and used a small spatula to put them on the parchment-lined cookie sheet!  If you don’t already own a silicone mat, this is yet another reason to buy one!

Whole Wheat Raspberry Ricotta Scones 

(Adapted from Smitten Kitchen 2011)

Makes 9

pf-icon2


Ingredients
  • 1 cup (120 grams) white whole wheat flour
  • 1 cup (125 grams) all-purpose flour
  • 1 tablespoon baking powder, sifted (mine always has lumps)
  • ¼ cup (50 grams) granulated sugar (remove 2 tsp from the measuring cup)
  • ¼ teaspoon table salt
  • 6 tablespoons (85 grams) cold salted butter, cut into pieces
  • 1 heaping cup (136 grams or 4 ¾  ounces) fresh raspberries
  • ¾ cup (189 grams) whole milk ricotta
  • ⅓ cup (79 ml) heavy cream
  • 2 teaspoons coarse raw sugar to top (demarada)
Instructions

Preheat oven to 425 degrees. Line a large baking sheet with parchment paper. 

In the bottom of a large wide bowl, whisk flours, baking powder, sugar, and salt together.

With a pastry blender: Add the butter and use the pastry cutter to cut the butter into the flour mixture until the biggest pieces are the size of small peas. Toss in raspberries and mix with your spatula.

Whisk the ricotta and heavy cream together in a smaller bowl, then pour into the large bowl containing everything else to form a dough with a flexible spatula. Using your hands, gently knead dough so it forms a ball and until all the flour is incorporated.  You can do all of this right in the bottom of the bowl. The raspberries will mush up a bit.

Once you form a ball, quickly transfer the dough to a silicone mat.  Pat it into a 7-inch square about 1-inch tall. Sprinkle the top with the raw sugar and gently press into the dough.  With a large knife, cut the dough into thirds horizontally, and then thirds vertically, so that you are left with nine almost even squares of dough. Transfer the scones to the prepared baking sheet with a spatula. 

Bake the scones for about 15 minutes, until lightly golden at the edges. Cool on the cookie sheet for two minutes then transfer to a cooling rack. It’s best to cool for about 15 minutes before eating them. If you have some left, cool them completely then store in a well-sealed container or zip lock bag.

For your freezer: During raspberry season, I take advantage and make a lot of these and bake them as needed.   I form the scones and cut them, then I put them on the parchment-lined sheet and freeze them raw.  Once they are frozen solid, I transfer them to a freezer bag.  When you feel like a fresh scone, preheat the oven and put the frozen square(s) on a parchment-lined sheet.  You do not need to defrost the frozen scones.  Bake them for 17-19 minutes.

Share
Posted in Breads | Tagged | Leave a comment

Blueberry Muffins

Click here to view recipe.

Blissful Blueberry Muffins

Fasten your seatbelts, because here comes a post for Blueberry Muffins published by Deb Perelman of Smitten Kitchen, and I hardly changed a thing.  I am not one who likes to follow a recipe to the “t”, ever.  Usually, I can read the ingredients and directions, then I tweak it ever so slightly (or, from time to time, more than slightly).

OK, I did use salted butter here because I was out of unsalted, then I reduced the amount of salt in the recipe.  See?  But I raise my glass (or cup of coffee) to Deb for the easiest, most delicious way to use blueberries in the summer.  I’m not even embarrassed to share that I have made these three times in a week! 

Ready For The Oven!

Blueberry Muffins

Yields Nine Muffins

pf-icon2


Ingredients:

(I put weighs of ingredients here because I always defer to that)

  • 5  tablespoons (70 grams) salted butter, cold is fine
  • ½ cup (3 1/2 ounces or 100 grams) granulated sugar
  • Finely grated zest from half a lemon 
  • ¾ cup unsweetened plain yogurt, stir before measuring
  • 1 large egg
  • 1 ½ teaspoons (7 grams) baking powder
  • Pinch of  baking soda
  • ¼ teaspoon fine sea salt
  • 1 ½ cups (195 grams) all-purpose flour
  • 1 ¼ to 1 ½ cups (215 to 255 grams) blueberries, fresh or frozen (no need to defrost) .  
  • FOR TOPPING:  3 tablespoons turbinado (sugar in the raw) sugar 
Instructions:

Heat oven to 375°F and put the rack in the middle 

Spray nine of the “cups” of the muffin tin with nonstick spray.  I usually pour water in the remaining three muffin indentations where I won’t be putting batter but can’t remember why I do this.  (There is a reason, though)  

Melt butter in the bottom of a large bowl and whisk in sugar, zest, yogurt, and egg until smooth. Whisk in baking powder, baking soda and salt until fully combined, then lightly fold in flour and berries. The batter will be very thick, like cookie dough. 

With a ¼ cup ice cream scoop, divide between the 9 prepared muffin holders and sprinkle each unbaked muffin with one teaspoon of turbinado sugar. This will give you a crunchy top. There is no need to even out the tops!

Bake for 25 to 30 minutes, until the tops are golden and a tester inserted into the center of muffins comes out clean (you know, except for blueberry goo). Let cool in the pan for 10 minutes.  I then gently gently twist them and use a knife to gently get the stuck parts to release from the muffin cups and then gently place them on a rack.

These are great warmed ever so slightly if it is a day later, then smear with salted butter.  I have also cooled and frozen them for a couple of weeks but truth be told, we eat them or give them to friends and family the first day.

Share
Posted in Breads | Tagged | Leave a comment

Kefir Coffee Cake

Click here to view recipe.

The Most Delicious Coffee Cake

I need another coffee cake recipe like I need a hole in my head. However, if you read my last post,  you have learned by now that my need to bake every day has become a full-blown sickness.   I read this recipe for coffee cake in the Food Section of the Seattle Times where it was presented by a 14-year-old aspiring chef as an option for Father’s Day.  How could I turn away?

What tempted me most was the use of oil in lieu of butter – especially since my butter stash was running low and I was not due for my COVID Grocery Store foray for a few days. Plus it was 6:30 am – my favorite time to bake. This cake required just a medium and a large bowl and a little elbow grease to make (no mixer needed). I had every ingredient in the house to boot!

I did not have buttermilk but I had kefir, which worked well.  I used avocado oil in place of corn oil, dark brown sugar in place of light brown sugar – and I was quite happy with the result The cake looks different (darker) than my usual sour cream coffee cake and I actually appreciated having a non-sour cream-yet-still-moist option. It didn’t taste quite as overwhelmingly rich to me.  

My recipe-tasting husband loved the breakfast cake, the cleaning woman for our condo gave it a thumbs up and a large chunk will go to my pregnant-with-twins daughter-in-law and my overly busy daughter and family.  

Hot Out of the Oven

Kefir Coffee Cake

pf-icon2


Ingredients:
  • 2 ¼ cups all-purpose flour
  • ½ teaspoon sea  salt
  • 2 teaspoons cinnamon (DIVIDED)
  • 1 cup packed dark brown sugar
  • ¾ cup granulated sugar
  • ¾ cup avocado oil
  • 1 cup raw chopped walnuts or pecans
  • 1 teaspoon baking powder
  • 1 teaspoon baking soda
  • 1 egg, beaten
  • 1 cup plain kefir, shake well before measuring
Instructions:

Preheat the oven to 350 degrees. Grease a 9 x 12 x 2-inch cake pan.

In a large bowl, combine the flour, salt, 1 teaspoon cinnamon, brown sugar, white sugar, and oil. Remove three-quarters of a cup of this mixture and put it in the small bowl. Into this smaller bowl, also add the nuts and remaining teaspoon of cinnamon. Set aside for the topping

To the remaining mixture in the large bowl, add the baking powder, baking soda, egg, and kefir to the flour mixture and stir everything together. It’s OK if you have a few small lumps. Pour this mixture into the greased pan.

Sprinkle the nut mixture from the smaller bowl evenly over the top of the batter. I kind of pressed down lightly on the topping so it wouldn’t immediately crumble off while eating.

Bake for 40 minutes or until a knife inserted into the middle of the cake comes out dry and free of wet batter.

Cool on a rack for an hour-the cover tightly with foil or saran.  You can also freeze this cake for up to a month.  Enjoy!!

Share
Posted in Breads | Tagged | 3 Comments

Huge Oatmeal Chocolate Chip Cookies

Click here to view recipe.

Seriously – The BEST!

I came home on a “rescue” flight from Guatemala in late May, just as the president was locking down the country.  Truly locking it down – as in no one was allowed to be outside for four days each week—which meant no shopping, no walking, nada.  Nisht.  I encountered these rules the weekend before we were to leave as our flight was canceled. But that is another story for another day. I’m just relieved to be home!

My mornings in Seattle begins around 6:30 am.  My barista (aka husband) makes me a mug of cappuccino so I can start my engine.  I then start putting my flour, sugar, yeast, vanilla, and everything I need for baking on the counter.  This morning, which is already three weeks since I’ve been back, he remarked that I was a sick individual with a severe baking addiction.  I cannot argue that point.  Every single day I make bread, some type of pastry or pie or cake and then the ho-hum soups and good, fresh dinners. 

I know, I know, I know!  I have no reason to have yet another oatmeal cookie recipe but come on…my daughter Rachel stocked our kitchen before we returned and quarantined with too much bread flour, white whole wheat flour, all-purpose flour, bittersweet chocolate, and other baking (and cooking) stuff. So bake, I must.

I can also blame this insanity on my sisters.  We Zoom every Sunday evening for 80 minutes then send flurries of texts so we compare notes on what we are cooking and baking, then recipes are sent back and forth and reviews of the food are unabashedly made.

Skeptic that I am, I don’t trust most people when they tell me a cookie recipe is really good.  But my seesters?  They have genetic taste buds like me and are baking snobs as well.  None of us would consider white chocolate or light chocolate or even semi-sweet chocolate, heaven forbid.  We are intense chocoholics after all.

Kay and I heard about these cookies from Susan, who got the recipe from her daughter-in-law Nicole who probably made them gluten-free.  Susan sent us both her recipe and Kay made them not once but three times in the past week!  Today was my maiden voyage. And I am here to testify that these are really good and really easy. Plus – they make enough for me to give some to my two offspring who brilliantly decided to settle in Seattle so they can always have food from their mother.  And if my freezer isn’t packed I’ll have an excuse to make yet another batch of cookies or scones or breakfast bread.

“BIG ASS” (Susan’s title) Oatmeal Chocolate Chip Cookies

Yield 24 large (4” in diameter) cookies 

pf-icon2


Ingredients
  • 1 cup salted butter softened
  • 1 ½ cup firmly packed dark brown sugar
  • 2 large eggs, room temperature
  • 1 tsp. pure vanilla extract
  • 1 ½ cup all-purpose flour
  • 2 tsp. baking soda
  • 1 tsp. sea salt
  • 2 ⅓ cup rolled oats (old-fashioned) 
  • 1 (12 oz) pkg. bittersweet chocolate chips (my bittersweet chips only had 10 oz which     Kay said was plenty, but I, of course, added two more ounces from another pack)
  • 1 ½ cup chopped toasted nuts (salted and/or smokey almonds are great I hear, but I just had pecans on hand which I toasted.  I try to go to the store no more than once a week right now.)
  • Coarse cane sugar for sprinkling on top
Instructions

Beat butter and brown sugar in a large bowl of an electric mixer until creamy; beat in eggs and vanilla.

In a separate bowl, stir together flour, baking soda, and salt; gradually add to butter mixture, blending thoroughly.

Add oats, chocolate chips, and cooled toasted nuts; mix well by hand or quickly in the machine.

Shape each cookie by scooping into a ¼ cup measure for large cookies, six per sheet.  I then cover the balls of dough with a piece of waxed paper and flatten them evenly. Next, sprinkle a few flakes of coarse sugar on top.  

Bake in a 350-degree oven for 13-15 minutes or until edges are lightly browned. Allow to cool on the cookie sheets for five minutes then transfer to racks to cool completely.

Cook’s notes:

  • In general, when I bake cookies, I do all the scooping at once and put the balls of dough onto a parchment-lined tray, then refrigerate until I am ready to bake.  This keeps the dough cooler and I can wash the pans and equipment while the first batch of cookies is baking.  I hate having a bunch of dishes to do at the end, truth be told. 
  • My sister Susan noted: these are “very similar to mom’s oatmeal ccc’s. Easy to make gluten-free w/substitute flour, tastes the same I swear.”
  • These freeze well up to two months, or you can freeze the dough balls and bake as needed.  
Share
Posted in Cookies | Tagged | 2 Comments