Kitchen Sink Soup

Click here to view recipe.

Kitchen Sink Soup – Guatemala Style!

I’m in Antigua, Guatemala as I write this post.  We are renting a small apartment in the center of town, and my kitchen here is very small and barely useable.  For example, the smallish electric stove is mostly rusted out and one burner only offers up high heat. That’s it.  The pots and pans are so worn that I bought myself one cheap fry pan and one cheap small saucepan. Oh, and I brought a couple of knives, a potato peeler, and a lime squeezer.  Forget about the oven—smoke pours out when I try to preheat!
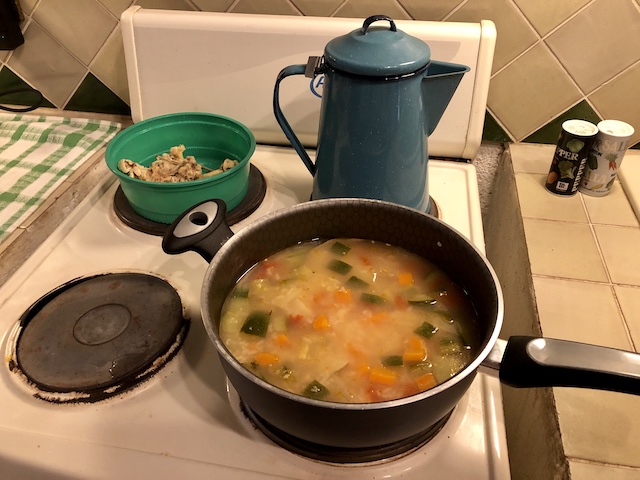
Check out my stove!

Amazing what one can do if motivated.  I am someone who does not enjoy restaurant food too often.  Saturday, while my husband was saving the world, I ventured out and bought “pollo entero de horno” or whole roasted chicken.  The first night we had a bit of roasted chicken with some vegetable laden rice and sauteed veggie that I made. . The next day I composed large salads with sliced chicken, mango, tomato, cucumber tossed with Tamarind dressing for lunch.  There were a few chicken sandwiches, chicken salad sandwiches, and four days later, the only bits left were untouched parts with very little meat on them. Waste not, want not. Besides, I craved soup.

So…I rifled through the fridge and cupboards.  Into the pot went the chicken neck, back and part of a thigh.  I added water to cover, probably around five cups. Since this wasn’t going to be any type of gourmet dish, I added everything else at the same time: half of a large green zucchini, chopped in half-inch bits, one regular carrot peeled and chopped into half-inch pieces, some white skinned potato cut up, three quarters of a white skinned onion, a few cloves of garlic, about a half a cup of Basmati rice and a handful of cilantro.  Salt and pepper. Cooked for 45 minutes partly covered. Lime juice at the end.

For some reason this tasted really great—it was hearty and thick,  and fed four adults some nice servings along with raisin macadamia nut bread slices slathered with butter, and cubes of papaya with lime.  

The next time you have some chicken bones or parts left over, make soup with everything but the kitchen sink.  And make it your own. I’d have added some green beans or white cooked beans if I had them, some sliced celery, perhaps pasta in lieu of rice…honestly, this came about just because of what I had in the kitchen here.  

Just so you can see what I did in a recipe format:

Kitchen Sink Soup

Makes 4-5 servings

pf-icon2


Ingredients
  • Leftover cooked chicken parts (i.e. neck, back, wings or whatever you have)
  • Water to cover said chicken
  • ½ large zucchini, cubed ½ inch
  • 3 fingerling potatoes, cut into 1-inch pieces but unpeeled.  
  • 1 large carrot, cubed ½ inch
  • 1 small white onion, unpeeled but cut into half
  • 2 cloves garlic, unpeeled
  • ⅓ cup raw white basmati rice
  • A handful of cilantro or dill
  • Salt (it takes a fair amount)
  • Black pepper
  • Juice of ½ lime for the end
Instructions

Cover chicken bones with a little meat clinging to them in a large saucepan.  Cover with fresh water by a ½ inch. Add everything else on the list but the lime.   Bring to a boil, lower heat and cook partly covered for 45 minutes. Fish out the onion, garlic and chicken bones (pick any chicken meat you find and return to the pot).  Squeeze fresh lime juice and add to taste along with extra salt and pepper.


Share
Posted in Poultry, Soups | Tagged | Leave a comment

Morning Glory Muffins

Click here to view recipe.

Marvelous Morning Glory Muffins

The other day I was looking at the Washington Post food section, and lo and behold – Ellie Krieger’s recipe for Morning Glory Muffins popped out at me.  Back in the day…way back in the day … I lived in Sioux City, Iowa. Bakeries weren’t common then like they are now, but I remember my mom taking me to get “morning glory buns.”  These yeasted pillowy buns contained nuts, apple shreds, carrots, raisins, coconut, and pineapple. I remember thinking that they sounded weird, but once I tried them I was hooked.  

I have never made them in their yeasted form, but now that I am typing this and I am feeling creative, I don’t see why I wouldn’t make challah dough then fill a rolled out rectangle with the same mixture.  I will report back when I have the time to follow through on this brilliant idea.

Anyway, I love breakfast muffins – particularly when they have whole wheat flour, oil, and less sugar than normal.  The only scones or muffins I eat happen to be those I bake – I am too cheap to pay good money for way less quality and unknown ingredients!  I copied the Washington Post recipe and here I am.  WAITING, as my kitchen smells with the most amazing smells, the last five minutes for these babies to be done.  The cooling rack is ready, the timer is ticking away and I am trying to write down every little change I made to the original recipe.

Not-So-Perfect Muffins

Note that I am not a baking perfectionist (usually) and that my muffins aren’t exactly the same size.  OK by me. The taste is better than I imagined. There is texture enough for my palate. Out of 12 muffins, 8 ½ now remain less than an hour later.  (I had help from the other person who lives here). The recipe sounds OK but the result is way better. Exceeded my expectations, as they say.

Morning Glory Muffins

Makes 12 nice sized muffins

pf-icon2


Ingredients:
  • ⅓ cup white raisins or dried cherries, soaked in hot water to cover
  • ¾ cup walnuts (coarsely chopped)
  • ½ cup unsweetened shredded coconut
  • ¾ cup dark brown sugar
  • ½ cup avocado or other neutral oil
  • 2 large eggs
  • 1 tsp pure vanilla extract
  • ¼ tsp ground nutmeg
  • One 8 oz can crushed pineapple, juice and all
  • 1 large carrot (peeled and grated)-about 1 cups
  • ½ cup unpeeled grated apple (mine was a Braeburn because that is what was handy)
  • 1 cup whole wheat pastry flour plus ¾ cup all-purpose flour
  • 1 ½ tsp ground cinnamon
  • 1 tsp baking powder
  • 1 tsp baking soda
  • ½ teaspoon fine sea salt
  • 2 tsp coarse Turbinado sugar for the top of the muffins
Instructions:

Preheat the oven to 350 with the rack in the middle.  Spray or grease a regular sized muffin tin with oil-one for 12 regular sized muffins

Soak the raisins in hot water, and leave them alone while you get everything else done

Toast the walnut pieces and the coconut at 350 for 1 ½-3 minutes.  I did mine in the toaster oven and they were done before I could blink.  If you overdo the coconut, it will burn – so watch out.

Whisk together the flour, cinnamon, baking powder, baking soda, salt, and nutmeg in a medium bowl.

In a large bowl whisk the oil, brown sugar, eggs and vanilla until well combined.  Add the pineapple and it’s juice and mix well. Drain the raisins, discard the water and stir the drained raisins into the liquid ingredients.  Then add the grated carrot, apple, and cooled toasted nuts and coconut. Add to dry ingredients and stir until barely mixed.

Using an ice cream scoop, divide the batter equally among the 12 muffin wells, sprinkle with a pinch of turbinado on top and bake for 20 minutes or until a toothpick comes out clean.  Transfer the pan to a wire rack and wait five minutes, then remove the muffins to the rack to cool completely. These freeze for up to three months and stay fresh for a few days at room temperature.  As if.

Oh, and soft cream cheese makes the perfect topping.

Share
Posted in Breads, Breakfast | Tagged | 4 Comments

Quick Curry Lentil Soup

Click here to view recipe.

Sumptuous Curry Lentil Soup

Following my trip to Antigua, Guatemala, I searched out a recipe for “curried red lentil soup.” During my visit, I had a real “yen” for soup and our rental apartment stove is so off balance that it is tough to saute or cook with much accuracy.  The stove tilts to the right, so if I use a pan and add oil, the bottom of the pan is never coated because I end up with a pool of oil in one spot of the pan. The stovetop also has two settings that function: off and full on high power. Nothing in between.  Suffice it to say, I use my toaster oven and do really simple cooking.

There is a wonderful little place across town, near to where we hike a few times a week.  On the way home one Sunday, I stopped and bought a pint of red lentil curry soup. Boy, it hit the spot and I decided then and there to try to replicate it when I came back to Seattle.

I found the recipe below in a two and a half-year-old Bon Appetit magazine and, of course, tweaked it here and there.  It is good, It is easy and quick to prepare, it is filling, it checks all the boxes for me.  And it stays refrigerated for a few days — easy to reheat for another lunch or dinner. It is vegan, in case that matters to you.

Red Lentil Curry Soup

Serves 4-6

pf-icon2


Ingredients
  • 2 tablespoons extra-virgin olive oil
  • 1 medium brown skinned onion, finely chopped
  • 2 garlic cloves, finely chopped
  • 1-inch piece ginger, peeled, finely grated
  • 1 tablespoon medium curry powder (I bought mine in bulk at the market)
  • 1 pinch of crushed red pepper flakes (add more if you love spice)
  • ¾ cup red lentils
  • 1 14.5-ounce can crushed tomatoes (mine were fire roasted)
  • 2 ½ cups water
  • ½ cup finely chopped fresh cilantro
  • Fine Sea salt
  • Freshly ground pepper
  • ¼ cup chopped cilantro leaves (for serving)
  • 1 13.5-ounce can unsweetened coconut milk, shaken well (full fat for me)  I removed about ¼ cup (for serving) f
  • Lime wedges (for serving)
Instructions

Heat oil in a medium saucepan over medium heat.   Cook onion, stirring often, until softened and golden brown, about eight minutes. Add garlic, ginger, curry powder, and red pepper flakes and cook, stirring, until fragrant, about two minutes. Add lentils and cook, stirring, about one minute.

Add tomatoes, ½ cup cilantro, a generous pinch of salt, and 2 ½ cups water; season with pepper. Set aside 1/4 cup coconut milk for serving and add remaining coconut milk to saucepan. Bring mixture to a boil; reduce heat and simmer gently, stirring occasionally, until lentils are soft but not mushy, 20–25 minutes. Season soup with more salt and pepper if needed.

To serve, divide soup among bowls. Drizzle with reserved coconut milk and top with more cilantro. Serve with lime wedges.

This soup can be made three days ahead (just wait to add the toppings when serving). Let cool; cover and chill.

Share
Posted in Soups | Tagged | 2 Comments

Upscale Orzo Salad

Click here to view recipe.

Upscale Orzo Salad

I would have to say that generally, I am not a pasta salad lover.  At all! I do like my Tangy Noodle Salad, although for over 15 years I made that salad in huge huge huge quantities for catering purposes.  It took a long time before I could even think about eating Tangy Noodles, but now? I do enjoy it every now and then.

Then last week, everything changed. I was kind of tired of salads with barley, salads with quinoa, salad with brown rice…and I happened upon a recipe adapted from Giada De Laurentis.  Containing pasta! But not that corkscrew kind slathered in mayonnaise you find in the deli section. Nope, Giada knows better. Hers contains orzo, dried cherries, arugula, toasted nuts – some of my favorites. I glanced at her recipe and then I went to town.  I immediately switched and swapped ingredients around and changed proportions so that the pasta is not the main show here, but merely a background ingredient.  

This is quick to make, plus it’s a great hot weather, non-mayonnaisy summer salad.  It has crunch from the toasted nuts and arugula, sweetness from the cherries, a little bitter from the greens and lemon juice and salt from the goat cheese.  

When my husband peered into the refrigerator he started with “You know, I don’t like pasta salads.”  “Uh-huh, just try it” I replied. And the rest is history since he ate two pretty large helpings.

Upscale Orzo Salad

Serves 4

pf-icon2


Ingredients
  • 6 oz orzo pasta
  • 2 Tbsp extra virgin olive oil
  • ½ tsp sea salt
  • ½ tsp fresh ground pepper
  • 1 cup fresh arugula
  • 2 oz crumbled goat cheese
  • ¼ cup fresh basil, chiffonade
  • ¾ cups dried cherries
  • ½ cup toasted pecans, coarsely chopped
  • 2 Tbsp fresh squeezed lemon juice
  • Zest of ½ lemon
  • For garnish: 8 bing cherries, seeded and sliced if you have them  + about 2 Tbsp toasted pecans  
Instructions

Bring a large pot of salted water to a boil, add orzo and cook until not quite done, stirring once or twice, about 6-8 minutes.  Drain well and run cold water over the pasta. Shake until no water remains. Spread the orzo on a large rimmed dish and add the oil.  Add salt and pepper and toss once more. Refrigerate for around 10 minutes until it has cooled.

Meanwhile, measure and put the rest of the ingredients except the lemon juice and zest into a bowl.  When the orzo is cool, add the bowl of chopped ingredients and mix. Add lemon juice and zest, stir and taste to see if you would like more salt. 

Before serving, I usually slice a few fresh Rainier or Bing cherries on top just for interest and sprinkle the top with a few chopped nuts.  

The salad keeps in the fridge for a few days and is really light and wonderful.  This recipe is enough to feed four but can be easily doubled for larger groups. You could make it your own by subbing a different type of toasted nut, spinach instead of arugula, mint in lieu of basil, chopped dried apricots for the cherries.  Capiche?

Share
Posted in Pasta, Salads & Dressings | Tagged | Leave a comment

Grilled Bruschetta

Beautiful Bruschetta

Nothing pleases me more than eating peak season produce in the summer AND not spending hours making a meal.  I am not really sure where or when I got this yen for bruschetta … There was a new restaurant in Antigua, Guatemala last time we were there that served “toasts” that tasted great so perhaps that is where the seed was planted.  And I have noticed many restaurants advertise similar appetizers on their menus – but the ones here stateside include fairly hefty price tags. And really – it’s just bread and toppings – nothing can be simpler! I promise – even for you “non-cooks.”

All you need is some good rustic bread, a bit of olive oil, Ricotta or goat cheese or even whipped cream cheese, vegetables, fresh herbs…and away you go.

Here is what I did today for lunch at home.  I grilled some “Como” sliced rustic white bread from the Essential Bakery after drizzling it with some good extra virgin olive oil. Two minutes on each side until the bread is warm and a little crunchy on the outside but not too much.  !removed the bread from the grill, brought it to my kitchen and topped each slice with about two tablespoons of whole milk ricotta cheese – because why not whole milk ricotta cheese? Then a dusting of freshly ground black pepper. Next, I pressed some halved homegrown cherry tomatoes onto the cheese, cut side down, and topped this with leaves of fresh basil and a few pickled onions. Oh, and a few flakes of Maldon salt.

The flavors exploded in my mouth.  My husband hummed his way through lunch.  I told him to expect variations of bruschetta all week long – radishes and butter and sprouts, thin zucchini ribbons and smoked peppers, goat cheese and arugula with cucumber, avocado with beefsteak tomato…he was truly happy about my new obsession.  

Recipe?  Not so much.  Just get creative depending on your palate – and what’s in season.  I am a girl who grills but I do not own a grill pan for my indoor stove.  A grill pan would work just fine if you have that item and don’t want to use the outdoor BBQ.  Call this breakfast and top it with an egg, make it your own.  


Share
Posted in Breads | Tagged | Leave a comment

A Midsummer Apricot Dream

Click here to view recipe.

Apricot Crisp

When summer gives you apricots, make apricot crisp!!

Stone fruit speaks to my tastes buds – I love apricots, peaches, nectarines and plums second only to raspberries and blueberries in the summer.  This July was one of the first Julys I have spent in Seattle in a long, long, long time and I must say that the summer fruits and vegetables during mid-summer rival anywhere I have been in the world.  

Last Sunday I bought a boatload of fruit.  One of the jewels of my bounty — large, beautiful, golden-hued apricots.  They were not quite ripe enough so I put them on my counter in one of my beloved Italian ceramic bowls and I must say they looked like a photo.  Then a few days later they finally ripened and it was time to make some decisions.

I put aside a few just to grab and eat.  Next, I searched the internet and found an old Smitten Kitchen recipe for “Apricot Breakfast Tart.”  Looking at her recipe and the comments that followed, I mentally decided to switch the granulated sugar for brown sugar, swap out pecans for sliced almonds (because that is what I had on hand), and use cinnamon instead of nutmeg.  

I loved making this – it was kind of rustic and only required one saucepan, the ceramic dish I baked the crisp in – and my hands.  It was quick to put together, quick to bake and then I left for a yoga class. When I returned the crisp was cooled off and I had to try it.

OH EM GEE.  The tartness, which the original recipe thought was too much, was perfect for my taste buds.  I planned to top the crisp with ice cream for dinner or with plain yogurt and honey for breakfast but changed my mind.  In my world, this is how desserts or breakfast should taste – a little sweet, a lot crunchy and filled with fruity flavor.  

Not so pretty, but the taste!

Suffice it to say – I will be making this again and again.  It is not the most beautiful dessert but what it lacks in appearance, it makes up for in flavor.  It’s kind of like eating an apricot granola parfait. And I loved the turbinado sugar so much in the topping for the crunchiness that I am adding this to all my crisp toppings going forward.

Oh, and I bet this would be good with Italian plums or peeled sliced peaches too.  It would be fun to make small ramekins of this crisp too. ENDLESS possibilities.

Apricot Crisp


pf-icon2

Fruit Base Ingredients
  • 2 pounds fresh ripe apricots 
  • ⅓ cup brown cup sugar
  • 1 tablespoon flour
  • ¼ tsp ground cinnamon
Crisp Topping Ingredients
  • 1 stick salted butter
  • ¾ cup  turbinado sugar 
  • 1 cup old fashioned oats
  • 1 cup all-purpose flour 
  • ¼ cup coarsely chopped pecans 
Instructions

Preheat oven to 400 degrees. 

Rinse apricots and pull apart at their seam, remove pits, and tear into large pieces (about six pieces total if the apricots are large – or four if they are medium-sized). Place them in an oven-safe baking dish (I used a ceramic pie plate).  Add brown sugar, flour, and cinnamon and mix with your hands so you feel like you are in kindergarten again!

Ready for the oven

Prepare the topping by melting the butter in a large saucepan.  Take the pan off the heat and add in turbinado sugar, oats, flour, and nuts then stir together with a rubber spatula. Sprinkle mixture over the fruit, distributing the topping evenly over the apricots with your hands. Bake for about 30 minutes mid oven and let it cool or refrigerate overnight and reheat slightly. 

This is tart – my favorite kind of dessert.  If you have a sweeter tooth than me, top with unsweetened yogurt and drizzle with honey, or serve with a scoop of vanilla or coconut ice cream on the side.   

Share
Posted in Dessert | Tagged | Leave a comment

Raspberry Dimple Cake

Click here to view recipe.

Delicious Raspberry Dimple Cake

Raspberries are, hands down, my favorite fruit.  My love of raspberries began when I was a young girl in Iowa and I have never ever swayed from placing this fruit #1 on my list.

Unfortunately, they are only in season for a short time here in Seattle. That said, our local berries are one thing that makes it worth living here — worth the horrible traffic jams, worth muscling through the grey cool weather, worth it for so many other reasons.  

Look at the size of these beauties!

This Fourth of July I didn’t get my act together to organize a party on our rooftop as in years way past.  We had been busy doing so many other things that I only started thinking about the Fourth two days before the fireworks display.  I did invite our son and daughter-in-law and their 1-year-old and a friend who was staying with them. I had already purchased meat for grilled burgers and I made potato salad and homemade pinto beans and a huge green salad.  All I was missing was dessert. Yes, I had cookies in the freezer (of course) but somehow cookies didn’t seem adequately celebratory.

I looked through old Gourmet magazines from years past and found this pretty easy Raspberry Buttermilk Cake.  Of course, I didn’t have buttermilk in the house, but I found kefir begging to be used. (Note: make your own buttermilk if you wish with vinegar or lemon juice and milk – there are recipes all over the Internet.) I used coarse raw sugar as a topping because I like the crunch and you’ve got to have a bit of sparkle on Independence Day.  I only found salted butter hanging out in my refrigerator so I used that and then reduced the salt. I added lemon zest because how could that be bad?? Oh, and I shortened the baking time a lot – which was ample and perfect. And VOILA! The resulting cake was a thin, raspberry-studded, moist cake, best served with some whipping cream and more berries.  Leftovers (you won’t have any) would be great as a breakfast cake along with your morning coffee.

Breakfast time

Raspberry Dimple Cake

About 9 servings

Adapted from Gourmet, June 2009

pf-icon2


Ingredients
  • 1 cup (130 grams) all-purpose flour
  • ½ teaspoon (2 grams) baking powder
  • ½ teaspoon (2 grams) baking soda
  • ⅛ teaspoon sea salt
  • ½ stick salted butter (2 oz), softened
  • ⅓ cup granulated sugar
  • Zest of 1 lemon, grated on the Microplane grater
  • ½ teaspoon pure vanilla extract
  • 1 large egg
  • ½ cup well-shaken plain (unsweetened) kefir.  Buttermilk would work here as well. 
  • 1 pint fresh raspberries  (It might take a little less, but have enough raspberries to place on top of the cake pretty close together – see picture)
  • About 1 Tbsp raw demerara sugar for the topping
Instructions

Preheat oven to 400°F with rack in middle. Butter and flour a 9-inch square brownie pan and line the bottom with parchment paper. 

Whisk together flour, baking powder, baking soda, and salt and set aside. In a larger bowl, beat butter and granulated sugar and lemon zest with an electric mixer at medium-high speed until pale and fluffy, about two minutes, then beat in vanilla and egg and beat well.

At low speed, mix in flour mixture until just mixed. With a rubber spatula, scrape the batter into the cake pan, smoothing the top.  Carefully place raspberries evenly over top (I put the hollow side – the side with the indentation of the raspberry up and stick the cone-shaped part into the batter) and sprinkle with remaining 1 tablespoon of raw sugar.  My raspberries were taller than the batter, but I put them in there anyway because they collapse. If you do place them with the point side of the raspberry facing up, the raspberries sink into the batter and they don’t show as much which is fine, but I get perfectionistic about these things, you know.

Perfectly placed berries

Bake until the cake is golden and a wooden pick inserted into the center comes out clean – about 20 minutes. Cool in pan 10 minutes, gently rock the pan to release the sides and cool to warm. If you want to remove the entire cake to a platter or board, lift it gently with the parchment.  Slice and serve. This is beautiful with a dollop of whipping cream and fresh berries on the side. And don’t forget – this is a lovely breakfast option!

PS: I made another of these last night and left it with my grandkids, then got a phone message this morning that gave this cake a “Four Thumbs Up”.  It doesn’t get better than that.

Share
Posted in Cakes & Pies | Tagged | Leave a comment

Napa Cabbage Salad Three Ways

Click here to view recipe.

Napa Cabbage Salad with Peanut Dressing

This summer, I have made salad nearly every single day.  I am growing loose-leaf lettuces up on our rooftop and it produces way more than two people can eat, even when those two people love interesting salads.  And believe it or not, I am also kind of burned out on that other oh-so-popular green – kale. Don’t get me wrong – I love a good kale salad. But a girl needs some variety.  Soooooooo, 2019 has turned into the “Summer of Napa Cabbage.”  

In my opinion, napa cabbage is kind of underrated.  It is easy to slice, it maintains it’s crispness for days if stored without dressing, it is crunchy and the perfect backdrop for all kinds of add-ins.  So, this summer I have a two-quart container in my refrigerator at all times containing chopped napa cabbage, shredded carrot, and diced cucumber along with gobs of fresh mint, cilantro, dill, and tarragon.  And I always make sure I have lemons and limes on hand. I generally prep a few batches of salad dressing each week. As a certified food snob, I will never elect to eat commercially bottled dressing. This way, all I need to add are more veggies if I desire (shredded purple cabbage for color, pea pods, cherry tomatoes, peppers, pickled onion nuts, cheese or even leftover roasted broccoli or cauliflower) or previously served hardboiled egg, beans, poultry, fish or meat.  

Here are my three current faves for dressings:

pf-icon2


Peanut Dressing

Ingredients
  • ⅓ cup avocado oil or vegetable oil
  • ½ teaspoon toasted sesame oil
  • ¼ cup seasoned rice vinegar (OR unseasoned rice vinegar with a tsp of honey added)
  • 1 Tablespoon peanut butter
Instructions

Whisk the above together.  This is great to add to the salad mix along with tons of chopped cilantro and chopped peanuts too.  It takes very little dressing to coat the greens.

Miso Dressing

Ingredients
  • 2 tablespoons seasoned rice wine vinegar (OR unseasoned rice wine vinegar with 1-2 tsp honey added)
  • 1 tablespoon white miso paste
  • ½ teaspoon tamari 
  • ¼ cup avocado oil OR peanut oil
  • ½ teaspoon toasted sesame oil
Instructions

Whisk the dressing or emulsify it in a nutribullet or immersion blender.  This is tasty when added to your basic napa cabbage salad mix along with tomato, toasted sunflower seeds, toasted sesame seeds …the sky is the limit.

My Daughter’s “Dressing”

(This is the one that got me started down the Napa cabbage path to begin with.  This is so refreshing and easy! It’s not exactly a recipe but you’ll get the picture.) 

Ingredients
  • Napa Cabbage mix (cabbage, shredded carrot, cucumber)
  • Olive oil
  • Fresh herbs (i.e. cilantro, basil, mint, etc.)
  • Citrus (lemon, lime, etc.)
  • Seasonal veggies of your choice, but I love corn
  • Freshly grated parmesan cheese
  • Salt
  • Pepper
Instructions

Toss 4 cups of the basic napa cabbage salad mix of cabbage, shredded carrot, and cucumber with about ½ tsp salt and 2-3 Tbsp of olive oil. And massage a bit to soften (like kale!). Add in about  ⅓-½ cup of chopped fresh herbs of your choice (the other night I did mint and basil from the garden), and seasonal veggies – corn kernels, edamame beans, cucumber. Squeeze fresh citrus (lemon or lime-about 3 Tbsp over the top. Add in about ⅓ c  grated fresh parmesan cheese, and add additional salt and pepper as needed.

Now go crazy! Chop up some napa cabbage and veggies and make a few dressings and you’ll be all set to have delicious salads for days.  Plus – what a perfect thing to bring to the next barbeque!

Share
Posted in Salads & Dressings | Tagged , , | Leave a comment

Homemade Steak Sauce

Click here to view recipe.

Simple, Savory Steak Sauce

I am in and out of town so much, but when I am “home” in Seattle and my older grandkids are around I love to have them sleep over on a Saturday night.  The two older boys, 10 and almost 8, consider this part of their routine and so far LOVE coming here. Their younger sister is 3 ¼ and is invited as long as we aren’t going out to a movie or activity where we will be up too late.  My youngest grandson just had his first birthday and has slept here for naps; soon he’ll be old enough to join his older cousins. I deeply miss my 3 “Nietos” (grandkids in Spanish) from California, but when we do see them we make up for lost time!

The Nietos!

Sleeping at Bukkah and Zadie’s house means long, hot showers followed by towels that are prewarmed in the dryer, a meal they usually love, an age-appropriate movie or a walk to the park to play, popcorn, hot fudge sundaes, time to read…and very few rules.  Lucky me, my in town children and spouses don’t make rules for what we can and cannot do when they are with us. Truth be told, the kids are unbelievably well behaved. We love having them as much as they look forward to coming here. I know it won’t last and that soon they will have parties and more sleepovers, so this might be a fleeting routine.  They assure us they will ALWAYS love coming here. We’ll see.

The first weekend of May, both boys had baseball games and they were scheduled to have a sleepover.  The prior week they really wanted to order steak at a restaurant and we explained how easy it was to prepare steak, and that next time we would have that for dinner.  And as I write this, all three kids are about to burst through the door and will have grilled steak with HOMEMADE steak sauce, baked potatoes with the works and Caesar Salad.  Blood orange soda to go with all that. I’m not sure if dessert will happen – just the thought of all that heavy food makes me feel full.

This steak sauce – adapted from America’s Test Kitchen – would also be good on turkey meatloaf or even grilled fish.  I like it because most steak sauces are laden with sugar or corn syrup, and this one incorporates raisins or cherries soaked in water for the sweetness.  A jar of this will keep in the fridge for a week or longer. Since I loathe using bottled sauces and salad dressings, this recipe hit a sweet spot with me.

Homemade Steak Sauce

Makes about 1 ⅓ cups

pf-icon2


Ingredients
  • ½ cup water
  • ⅓ cup dried cherries or dark raisins  (I used dried cherries because that is all I had on hand)
  • ¼ cup ketchup
  • 3 tablespoons Worcestershire sauce
  • 2 tablespoons Dijon mustard
  • 2 tablespoons unsweetened vinegar
  • Salt and pepper to taste
Instructions

Cover raisins or cherries with water in a medium saucepan. Bring to a simmer, cover and let it cook for three minutes.  Remove from the heat for five minutes to cool off.

In a food processor, add the soaked raisins with any remaining water, ketchup, Worcestershire, mustard, and vinegar until smooth, about one minute. Season with salt and pepper.

Grill and slice the steak or meat, and pass this sauce to put on the side.

PS:  I can report that ALL of us really loved this steak sauce.  The boys used it to top their baked potatoes as well. Hmmmm, it actually tasted good used that way.

Share
Posted in Condiment | Tagged | 2 Comments

Ceviche – Antigua, Guatemala

Click here to view recipe.

Colorful Ceviche

I am a sucker for ceviche. When we had our home in Belize for 18 years, ceviche was top of the menu on every single trip.  Not just once – many times. For me, ceviche and warm weather go together and really the only “hard” part of ceviche is chopping all the ingredients. Other than the chopping, which I actually find to be a Zen experience, preparation is dead simple.

All chopped up and ready to go!

We have a favorite place to eat in Antigua, Guatemala and I have been ordering ceviche there almost every time we go to dinner with friends or just the two of us.  I love their ceviche, made with a bit of mango and a touch of avocado at the end – not too acidic from a touch of lime juice and yet a little sweet. There were peppers, there were tomatoes and of course cilantro and red onion.  

The restaurant wasn’t cooperative when I asked for the recipe or even details of preparation.  A few months back I attempted to replicate this ceviche and I really didn’t do too well. The mango disintegrated and the Philippine variety I tried wasn’t right.  The avocado really mushed up so that the whole mixture looked like a mess. Unlike ceviche we made in Belize, somehow the seafood in the restaurant ceviche seemed cooked but wasn’t too acidic.

And so it came to pass that my other half decided to become a ceviche maker.  He combed the internet and watched a few YouTube videos – of course he did. What CAN’T you learn from YouTube these days?  But at the end of the day, as all cooks know, it’s best to wing it while cooking.

We have had his ceviche twice in the last few days for dinner alongside saltine crackers.  Don’t knock it till you try it! I’m not really a tortilla chip fan but I love saltines, and it pairs well with the slightly sweet mango influence.  I could eat this every single day and not tire of it for a long time, if not forever.

Ceviche de Mi Esposo (my husband’s ceviche)

Serves 3 as a main course or 4-6 as a hearty appetizer

pf-icon2


Ingredients
  • 1 lb shrimp-shelled and cleaned or 1 lb firm-fleshed fish fillet without skin, barely steamed in a steamer basket for about 3 minutes
  • 3 Roma tomatoes, diced ¼ inch (I did remove a few of the seeds here but didn’t get too carried away)
  • ⅓ cup cilantro, washed, dried and finely chopped
  • 1 small red onion, finely diced
  • ½ peeled, seeded cucumber diced ¼ inch
  • 2 small serrano chilies, finely chopped-seeds and all (use more if you prefer more heat)
  • Juice of one lime
  • Large mango, peeled and cubed (about 1 cup cubed ½ inch) – Haden variety (look up pictures but it is pretty large, with greenish/reddish skin)
  • 1 large or two small avocado, peeled and cubed ½ inch
  • 1 lime, cut into 4 wedges to garnish
  • Salt and pepper to taste
  • A few roasted macadamia nuts for garnish (optional)
Instructions

Fill a straight-sided saute pan with about one inch of water and bring to a boil.  Put shrimp or seafood in a steamer basket or metal strainer over the water and cover the pot for three minutes or until the seafood is barely cooked.  Remove from the heat to a clean bowl to cool, then cut into small bite-sized pieces, ½ inch.

Meanwhile, chop the Roma tomatoes, cilantro, red onion, cucumber, and chilies.  Squeeze a lime and put the lime juice over these veggies and mix well. Add about ½ tsp of salt and some fresh black pepper. Taste and add more salt or pepper as needed.

Add the seafood once it is cooled and cut.  Stir all of this together and put into the fridge while you peel the mango and avocado.

Peel and cube the mango and avocado for the final presentation.  Cut a lime into wedges and have a few macadamia nuts ready to go.

Let the mixed ceviche (minus the mango, avocado, and garnishes) marinate in the fridge for about 20 minutes.  Finally, stir the bowl of ceviche one more time, add more salt or pepper if needed and divide into serving dishes and garnish with mango, avocado, lime wedges, and macadamia nuts.  Serve with tortilla chips or saltines! Eat. Repeat.


Share
Posted in Fish & Seafood | Tagged | Leave a comment