Click here to view recipe.
Colorful Winter Salad
Ina Garten is my hero. She’s close to my age which probably means that she actually cooks her food, with or without her cookbooks and cooking show. When I watch her, it’s like watching myself… Ina levels off cups of sugar or flour with her forefinger (GO INA!)
The original recipe for this salad started with the one recently was published in her newest cookbook, Cook Like A Pro. “Brown Rice with Cranberries and Squash and Marcona Almonds.” She had me at Marcona almonds and squash, two of my winter/fall faves. My brain started to whirl and I tweaked her formula – I didn’t even use straight up brown rice or cranberries. I made it with a third less rice, I added orange zest and swapped celery for green onions to suit my palate, substituted sherry vinegar for white wine vinegar, reduced some of the salt so that it can be added to your taste at the end. I also used a rice mix rather than all brown rice, dried cherries instead of dried cranberries and topped the final dish with pomegranate seeds. This tastes like autumn in a bowl and I am putting it on my list for Thanksgiving 2019!
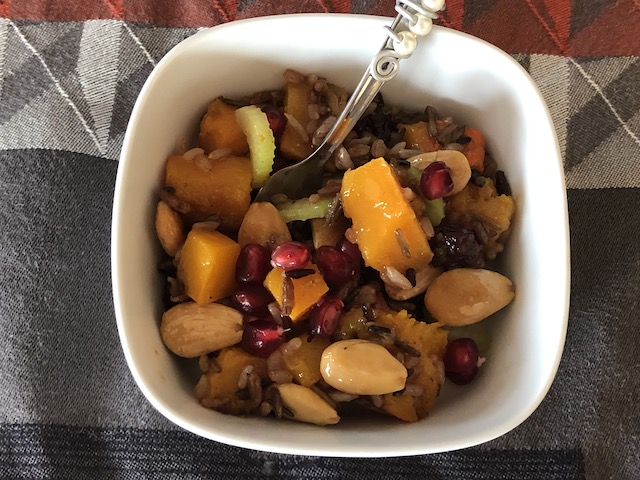
Rice, Cherry, Squash and Marcona Almond Salad
Serves 6-8
![]()
Ingredients
- 4 cups (1½ pounds) butternut squash (½ to ¾-inch-diced)
- 2 tablespoons avocado oil or other neutral oil
- 1 tablespoon pure maple syrup
- ½ tsp Sea salt
- 15 grinds freshly ground black pepper
- 1 cup wild rice or a mix of brown, black, red and sweet rice (such as Lundberg Wild blend)
- 3 tablespoons freshly squeezed orange juice
- 2 teaspoon orange zest
- 1 teaspoon pure maple syrup
- 1 tablespoon balsamic vinegar
- 1 tablespoon sherry wine vinegar
- 2 teaspoons Dijon mustard
- ½ cup extra virgin olive oil
- ¾ cup thinly sliced celery
- ½ cup dried tart cherries
- ½ cup salted Marcona almonds (also called Spanish Valencian almonds)
- A few pomegranate seeds to garnish, optional
Instructions
Preheat the oven to 400 degrees. Line a rimmed cookie sheet with oiled parchment paper or foil.
Prick a large butternut squash all over with a fork and microwave for five minutes. Cool well, cut off the stem and other end, and cut in half. Peel with a potato peeler or a paring knife then remove seeds and cube into 1/3-1/2 inch pieces. Place the butternut squash on a sheet pan. Add two tablespoons of oil, one tablespoon of pure maple syrup, ½ teaspoon salt, and ground pepper. Toss together, spread out in a single layer, and roast for a total of 20-30 minutes, checking every ten minutes, until tender. Mine took about 20 minutes in my toaster oven, probably because it was par-cooked from the initial step.
Meanwhile, cook the rice according to your preferred method or suggestions on the package. Set aside.
For the vinaigrette, in a glass measuring cup, whisk together one tablespoon of maple syrup, the orange juice, balsamic vinegar, sherry vinegar, mustard, two teaspoons sea salt, and ½ teaspoon pepper. Slowly whisk in ½ cup olive oil then add orange zest and set aside.
Pour the warm rice into a large serving bowl and add dried cherries right away so they plump up a bit. Let it cool about ten minutes and add half of the vinaigrette and combine. Add the roasted squash, celery, and almonds and toss well. (As the dish sits, it will probably need the extra vinaigrette.) Top with pomegranate seeds right before serving if you wish.
Taste for seasonings and add more vinaigrette, then and serve warm or at room temperature.
PS: Truth be told, I really didn’t measure a thing. I’m pretty accurate with quantities by eyeballing, but honestly, I don’t think it makes much difference.
PPS: If you are making this to be served later in the day, I’d add the Marcona almonds right before serving so they remain extremely crunchy. Having said that, Marconas stay pretty crunchy even the next day.