Souper Sunday Sweet Potato & Black Bean Soup

Click here to view recipe.

Souper Soup!

Everyone seems to have gotten on board with “meatless Mondays.”  Personally, I like my Souper Sundays just as much.  After a weekend at home or out and about, soup is always something we love as do our occasional guests who stop in for an early dinner.

This latest creation is simple to prepare, has pretty basic ingredients, and start to finish takes a little under an hour.  Easy, delicious, super healthy and so satisfying!

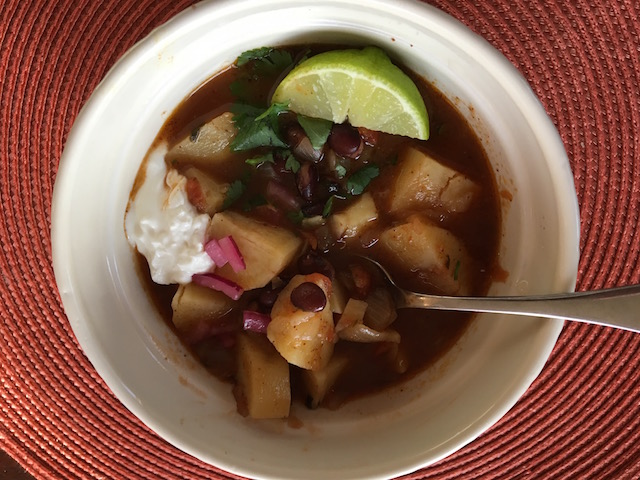
Souper Sunday Sweet Potato and Black Bean Soup

Serves 6
pf-icon2


Ingredients
  • 1 medium yellow onion, peeled and diced ¼ inch
  • 1 Tbsp extra virgin olive oil
  • 3 medium sweet potatoes, peel and  chop into ¾  inch pieces (about 4 cups)
  • 1 16-ounce jar prepared chunky salsa (get from the refrigerated section at the supermarket)
  • 1 15-ounce can black beans, rinse and drain or fresh made black beans, 1 ½ cups
  • 4 cups chicken stock (you can use “Better than Bouillon” in a pinch or vegetable broth if you are making this vegetarian.  I was lucky to have frozen chicken stock)
  • 1 Tbsp ground chili powder
  • 2 tsp ground cumin
  • ½ tsp ground cinnamon
  • pinch ancho chili powder if you like a little spice
Optional Garnishes
  • Fresh chopped cilantro
  • Marinated red onions
  • Greek yogurt or sour cream
  • Lime wedges (this is a must in my book. I put a little wedge on the rim of every soup bowl)
  • Shredded cheese
  • Hot sauce if you like heat
  • Good quality corn chips to scoop
Instructions

In a large pot over medium heat, gently cook onions in one tablespoon oil. Stir and continue cooking on medium heat for about five minutes.  

Add sweet potato and spices. Cook for three minutes. Then add salsa and chicken broth.

Bring mixture to a low boil on medium heat and then lower heat and gently simmer. Add black beans, cover and cook for at least 20 minutes more or until the sweet potatoes are fork tender and the soup has thickened.

Serve with any of the listed garnishes.  I usually have good tortilla chips alongside, especially when I have little people eating at my house.   In case you were wondering, we had oatmeal honey bread on the side and a great fall salad too.

This soup is even better the next day! It thickens up considerably too.

Share
Posted in Soups | Tagged | Leave a comment

Autumn Apple Arugula Salad

Click here to view recipe.

A Fabulous Fall Salad

AHHHHH.  This recipe is always a hit around my house!  I have been making this salad for a long, long time but forgot about it until this fall.  I’ve had my fill of Caesar salads and light tomato garden lettuce salads from the summer, so the combination of slightly buttery, sweet pecans, slivers of seasonal Washington apples and crumbles of sharp bleu cheese spoke to me.  

I have recreated this wonderful little salad using feta cheese in place of bleu cheese, walnuts in lieu of pecans and even sliced grapes or ripe plums can be swapped for the apples. So don’t be afraid to make this according to your palate.

As for me, this is my longtime fave.  I love bleu cheese (it is an acquired taste I am told) and I find this a perfect accompaniment to any savory main dish.  And I always make a lot more dressing than I need for one meal — because the dressing keeps for a few weeks and  I just know I’ll be making this salad several times within that time frame (often every other night!).

I hope you give this a try sometime soon. It screams Fall.

Autumn Apple Arugula Salad

Serves 6  generously

pf-icon2


Candied Nuts Ingredients
  • 1 tablespoon granulated sugar
  • 1 tablespoon cold salted butter
  • 2 pinches of sea salt
  • 1 cup pecans, coarsely chopped (I  reserve ¼ cup once cooked to top the salad when serving)
Dressing Ingredients
  • 2 tablespoons sherry vinegar
  • ½ teaspoon Dijon mustard
  • 3 tablespoons extra virgin olive oil
  • 3 tablespoons walnut oil (keep this in the fridge so it does not become rancid)
  • ½ teaspoon honey
Salad Ingredients
  • 1 Braeburn or Pink lady or any red tart apple, cut into thin slices
  • Juice of half a lemon
  • 10 grinds of fresh black pepper
  • 8 cups greens (I use arugula or a combination of arugula and baby spinach – or any type of soft lettuce is wonderful)
  • 3 ounces Roquefort or bleu cheese, crumbled
Instructions for Candying Nuts

In a small fry pan, sprinkle the sugar on the bottom of your pan and cook gently over medium-high heat without stirring. Shake the pan occasionally. Once the sugar is melted and light brown, stir in the butter and a pinch of salt. Stir in the pecans and cook until the caramel turns dark brown. Quickly remove the nuts to a small plate to cool. Keep moving them around the plate after a few minutes so they don’t stick together, and store them in a jar in the fridge.  Here too I always make more than necessary!

Instructions for the Dressing

In a small jar or squeeze bottle add the vinegar, mustard, honey, a pinch of salt and oils.  Shake vigorously until combined — taste and add more honey to smooth the taste if you like it a little sweeter like me.

Instructions for Assembling the Salad

Place the apple slices in a small cereal bowl, toss with lemon juice (I did lime one time) and season with ground pepper.

Combine the greens in a large bowl. Toss with just enough dressing to coat. Season with salt and pepper. Add the walnuts, apples and crumbled Roquefort and mix well. Sprinkle the reserved nuts over the top of each salad plate once it is dressed.  

Share
Posted in Salads & Dressings | Tagged | Leave a comment

Almond Slices

Click here to view recipe.

Elegant Almond Slices

The roots of this recipe are circuitous, which most recipes actually are – at least the ones I adore.  Let’s begin at the beginning.  True story: while hiking with me in Mexico, my sister Susan mentioned these little almond gems because we incessantly talk about food and cooking and she knows I love, love, love crispy, nutty, not too sweet, easy to make cookies to have with tea or coffee.  Shortly thereafter she sent me a link to the recipe for Almond Slices from David Lebovitz’s blog and he gave credit to his recently deceased friend Flo Braker.  So from Flo to David to Susan to moi.  Oui oui!

I had the added benefit of my sister’s suggestions and comments before I actually got started.  We decided that a bit more cinnamon hit the spot and agreed that salted butter would add a nice balance to the sweetness of the cookies. We both have the same oven and probably equivalent baking skills, so that works for me.  I made them and loved them – crispy, nice texture, nutty, sweet and so good it’s impossible for me to eat fewer than two at a time.  Susan made them for her 4th of July bash and they were ooooed and ahhhed over, and the only people that haven’t liked them to date are Jakey Boy, his wife Nazlee and her Persian family.  These naysayers do not like sweet desserts ever, so do not let this stop you.  

I call these a melding of brittle and cookies.

Almond Slices

The original recipe says this makes 80-90, but in my world I would count on 45-55 realistically.  Unless you slice more thinly than me…

pf-icon2


Ingredients:
  • 1 stick of salted butter (4 oz) cut into 8 pieces.
  • ⅓ cup water
  • 1 ⅓ cups raw turbinado sugar (most grocery stores will carry this)
  • ½ heaping teaspoon ground cinnamon
  • 2 ⅓ cups unbleached all purpose flour
  • ¼ tsp baking soda
  • 1 cup sliced almonds
Instructions:

Melt the butter in a medium-sized saucepan over low heat with the water, sugar, and cinnamon.  Stir until the butter just melts but don’t allow it to boil: most of the sugar should not be dissolved.

Remove from the heat and stir in the flour, baking soda, and almonds with a rubber spatula until well blended.

A great tip, per Mr. Lebovitz, is not to let the sugar melt when you’re mixing in the butter; the big crystals add a wonderful crunch to these delightfully delicious cookies.

Line a 8-9-inch bread loaf pan with plastic wrap and press the dough into the pan so the top is smooth. I do this with an offset spatula.  Cover well and chill until very firm. Personally, I do this overnight.

To bake the cookies, preheat the oven to 325Fº.   Using a very sharp chef’s knife, slice the dough crosswise, as thin as possible, into rectangles. The thinner they are, the more delicate and crisp they’ll be.

Space the cookies on parchment lined baking sheets and bake in the middle of the oven for 10-15 minutes, or until the cookies feel slightly firm and the undersides are golden brown. Carefully turn the cookies to their other side with a  large offset spatula and bake an additional 10-15 minutes, until the cookies are crisp and deep golden-brown on top. The baking times depend on how thin you cut the cookies.  Mine took 15 minutes for the first side and 13-15 minutes for the second side.  Be careful because they go from nutty brown to burned in a flash, and I speak from experience.

Fresh out of the oven!

Cool completely, then store in an airtight bin until ready to serve.

Storage: Once baked, the cookies will keep in an airtight container at room temperature for up to three days or in the freezer for a month.

The dough can be stored in the refrigerator for up to four days, or frozen for up to two months, if well-wrapped.  I have even sliced and baked the cookies straight from the freezer with great results. Perhaps I should let David in on this little tip!

Share
Posted in Cookies | Tagged | Leave a comment

Vegetarian Yellow Split Pea, Barley and Vegetable Soup

I first posted this recipe back in November of 2012 – where has the time gone?! I wanted to share it again because it’ll be simmering away in my kitchen on September 29 when the family descends on my home for Kol Nidre – the evening before Yom Kippur. It’s the perfect meal for the celebration – warm, nourishing and hearty!

*****************

Click here to view recipe.

Soothing Soup

The week following Thanksgiving is tough for me. All our out of town guests depart, one after the other… my house feels suddenly very quiet (but cleaner) … and I am stuffed with turkey, sweet potatoes, pie, leftovers and heavy food in general. Because I feel both full and empty at the same time – I always turn to warm, healthful, vegetarian soup containing vegetables and grains. My standard go-to: yellow split pea soup with barley. It’s an old standby, and after years of playing with the original formula, I have now perfected it to the point where it pleases me without fail. Plus – it’s so simple … just serve this soup after Thanksgiving with huge slices of whole grain bread and a simple green salad and call it dinner.

Vibrant Vegetables for Soup

Vegetarian Yellow Split Pea, Barley and Vegetable Soup

Serves 6 large eaters and can easily be doubled to serve a crowd or to freeze for later

pf-icon2

Ingredients:
  • ½ pound of dry yellow split peas
  • ½ cup pearl barley, measured then put in a strainer and rinsed
  • ½of a  bay leaf
  • 1 Tbsp fine sea salt
  • 8 cups water
  • 1 Tbsp extra virgin olive oil
  • ¼ minced yellow peeled organic onion, diced ¼ inch
  • 2 cloves finely minced garlic (I mince this by hand)
  • 2 stalks of diced celery – dice 1/4 inch
  • ½ small diced peeled potato (1/4 inch pieces) – about ½ cup
  • 2 peeled medium diced ¼ inch carrots – about 1 cup
Instructions:

Bring the first five ingredients to a boil, turn heat to low and simmer covered for 40 minutes or until the split peas and barley are soft. Remove the bay leaf.

Meanwhile, sauté remaining ingredients for eight minutes in a frying pan on medium heat.  Sautéing the vegetables give a different dimension to this soup and any soup for that matter.

When vegetables are a bit tender and barley/yellow split peas are soft, add the vegetables to the soup. Cover and continue cooking together on low simmer for 20 minutes.

This can be done a day or two ahead of time – the soup thickens a lot when it is cold.

Heat and season the soup before serving with fresh ground pepper and more salt if needed to taste. (I did not add more salt). I add a pinch of dry mustard as well and ¼ tsp of sesame oil while heating the soup and I top the plated soup with some chopped fresh parsley and diced tomato if I have it around.

Cook’s notes:
  • To cool soup quickly so you can store it in the refrigerator and avoid leaving it out at room temperature, fill a large sink with ice and water (I happily have an ice maker in my freezer). Put the pot of soup in the sink so the ice water is above the “soup line” and stir occasionally. After a mere 15 minutes it cools down and is fridge ready. I use this method for anything that is hot and needs refrigeration to avoid leaving things at room temperature.
  • If you happen to have a chicken carcass or chicken bones left over (I always freeze mine when I roast chicken or make chicken breast on the bone) this can be added to the soup with the barley and split peas at the beginning. If you do this, remove the bones as you add the carrots and celery.
  • The soup, prep and all, takes about an hour –so I always use the time while cooking takes place to do other kitchen prep or chores. Today I made chicken sandwiches for lunch, salad dressing for the week, I rolled and baked crackers (made the dough last night), and made enough steel cut oats for the week as well!
  • In my picture of ingredients, you’ll see I used a small purple fleshed potato and a small Yukon gold potato instead of half a potato – next time I would only use Yukon gold potato as the purple potato had a weird color in the soup.
  • This soup freezes really well!
Share
Posted in Soups | Leave a comment

Eclipse Bittersweet Hot Fudge Sauce

Click here to view recipe.

Deep Dark Chocolate Sauce and My Favorite Ice Cream

OK you fellow chocoholics, listen up.  If you are like me and answer YES to the following three statements, then this one is for you!

  1. I love chocolate
  2. I always choose the darkest chocolate
  3. I enjoy hot fudge sauce on top of vanilla bean or coffee or coconut ice cream

I am naming this “eclipse hot fudge”, because I just got back from TOTALITY in Madras, Oregon with my sisters, and I told them they must make this sauce.  It is a chocolate blackout.  It is almost as good as Totality.  Truthfully though, even dark chocolate isn’t as good as Totality… Complete magic!

Sisters Spying Eclipse!

But back to my original thought.  This is the ULTIMATE hot fudge sauce.  I deleted the other recipes I have had on my computer since the end of time – all those with evaporated milk, with manufactured squares of unsweetened chocolate.  I am finished with my search for hot fudge – and once I settle on the perfect anything – be it recipes for chocolate chip cookies, brownies, or chocolate cake…I no longer am interested in a new or more hip or exciting formulation.  Call me stubborn, call me set in my ways, but that is the truth.  

Enough said.  

If you want, you could always change this a bit by adding mint extract and chopped peppermint candies to top a sundae or coconut extract with toasted coconut or almond extract with toasted almonds.  But as far as I’m concerned, just give me pedestrian hot fudge.  We did a blindfolded taste test last night with my favorite gourmet hot fudge sauce that I have been ordering on the internet for a long time, and there was no question.  THIS is the winner.

Such Simple Ingredients

The only hard part, really, is chopping up chocolate and truthfully it just isn’t that hard.  I just took a wide sharp knife, began at a corner and kind of chopped/shaved the chocolate until it weighed in at six ounces.  

I beg you to make this!  It isn’t bad at all for dipping banana chunks either.  I use this for my grandkids by warming up a couple of tablespoons of fudge in a shallow dish and then topping it with a small scoop of great ice cream.  We call this “floating island” and it is what the kids always request for dessert.  Nothing could be easier or better.  The origin of this recipe is from a 2004 issue of Gourmet Magazine, may she rest in peace.  Make this in her memory!

Eclipse Bittersweet Hot Fudge Sauce

pf-icon2


Ingredients
  • 2 tablespoons (30 grams) salted butter
  • ⅔ cup (155 ml) heavy whipping cream
  • ½ cup (170 grams) Lyle’s golden syrup (grocery stores often carry this near the breakfast syrups)
  • ¼ cup (50 grams) packed dark-brown sugar
  • ¼ cup (20 grams) cocoa powder (Scharfenberger is my favorite)
  • ¼ teaspoon fine sea salt
  • 6 ounces (170 grams) good quality bittersweet chocolate, chopped
  • ½ teaspoon pure vanilla extract
Instructions

Wash and dry two empty glass jars (I always use recycled ones) that will each hold a cup of liquid and set aside.

Combine everything except cocoa, chocolate, vanilla and salt over medium heat and bring to a simmer. Barely simmer on low, stirring, for three to five more minutes after everything has melted (220 degrees)  remove from heat and stir in chopped chocolate, cocoa and salt.  Whisk and put on low for 1 more minute until thick.  Take off heat and whisk in vanilla.

It’s now ready to ladle over ice cream, although it thickens more as it begins to cool, so you could also wait for 15 to 20 minutes before doing so, if it’s not too unbearable.

Pour leftovers into a jar or jars and refrigerate. Hot fudge sauce keeps chilled in the fridge at least a month and often two, although it’s rare it lasts that long.  When cold it resembles thick chocolate ganache.  This is the last thing I pack in my suitcase when I go to Belize so that I have something spectacular to eat with the excellent coconut ice cream there.


Share
Posted in Dessert | Tagged , | Leave a comment

One Pot Summer Halibut

Click here to view recipe.

Healthy & Colorful Halibut

August is my favorite month in Seattle foodwise: warm, sunny weather produces tons of cherry tomatoes, both red and yellow, along with an explosion of fresh herbs and peppers that I grow on my deck.  And it just so happens that Alaskan halibut and Wild Alaskan King Salmon are the most affordable this time of the year. Win/win!

So the other day I picked up a pound of fresh Alaskan halibut, having no clue how I was going to prepare it.  I looked lovingly at my large cast iron skillet, and because I had recently served brown rice and sauteed eggplant, I figured I’d prepare a very, very simple halibut dish using what I had in my kitchen and on my deck. Eat local and all…

I briefly sauteed the fish in olive oil, about two minutes on each side.  Then I added my tomato/basil, garlic, lemon juice mix and swirled it in the skillet, adding a dab of butter for richness.  Everything was briefly warmed and badda bing, badda boom – I was done.  

Just One Pot!

This is so bright and easy and you only dirty one large saute pan! The sauce tastes delicious over rice or sopped up with a piece of crusty bread…Run, don’t walk, to the fishmonger and pick up a halibut fillet – or two.  Make a salad, prepare some summer veggies, steam some rice or another whole grain and know that the fish, prep and all, will take no more than 15 minutes start to finish.  And the majority of that time is just for heating your skillet.

One Pot Summer Halibut

3 large servings (or 4 smaller ones)

pf-icon2


Ingredients:
  • 1 lb halibut fillet (with skin on)
  • ½ tsp sea salt
  • ¼ tsp fresh ground pepper
  • 2 Tbsp extra virgin olive oil
  • ⅓ cup basil leaves, chiffonade plus four whole sprigs for serving
  • 1 ½ cups cherry tomatoes (red or yellow or a combination)
  • Juice of ½ large lemon
  • 2 cloves garlic, minced
  • 2 Tbsp salted butter
Instructions:

Cut your halibut into three or four pieces and pat dry. Press in the salt and pepper to the side without skin.

Chiffonade the basil, cut the cherry tomatoes in half, juice the half lemon and mince the garlic. Combine and set everything aside.

Heat the cast iron or other fry pan until it is medium hot.  A cast iron skillet takes at least eight minutes set on medium heat to be ready.

Add the oil and wait a minute until it is hot.  Add the halibut fillets skin side down, shaking the pan slightly to prevent sticking.  After three minutes, carefully turn each piece with a fish spatula.  Cook an additional two minutes on the skin side.  

Add the basil, tomatoes, lemon juice, garlic and simmer with the fish for two minutes.  Add the butter until melted.  Once the fish is cooked through, another minute or so, taste the sauce and add more salt or pepper to taste.  

Place warmed rice (or another cooked grain) on the bottom of a shallow bowl, top with the fish and spoon sauce on top of the fish.  Top each dish with a sprig of fresh basil.  Enjoy!

Cooks note:  I know this sauce would be good with almost any other delicate white fish too.  Halibut is one of my faves and I only eat it in the summer when it is fresh fresh fresh!

Share
Posted in Fish & Seafood | Tagged | Leave a comment

Hearty Chicken Sausage Rotini

Click here to view recipe.

Hearty Chicken Sausage Rotini

In early June, I had a “batch cooking” day with my daughter.  We always love cooking together and on that day, we were especially productive. In a mere 3 ½ hours, we prepared enough for her household (and for the two adults in my home) including bread, cookies, pulled barbecued turkey meat for sandwiches, chicken chili (enough for 16 guests), and this whole wheat rotini pasta dish.  Other items were created, but it was such a whirlwind, I cannot remember them.  Oh yeah, Caesar salad dressing and fresh croutons, cut up veggies for the fridge…on and on.

This is one of the recipes we chose to make together.  Although this has been in my files for a long time, I forgot how unusual and delicious it tastes!  I like this pasta iteration because, ratio wise, there are less noodles and a lot more  tomatoes, chicken sausage and olives – the good stuff.  This is a great make ahead dish if you choose.  When ready to reheat, remove the serving dish from the fridge at least an hour beforehand. Either microwave to reheat or add some of the pasta water or milk, grate cheese on top and cover with foil.  Heat at 350 until piping hot.

This is kind of a seasonless recipe, although when my cherry tomatoes are growing at their peak, they make a recipe like this extra good.  With both yellow and red small tomatoes, it will be lovely!

Hearty Chicken Sausage Rotini

Serves 6

pf-icon2


Ingredients
  • 2 cups whole wheat Fusilli pasta (or regular semolina pasta)
  • 5 links of Chicken Basil Sundried Tomato Sausage (or any kind) casings removed and cut into bite-sized pieces
  • 1 Tbsp extra virgin olive oil
  • 4 large cloves of garlic, peeled and minced
  • 1 cup Kalamata olives, pitted, drained and halved
  • 12 brown mushrooms, stems removed mushrooms sliced thick** (see note if you or yours do not like mushrooms)
  • 1  pint cherry tomatoes, halved
  • 2 Tbsp capers, rinsed and drained
  • 1 ½ cups fresh Parmigiano Reggiano, grated on the microplane
  • An additional cup of grated cheese, and a few basil sprigs (to serve)
Instructions

Bring a large pot of water to boil for the pasta, add 2 teaspoons of sea salt and add fusilli after it starts boiling. Cook a little al dente or about 1-2 minutes less than what the pasta package calls for.  Drain but reserve about a cup of the pasta water and set aside.

Heat a large, 12-inch skillet and when hot, add olive oil.  Wait one minute then turn the heat to medium and add chunks of sausage.  Turn the sausage so it starts to brown, and after about three minutes add the garlic, olives and mushrooms**. Continue cooking until the sausage is done.  

Add the drained noodles to the pan and then add the tomatoes followed by the capers. Add some pasta water if the dish seems a little “dry”

Add the grated cheese to the hot pasta in the skillet and stir to combine.   Taste and add more salt or pepper to taste.  I rarely add much salt due to the kalamatas, capers and cheese!

Serve in bowls with additional grated cheese and fresh basil.

** Regarding the mushrooms, if you are serving this to children who are mushroom-averse, you chop them very finely in a food processor or nutribullet.  The flavor from the mushrooms is so good, and not having chunks of identifiable mushroom seems to make this a child-friendly dish.

Share
Posted in Pasta, Poultry | Tagged | Leave a comment

Triple Lemon Coocakes

Click here to view recipe.

lemon-cookies-plated

Luscious Lemon Coocakes

I am a lover of most things lemon, or most things citrus for that matter.  I mean, what vegetable isn’t improved with a squeeze of lemon?  And pastas?  Salads? Soups?  Fruity things?   

So when I spotted a recipe for lemon ricotta cookies, I investigated further.  This highly touted recipe for lemon cookies began with Giada over at Food Networks.  Right off the bat I could tell that Giada, as cute and peppy as she appears, is not a cook like me.  Who would want to battle with mushy batter for cookies?  The cookies spread out and weren’t attractive in my eyes.  And why would she show a quart sized container of ricotta cheese?  I could tell from looking at the recipe that her original formula would be way too sweet for my taste – especially when I thought of eating them with coffee in the morning (in my humble opinion there is nothing wrong with cookies for breakfast).  

And so, before I even started, I began conjuring my version of these cookies and am happy to report that they turned out to my liking.  And to the liking of my son and my grandson and my daughter.   I would not call these little lemon-infused desserts cookies or cakes, but rather a hybrid of the two.  They are mixed together like cookies but have the texture of cake, or even a scone of sorts.

Cooled and glazed and ready to eat!

Cooled and glazed and ready to eat!

Why, I ask myself, isn’t the Food Network hiring me, a 66-year old grandma who loves to cook, to be on TV and talk up my recipes?  Well, the answer is that most viewers would rather look at cute little Giada.  What a pity.

I made these before Thanksgiving to have around for my out of towners and to give to my kids who live nearby.  35 large cookies is a lot.  I confess I put a couple dozen out of sight but I”m going to the cookie drawer daily and withdrawing a couple of these. So I hope there are still a few around when my guests arrive…

Triple Lemon Coocakes

Makes 33-35

pf-icon2


Cookie Ingredients
  • 2 ½ cups bread flour (The package will say Better for Bread or just Bread Flour)
  • 1 tsp table salt
  • 1 tsp non aluminum baking powder
  • 1 stick unsalted butter, softened
  • 1 ½ cups granulated sugar
  • 2 large eggs
  • 15 oz whole milk ricotta cheese
  • Grated zest of 1 large lemon
  • Juice of one large lemon (at least 3 Tbsp)
  • ½ tsp lemon extract
Glaze Ingredients
  • 1 ½ cups powdered sugar
  • Zest of 1 large lemon
  • Juice of 1 large lemon (about 3 Tbsp)
Instructions

Preheat oven to 375 with rack in the middle (I used my convection setting at 350 and put the three racks in there at the same time – one middle, one four inches above and one four inches below).  Line three cookie sheets with parchment paper.

In a medium bowl, combine the bread flour, salt and baking soda. In a large bowl, cream the butter with the sugar on medium to high speed for four minutes.  Add the eggs and mix in well. Add the ricotta, lemon zest, lemon juice, and lemon extract and mix again.  Stir in the flour mixture until just combined – do not over mix.

Refrigerate the dough for at least two hours or even overnight.

Scoop about 2-3 tablespoons of dough per cookie (my scoop said #30) onto the parchment covered cookie sheets – I made 12 cookies per sheet.  Bake 15 minutes for a single sheet in a regular oven at 375 degrees until the edges are slightly brownish.  Remember, I baked all three sheets of cookies together on convection 350 for 15 minutes.  Remove from the oven and put the sheets onto cooling racks – you don’t need to transfer the cookies at all (Giada, please note this).  

While the cookies are baking, make the glaze by stirring the ingredients together.  The consistency is a little thicker than maple syrup.

When the cookies are cool to the touch slide the parchment with the cookies off of the trays for easy cleanup (Giada, please note this too).   Any frosting that drips off the cookie will end up on parchment!  And just so you know, I lick any frosting drips.  Put about one teaspoon of glaze on each cookie and skim it over the entire top with a knife or the back of a spoon.  Let the frosting harden – this took me about one hour maximum.  Pack into a cute container and eat or gift them.  

I did freeze these but when defrosted the frosting became tacky.  Wait a bit and the icing hardens,  so I would still freeze them and I imagine they would keep for at least a month frozen.  HAHAHA, you’ll never have them around that long.

Share
Posted in Cookies | Tagged , , , | Leave a comment

Middle Eastern Carrot Salad

Click here to view recipe.

Colorful Carrot Salad

I titled this “Middle Eastern” carrot salad just because…cumin, roasted garbanzo beans, tahini,  lemon, pistachios…need I say more?  This salad was calling my name and originally came from the Smitten Kitchen website.  As always, I did some tweaking and I have to say, I’m pleased with the results.  On a hot summer day when you can’t bare the thought of another lettuce salad, make this.  It is crunchy, tangy, sweet, chewy and just downright delicious.

Summertime Middle Eastern Carrot Salad

Serves 4-6

pf-icon2


Roasted Chickpeas Ingredients
  • 1 ½  cup cooked chickpeas, or one15-ounce can
  • 1 tablespoon extra virgin olive oil
  • ½  teaspoon fine sea salt
  • ¼ teaspoon ground cumin
Salad Ingredients
  • 5 large fresh carrots, peeled and grated coarsely by hand or in the Cuisinart
  • ¼ cup coarsely chopped flat leaf Italian parsley
  • ¼ cup shelled, salted pistachios
Dressing Ingredients
  • 1 garlic clove, peeled and minced by hand
  • 1 large lemon, juiced
  • 3 tablespoons well-stirred tahini
  • 2 tablespoons water
  • 2-3 tablespoons extra virgin olive oil
  • Salt and a tiny pinch of red pepper flakes to taste
  • White pepper to taste
Instructions

Roast chickpeas:

Heat the oven or toaster oven to 425 degrees F. Dry the chickpeas in a couple of paper towels and toss them with one tablespoon olive oil, salt and cumin until they’re all coated. Spread them on a foil-lined rimmed baking sheet or pan and roast them in the oven until they’re browned and crisp, about 15 minutes or even longer.  Shake or stir them occasionally to make sure they’re toasting evenly. Set aside to cool until needed. Note: if you want to cook your own chickpeas, try your pressure cooker! I didn’t even soak the beans and they came out so darned perfectly in 45 minutes start to finish.  Fellow pressure cookerites can write me if you want explicit instructions for this.

Make dressing:

Whisk all ingredients together until smooth, adding more water if needed to thin the dressing slightly. Be aware that it thickens as it stands.  Taste but I wouldn’t mess too much with it even if you taste a lot of lemon.  This sourness contrasts nicely once you put this on the sweet carrots.

Assemble salad:

Place grated carrots in large bowl and toss with the parsley. Mix in a little over half of the dressing, adding more if desired. Taste, then more salt and pepper if needed. Right before serving, sprinkle with the roasted garbanzo beans and pistachios.  

Notes:
  • I get my pistachios at Costco in huge bags – I’m a pistachio fan so they are always in my pantry.)
  • I often make just the oven crispy chickpeas as a type of pre-dinner munchie.  I learned this from my Israeli friends, and adults as well as kids adore them.  
  • Finally, I made this again and used fresh roughly chopped mint leaves.  It tastes totally great and is a nice refreshing change from parsley.
Share
Posted in Salads & Dressings | Tagged | Leave a comment

Savory Summer Corn Pudding

Reposting an old favorite … hopefully you’ll have time to whip this up while our beautiful corn and tomatoes are in season! (Originally appeared on July 22, 2015!)

~ ~ ~ ~ ~ ~ ~ ~ ~ ~ ~ ~ ~ ~ ~ ~ ~ ~ ~ ~ ~ ~ ~ ~ ~ ~ ~ ~ ~ ~ ~ ~ ~ ~ ~ ~ ~ ~ ~ ~ ~ ~

Click here to view recipe.

Comforting Corn Pudding with Colorful Tomatoes

Comforting Corn Pudding with Colorful Tomatoes

I love brunch in the summer – more specifically, Sunday morning gatherings with friends or family.   Most of the invitations I receive or brunches that I host become potluck events – easy, casual ways to entertain.  Unlike many people, I never sign up for bringing fruit, or coffee, or orange juice or bagels (not that there’s anything wrong with that!).  I suppose I figure, because cooking is easy and joyful for me – why not make something homemade. And I tend to make food that presents as more hearty, a little eggy, often a savory dish.  One of my “go to” recipes has been Spinach or broccoli frittata. This summer, however, I have a new fave.  I’ve been buying fresh sweet corn to grill, to put into salads or soups and this week I remembered an old recipe in my files for a corn “pudding.”

Some recipes require a lot of chopping, sauteeing, baking, what have you.  This little gem requires nothing.  Nisht.  Nada.  Just get the ingredients, stir them together and VOILA.  It’s not the most healthful thing in the world, but it’s quick and fresh tasting.

Let me report that this savory dish flew off the buffet I just brought it to … fortunately I had made a second pan full.  Everyone wanted the recipe…and so I present to you SUMMER SAVORY CORN PUDDING.  It could just as well be a dinner item, and leftovers reheat beautifully.  Make it while there is fresh, succulent sweet corn at the market.  And because it is a bit drab in the old appearance department (golden yellowish brown), slice some ripe tomatoes to serve alongside or include other side dishes with pretty colors.

Corn Pudding in My Favorite Dish

Corn Pudding in My Favorite Dish

I try to use an oval, ceramic dish to bake my corn pudding – like the one pictured.  I find it much more appealing than preparing it in a clear glass pyrex container. It’s like night and day really.

Summer Savory Corn Pudding

Serves 10

pf-icon2


Ingredients
  • 5 large eggs
  • ½ cup whole milk
  • 2 cups half and half
  • ⅓ cup all purpose flour
  • 1 Tbsp sugar
  • 1 tsp salt
  • ½ tsp baking soda
  • 2 cups fresh corn kernels (about 2 large ears)  or leftover grilled corn kernels
  • 1-15 oz can cream corn* (see “PPS” note at the bottom)
Instructions

Preheat oven to 375 and put the rack mid oven.  Spray an 9 x 12 baking dish.

Whisk the eggs in a large bowl to blend, stir in dry ingredients but DO NOT add THE CANNED AND FRESH CORN until the end.  Whisk to blend, adding both types of corn last.  Pour into the prepared pan and bake until the top is golden brown and a knife inserted into the center comes out clean, about 1 hour and 10 minutes.

PS: I have been known to make this in the winter months using frozen corn kernels, defrosted and drained on paper towels.  It is still a wonderful thing but not as tasty as when you make it from sweet corn just cut off the cob.

PPS:  It kind of grosses me out to be using creamed corn from a can!  I never, ever use canned vegetables and I’m including the creamed corn here as an option for you.  However, next time I am going to measure out 1 ½ additional cups of fresh corn, puree it slightly then add ½ cup of milk and 1 teaspoon of cornstarch to thicken it slightly.


Share
Posted in Breakfast, Side Dish | Tagged | Leave a comment