Bow Tie Pasta with Smoked Salmon and Peas (aka Salmon and Noodles and Peas…Oh My!)

Click here to view recipe.

Bow Tie Pasta with Smoked Salmon & Peas

This is a very, very quick pasta dish that goes from ingredients to the final meal in less than 30 minutes.  I made it recently – mainly because I had leftover smoked fish from a weekend brunch, and it sounded very warming and beautiful to me.  The original recipe called for poached salmon, but I think the smoked fish is much more flavorful and pairs so well with the lemon.  I’ll be making this again!  With a nice green salad and some fresh fruit, it seems like a fancy meal suitable for company.

My husband and I loved this as did my close-by family with three little boys.

Bow Tie Pasta with Smoked Salmon and Peas

Serves 3-4 but I always double it for leftovers

pf-icon2


Ingredients
  • 2 rounded cups bowtie pasta (farfalle), uncooked (probably 6-7 ounces) 
  • 1/2-pound cold alder smoked salmon
  • Juice and zest of 1 large lemon (you should have around ¼ cup of juice)
  • 1 ¼  cup frozen peas, no need to defrost
  • 1/3 cup heavy cream
  • ¼ cup freshly grated Parmesan cheese plus about 2 Tbsp to sprinkle on top of the finished dish
  • Cracked black pepper to taste
Instructions

Remove the skin from the smoked salmon and tear the fish into medium sized pieces. Remove any bones you find along the way.

Bring a large pot of water to a boil and add two teaspoons of table salt.  Cook the pasta to just al dente. Drain, but reserve a half cup of the pasta cooking water.

While the pasta is cooking, gently heat the cream in a large sauté pan. Add the frozen peas, the lemon juice and zest, ¼ cup of grated parmesan and the pepper to taste and stir slightly.  Add the frozen peas and the fish and barely cook until the peas are heated but still green. Add the cooked, drained pasta and mix together.  Taste and add more ground pepper if desired. Add a bit of the reserved pasta water if the sauce seems too thick. Because of the smoked fish, the salted pasta cooking water  and the parmesan cheese I do not add additional salt!

Serve while hot and sprinkle each bowl with extra cheese to garnish.


Share
Posted in Pasta | Tagged | Leave a comment

Hershey’s Best Brownies

Click here to view recipe.

The Best Brownie!

Mr or Mrs or they Hershey happens to have timeless recipes.  Remember Bubbie’s chocolate cake?  So it came as no surprise to find out that these amazing brownies that someone brought to my sister Susan came from the Hershey files as well.  She didn’t know this and asked her friend for the recipe, so when I read it I laughed.  The moral is not to judge a recipe by the origin.  

Truthfully, it doesn’t sound that great but it is deeply chocolatey and easy to whip up in a hurry.  I made a big pan last week to take to my daughter’s house where there were four 14 year old boys, three 12 year old boys and the usual five of us.  Needless to say, the teenaged boys ate like they had never seen food.

I cut the brownies into medium sized pieces.  Even though they were still too filling and rich for me, I topped each brownie with a scoop of good vanilla ice cream.  It looked like a fancy pants dessert, but in reality they were pedestrian brownies.  AND I used Hershey cocoa, not the expensive stuff I hoard these days.

Hershey’s Best Brownies

Makes a 9×13” pan size batch

pf-icon2


Ingredients
  • 1 C salted butter
  • 2 C granulated sugar
  • 4 eggs, room temperature
  • 2 tsp. pure vanilla extract
  • ¾ C cocoa (Hersheys is fine, but I do sift it) 
  • 1 C flour
  • ½ tsp. baking powder
  • ¼ tsp. salt
  • 1 C toasted nuts, either pecans or walnuts cut into ¼ inch pieces
  • Optional:  Sprinkle a handful of chocolate chips on top before baking.  You better believe I did this and used dark chocolate chips!
Instructions

(This is a one bowl or pan mixing situation)

Heat oven to 350, spray or use my pam like mixture,  9 x 13 pan.

Melt butter, stir in sugar and vanilla. Add eggs, hand beat, add cocoa and beat until well blended. Add flour, baking powder, salt and nuts.  Sprinkle about one cup of chocolate chips evenly on top. Bake for 20-25 min. Cool and cut. 


Note: you can make this in an 8 x 8 or 9 x 9 brownie pan by cutting the recipe in half.


Share
Posted in Cookies, Dessert | Tagged | Leave a comment

Pinto Bean Soup with Salami and Vegetables

Click here to view recipe.

Pinto Bean Soup with Salami & Vegetables

Another soup for you, straight from my imagination.  I began with a formula for navy bean soup, and since I had too many pinto beans, I decided to go forth and use them as a base instead. I did a quick soak of the beans then added some vegetables and a little broth and water.  About an hour in, I sauteed cubes of salami (I don’t eat pork but wanted something salty and meaty, and I had leftover salami) and added them to the pot along with a small russet potato I had hanging out in my pantry.  Oh, and fresh dill went into the soup since it was on its last day and I didn’t want to waste it.

This tasted really great and I’ll make it again this winter since I looooove beans.  It seems flexible too with regard to vegetables you could add or type of bean or fresh herbs.

Pinto Bean Soup with Salami and Vegetables

Serves 4-5—you can easily double this for leftovers

pf-icon2


Ingredients
  • ½ pound pinto beans,
  • ½ large white onion, diced 1/3 inch
  • 2 medium carrots, washed-then peeled and cut into ½ inch pieces
  • 1 peeled parsnip, cut the same size as the carrots
  • 1 rib celery, washed and cut into ½ inch pieces
  • Half a bunch of fresh dill
  • 2 cups beef broth (I used Better than bouillon to make this, follow the directions for 2 cups)
  • 3 cups water
  • 3 bay leaves
  • 1 tsp tomato paste
  • Fresh ground black pepper
  • 2 ounces salami, cut into ½ inch cubes and lightly sauteed
  • 1 small russet potato, peeled and diced 1 inch
Instructions

Sort and rinse the beans  Cover with water by two inches,  bring to a boil for two minutes then cover and remove from the heat and let it sit for at least two hours.  Then drain and proceed.

Begin by sautéing the onion in about a tablespoon of extra virgin olive oil and sauté for 4 minutes until it is soft.  Add the cut carrots, celery and cook another few minutes.  Then add the previously soaked beans, broth, water, tomato paste, bay leaves and pepper.

Bring everything to a boil, then lower the heat to low and cover the pot for about an hour.  I stirred my soup every time I walked by.  After the hour is up, add the slightly cooked salami and the cubes of potato.  Let the soup cook another ½ hour on low with the lid on, checking that the you don’t need to add water.  Taste for seasoning and add what you need.  (I never add more salt since the broth and salami both have salt in them.) The soup thickens as it sits, so add water or broth if you want a soupier soup.

Serve with a nice loaf of bread or crackers and a light lettuce salad. I plan to have leftovers over previously cooked brown rice for lunch tomorrow!

Share
Posted in Soups | Tagged | 3 Comments

Tortilla Soup with Crisp Tortillas and Avocado Relish

Click here to view recipe.

Tortilla Soup with Crisp Tortillas and Avocado Relish

The first time I tasted tortilla soup was at my daughter’s home, and her kids said this was one of their favorite things for dinner.  It was a little spicy but so, so good. And, as it turns out, so, SO easy. The original recipe from Epicurious required frying the corn tortillas rather than buying the chips, using and dicing fresh tomatoes rather than canned, and hunting down and finding all types of peppers.

Rachel is like me.  She cooks fast and mean and comes out with food lickity split that is always delicious.  These are some notes from our texts when I asked for the recipe:

“Here’s the recipe with my changes – bottom line is I make it without requiring complicated grocery runs. It’s hard to find these chilis here, for example, or they only come in large quantities and then sit around in pantry for months after. Onion type has varied depending on what’s on hand as well. First time I made my own tortilla chips as per original recipe. Unnecessary. Didn’t measure chips second time through, just cook and puree with an immersion blender until the texture/thickness I like.”

A note of my own: You will want an immersion blender for this! That way nothing has to be cut small.

Tortilla Soup with Crisp Tortillas and Avocado Relish

Makes about 9-10 cups

pf-icon2


Tortilla Soup Ingredients
  • 1 Tbsp olive oil
  • 1/2  white onion (or red or brown if that is all you have)
  • 28 oz can Muir Glen fire roasted tomatoes
  • 6 peeled, coarsely chopped garlic cloves
  • 1 fresh jalapeno pepper seeded and coarse diced
  • 2 chipotle chilis in adobo sauce (I always keep these in my refrigerator in a jar and use them when I need them, they keep a looooong time. I didn’t even bother to chop them.)
  • 15-ounce bag white corn tortilla chips with salt. Get cheap ones and save about 3 cups for serving.
  • 4 cups chicken stock (Better Than Bouillon is my go to)
  • 4 cups water
  • 1/2 teaspoon dried oregano, crumbled (if you have it-I did not use it)
  • 1.5 lbs. boneless skinless chicken thighs
Avocado Relish Ingredients
  • 2-3 ripe California avocados
  • 2 small vine-ripened tomato
  • 2/3 cup finely chopped white or red onion (about 1/2 onion)
  • 1 to 2 fresh serrano chilies chili of preference or hot sauce (I used zero extra spice and did not add peppers to the relish since the soup is pretty spicy)
  • Lots of chopped fresh cilantro, at least a half bunch
  • 2 teaspoons fresh lime juice
  • ¾ teaspoon sea salt
  • 1/2  teaspoon fresh ground black pepper
Instructions

Chicken:

You can use store bought roasted chicken or roast chicken breasts or roast chicken thighs.  I happened to have a package of raw boneless skinless thighs that I put in the soup to cook along with everything else.  Once cooked, and before pureeing,  I took the pieces of chicken  out and shredded the meat.  Turns out this chicken flavored the soup nicely and the method was easy and quick.  The  dark meat is never dry.

Soup:

Heat oil in a large heavy soup pot. Coarsely chop onion. Sauté salt, garlic & onion until soft. Add can of tomatoes, roughly diced jalapeño and cook a bit and add 4 cups chicken broth. At this point I added the raw chicken thighs and let them simmer for 15 minutes.  Then add the remaining 4 cups of water.  When hot throughout and the thighs are cooked, remove the chicken pieces from the soup and set aside  Add handfuls of tortilla chips – crush them in your fingers as an add in*. When the pieces of tortilla chips have softened turn off the heat. Using an immersion blender, blend everything into a puree. The thickness of soup should be to your preference. The chips serve as a thickening agent. If necessary add more salt or pepper.  It turns out I used most of the 15-ounce bag of chips but reserved  about 3 cups to serve with the soup.  Shred the chicken meat and add it back to the soup pot after you puree everything else.

* Whatever tortilla chips you didn’t use for the soup, crush up and sprinkle on the soup when you serve it!

Make relish while soup is simmering:

Halve avocados, remove pits and cube flesh (recipe says 1/4-inch dice) and finely chop tomato. If using chilis, finely chopped and add to avocados and tomatoes. Also finely chop 1/2 onion (white or red). Finely chop a ton of cilantro. In a bowl gently stir together avocados, tomato, onion, chilies, and remaining relish ingredients until combined well. I added extra lime. Salt to taste. Don’t make the relish until right before serving the soup or it gets too mushy from the lime juice.

Serve:

Pour soup in each bowl,  making sure to include chicken.  Add a scoop of avocado relish, crumple up a small handful of chips on top (hearty!). Serve with lime wedges, a salad and sweet corn as a side.   Also put lime wedges, hot sauce, salt and pepper on the table.

Rachel wrote that this is embarrassingly easy, but I love embarrassingly easy!

Share
Posted in Central America, Soups | Tagged | Leave a comment

Greek Salad My Way

Click here  to view recipe.

Gorgeous Greek Salad in Spetsai Greece – my favorite of all time!

Mediterranean food is, hands down, my favorite in the whole wide world.  There, I said it. If I am ever on death row, I might ask for a Greek Salad with a piece of baklava as my last meal!  Don’t get me wrong – I love other ethnic foods too, but the fresh fruits, dried fruits, honey-based pastry, sharp cheeses, and citrus I discovered in Greece … it’s hard to find words.

This fall I visited Turkey and Greece, and in every Greek town I went searching for a Greek salad and Moussaka.  Turns out it was hard to find Moussaka in most places, but I was able to score a good Greek salad most of the time.

I ate, I photographed, I deconstructed, I documented. And now I am an authority.  

Another Beautiful Salad From Patmos, Greece

So of course I came home to Seattle and began experimenting like a crazy person.  I think I made Greek salad seven days in a row – and that is on the conservative side.  My husband, fortunately, likes the same foods as I do and didn’t complain.  In fact, he noted when I needed more lemon, more salt, more pepper and the like.  

MY Greek Salad

I give you…

Greek Salad My Way

pf-icon2


Salad Dressing Ingredients

Makes enough for 2-4 large salads

  • 2 tablespoons red wine vinegar
  • 1 clove minced garlic
  • 2 Tbsp fresh lemon juice
  • ¼ cup extra virgin olive oil
  • ¼ teaspoon Dijon mustard
  • ¼ teaspoon sea salt
  • Freshly ground black pepper
Salad Ingredients

This makes 2 very large salads, the kind I like

  • ¼ cup slivered red onions: halve lengthwise, cut in half again and thinly slice, then separate into rings
  • 1 cup cherry tomatoes sliced in half (or the same amount of other flavorful tomatoes, cut into cubes
  • 1 cup English cucumber sliced in 1 inch pieces: do not peel but slice lengthwise and remove the seeds, then cut into ½ inch pieces
  • ½ green pepper – seeds and pith removed, and cut into ¼ inch slivers
  • 1 ½ cups fresh romaine lettuce, torn into 1-inch pieces
  • ¼ cup pitted Greek olives, I had a combo of green and black.  Cut into ⅓’s
  • ⅓ cup fresh feta cheese, crumbed or cut into a rectangular slice if you have a big chunk
Instructions

For the dressing, measure  all ingredients and shake together.  Add a touch of sugar if it is too sharp.  Shake or whisk and let it stand for a few minutes.  (This takes away the sharpness of the garlic). 

Add the slivered red onions to about one tablespoon of the dressing and let them soak up the dressing for 10 minutes.  This removes the bitterness of the raw onions, which is a win/win for me.  At this point I put the soaked onions in the very bottom of my salad bowl so they don’t get the rest of the ingredients mushy.

I then layer the tomato, cucumber, pepper, and romaine, and top with the olives and feta.  I put a damp towel on top and slide it into my refrigerator until I want to eat the salad, sometimes as long as 6-8 hours.pf-icon2

Salad Layered in Bowl

Right before serving, whisk the remaining dressing and add it a bit at a time until the salad is dressed to your liking.  I always have leftover dressing, enough for at least another two salads.

Enjoy!  Can’t wait to make this in the summer with garden fresh tomatoes. When I have it, I add some chopped mint and chopped basil or oregano too.


Share
Posted in Salads & Dressings | Tagged | Leave a comment

Summer Strawberry Lemon Loaf Cake 

Click here to view recipe.

Summer Strawberry Lemon Loaf Cake

For me – strawberries scream summer, or pre-summer.  In early June, I set out to find some type of strawberry cake to make for my grandson in Seattle.  He always chooses strawberry ice cream and when I told him I was going to make a post birthday cake with strawberries, he was really thrilled. What I stumbled upon is a lemon cake with diced, jammy, fresh strawberry bits inside.  It has an interesting, dense texture and is terrific as a dessert or as a breakfast item.   

I started with a New York Times recipe by Millie Peartree. I love that name, Peartree!  I changed her recipe a lot but kept it very simple.  As I often do, I used a kitchen scale to measure quantities whenever I could which makes clean-up much easier.   

Another plus here is that the cake contains oil rather than butter and can be stirred together in a bowl with a spatula.  No mixer to haul out or clean after the fact!  I ended up reducing the sugar and substituting whole milk plain yogurt for sour cream.  I used half the amount of glaze called for which was just enough for me and did not overpower the cake.  

The bread pan I used, which I do love, was a little small and the cake rose beyond the top of the pan and was not “domed” like a lot of breads can be.  Note to self: I need to buy a 9 x 5 bread pan since the 8 x 4 is giving me trouble! 

My next plan is to try this with diced spring rhubarb.  Yum! 

Summer Strawberry Lemon Loaf Cake 

Yield: one  8–9-inch loaf 

pf-icon2


Cake Ingredients 
  • 150 grams strawberries (remove the stem and dice ¼ inch.  I weigh the berries without their stems. 
  • 20 grams of granulated sugar to macerate the berries
  • 170 grams of granulated sugar  
  • Grated zest of 1 large lemon 
  • 192 grams all-purpose flour 
  • 2 tsp baking powder 
  • ½ tsp sea salt 
  • 227 grams unflavored whole milk yogurt (I use Stonyfield Farms) 
  • 110 grams avocado oil or another neutral oil
  • 3 large eggs 
  • 1 Tbsp fresh lemon juice 
  • 1 tsp pure vanilla extract or lemon flavoring 
Glaze Ingredients 
  • ½ cup powdered sugar (about 60 grams) 
  • 2 tsp fresh lemon juice 
  • 2 tsp of lemon zest 
Instructions 

Spray a loaf pan or use my homemade baking Pam mixture.  Preheat the oven to 350 degrees with the oven rack in the center. 

Macerate the strawberries with 20 grams of sugar. All this means is add sugar to the diced berries and let them sit for around a half hour to release the juices.  Stir them occasionally.  I then drain juice from the berries in a strainer and toss the plain berries with a teaspoon of flour right before adding them to the batter at the end.  I taught my 5-year-old grandson the word “macerate” too! 

In a large bowl, combine the 170 grams of sugar and the lemon rind and mix them together with your fingers so the lemon oils flavor the sugar.  To the same bowl add flour, baking powder and salt. 

In a medium bowl, whisk together the yogurt, oil, eggs, lemon juice and lemon flavoring or vanilla.  Pour this liquid mixture into the dry ingredients above and stir together gently. Gently fold in the strawberries 

Pour the batter into the prepared pan and bake until a toothpick comes out clean, between 55 minutes and 65 minutes.  It will brown nicely on top.  Cool the cake in the pan on a rack for 10 minutes, then gently remove it to a cooling rack.  Let it cool completely. 

To glaze, when the cake is cool, whisk ½ cup of powdered sugar, 1-2 tsp of lemon juice together. Add more lemon juice if needed so it has the consistency of maple syrup.  Drizzle over the top of the cooled cake and then immediately sprinkle with the lemon zest.   Let it cool and harden.   

Serve slices of the cake with some sliced strawberries.

Share
Posted in Cakes & Pies | Tagged | Leave a comment

Coconut Curry Carrot Soup

Click here to view recipe.

Comforting Coconut Curry Carrot Soup

It was so chilly in April that I made soup at least three nights each week. I often revert to my favorite meat/barley or cauliflower soup but this week I tried something new.  I shared my pot of carrot soup with my son and his family, and they liked it enough to ask for the recipe.  

This  is easy, tasty, and so doable.  Best of all, because it is pureed at the end with an immersion blender, there is no need to chop anything very small.  Lazy crazy me.  By the way, immersion blenders save so much work and are not a huge investment.  I use mine at least twice a week if not more!

One caveat: if you are not a ginger lover (here’s looking at you, husband), use half or less of the fresh ginger in the recipe.  Me?  I love ginger and the kick it gives this dish.

This soup can be refrigerated for up to three days, or frozen for up to three months. You may need to thin it with water when reheating.

Coconut Curry Carrot Soup

Serves 6

pf-icon2


Ingredients
  • 1 tablespoon olive oil
  • 1 medium onion, roughly diced
  • 2 cloves garlic, minced by hand
  • 2 teaspoons peeled, finely grated, fresh ginger root
  • 1 teaspoon ground cumin
  • 1/4 teaspoon freshly ground black pepper
  • 1/4 teaspoon ground turmeric
  • Pinch ground cayenne pepper
  • 1 1/2 pounds carrots – scrubbed well,peeled if not organic and  cut into 1/4-inch thick coins
  • 4 cups chicken broth (Better than Bouillon is my friend here)
  • 1 cup low-fat coconut milk
  • 2 teaspoons honey
Instructions

Heat the oil in a medium pot over medium-high heat. Once the oil shimmers, add the onion and cook for 3 to 4 minutes, stirring occasionally, until softened. Add the garlic, ginger, cumin, pepper, turmeric and cayenne pepper; cook for 30 seconds, stirring, then add the carrots and the broth.

Increase the heat to high just to bring to a boil, then reduce the heat to medium-low, partially cover and cook for about 12 minutes, or until the carrots are tender.

Stir in the coconut milk and the honey, then puree using an immersion (stick) blender, or in several batches in a regular blender (if using the latter, be sure to allow the soup to cool first.). Serve warm. 


Share
Posted in Soups, Vegetables | Tagged | Leave a comment

Tangy Noodle Salad – Redux

Hey people. I feel compelled to repost this one (it’s been almost 10 years!). I keep a double batch of the dressing here on my pantry shelf (no refrigeration needed) and make this whenever I need a side salad or something to bring to a family or to a potluck dinner.  It’s good in the winter as well as summer.  I’ve even been known to stir fry the final dish, adding tofu or leftover chicken and veggies.

~*~*~*~*~*~*~*~*~*~*~*~*~*~*~*~*~*~*~*~*~*~*~*~*~*~*~*~*~*~*~*~*~*~*~*~

Originally posted June 2, 2014

Click here to view recipe.

Tangy Noodles!

Tangy Noodles!

It’s almost the 4th of July and if you are invited to or in charge of  a potluck, you might be scratching your head, trying to come up with something delicious and easy to prepare. Potato salad? Baked beans? Coleslaw?   If you’re like me, you’ve been there and done that.  Time to think outside of the box.

Folks, this is it.  Another tried and true recipe from my catering days!!  If my children are reading this, they are gagging by now since they all, at one time or another, worked for me in my commercial kitchen, and had to boil noodles, grate carrots, toast sesame seeds or put together batches of tangy noodle (aka capellini) salad.  We’d don disposable gloves to toss the noodles and dressing together, then this salad was stored in huge, full-sheet deep pans.  After six hours of nonstop cooking before a huge event (think 400 guests) I’d make a little extra of this salad to take home and then grill and add sliced chicken and make it a meal in one.

Sometimes my son’s entire baseball team ate at our house so I kept this handy for those 17 year old boys.  They loved it, the adults loved it, everyone loved it! Alas… my kids begged me to stop making tangy noodles.

All eating phases generally end, and now my children happily eat this salad if I make it in their homes or when they are visiting Seattle.   It’s perfectly balanced and satisfying and an inevitable crowd pleaser. Plus it’s a little different and visually attractive enough for any 4th of July buffet!

Go forth (or 4th!) and try this.  You can also omit the grated carrots and instead dice up yellow, red and/or orange bell peppers to give it a celebratory appearance. I’ve also added chopped cilantro or black sesame seeds to the top in lieu of green onions. Leftovers really keep well too – at least for a few days.  I’ve even stir fried the noodles as is with some type of protein just to be fancy.

The recipe you will read below has morphed over the years…the original called for black Chinese sesame oil and Chinese balsamic vinegar and fresh noodles, too.  I’ve tested and retested to develop a recipe that is easy – featuring ingredients that can be found at most supermarkets or in your pantry.

Tangy Noodle Salad

Feeds at least 10-15 eaters on a buffet

pf-icon2

Ingredients:
  • 1 lb. dried Angel hair (capellini) pasta
  • 3 Tbsp dark toasted sesame oil (I have Trader Joes brand)
  • 1 Tbsp canola oil
  • ¼  cups tamari sauce (I’ve used soy sauce in a pinch, but prefer tamari)
  • ¼ cup balsamic vinegar
  • 1 teaspoon chili oil* – it must be spicy (add more the next day if needed but be careful!)
  • 2 Tbsp honey
  • 1/3 cup toasted sesame seeds  (sometimes I use black sesame seeds to switch it up)
  • 1-2 large grated carrot
  • 2 scallions (light green and white parts) sliced into thin rings-for garnish
  • 1/3 cups salted cashews – for garnish
Instructions

Fill a large stock pot with water and add two teaspoons of table salt and bring to a boil.  Meanwhile, combine the rest of the dressing ingredients (the oils, Tamari, vinegar and honey) and whisk together in a small bowl.

Put the angel hair  noodles into the pot and keep boiling them until they are al dente (a little less than package directions – mine took three minutes).   Drain really well, shaking off all the water.  Keep them in the colander, and let them cool a bit, but keep stirring the noodles in the colander so they don’t stick together.

Add half of the dressing to the slightly warm noodles and toss well to combine. I do use disposable gloves to do this.  I add the remainder of the dressing about a half hour later when the noodles are more room temperature.

Stir in the sesame seeds (reserve two tablespoons for garnish) and the grated carrot (reserving a tablespoon for garnish).  Refrigerate overnight or for at least an hour at room temperature.  Right before serving, toss and taste, adding more balsamic vinegar or tamari as needed for your taste buds.   For me  it is seasoned most often well and I do not need to add another thing, but see what you think.

I like to serve this at room temperature – the flavors seem more robust to me this way.  Garnish the finished dish with the reserved sesame seeds, carrots, scallions and cashews. Enjoy!

*I’ve been in places without chili oil, and I simply add cayenne to the dressing until it is fairl


Share
Posted in Pasta, Salads & Dressings, Side Dish | Tagged | Leave a comment

Pistachio Bundt Cake

Click here to view recipe.

Perfect Pistachio Bundt Cake

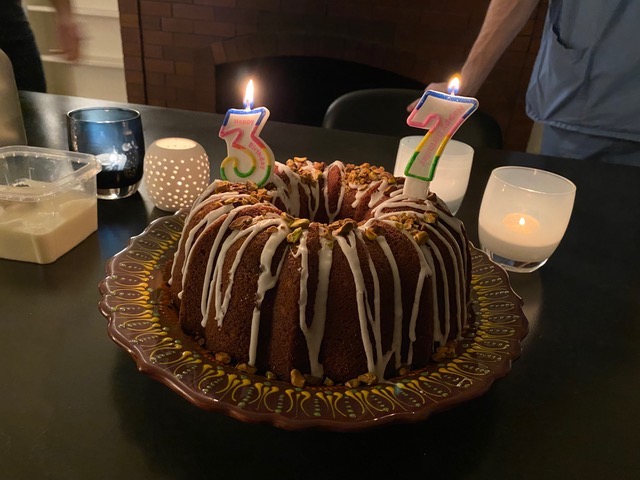
This year was Jakey Boy’s 37th birthday, and his 4th baby was to be born close to that date.  The family decided to bring his birthday to HIM, so I made a cake!  Jake is not a dessert lover at all.  He doesn’t like really sweet things, and each year I try to find something to bake for him that is different, a little tart and fun.

This recipe had been in several newspapers recently and it intrigued me.  It looks like a lot of work, but actually it wasn’t too bad.  There are three components: the cake, the glaze and a ricotta mix to serve on the side.  Honestly a dollop of fresh whipping cream in lieu of the ricotta cream would have been fine but the glaze kind of dresses it up. And for me, I’ll make the ricotta topping just because I liked the texture.

I was worried about the cake.  My 11-year-old grandson was with me and he separated the nine eggs; I cannot say for sure that they did not have any yolk in them.  I demonstrated and he did the work, but when I whipped them they were a little…less than marshmallow-like and they did not really hold their peaks.

I needn’t have worried. The end result was sensational!  The cake was lovely and green and moist.  Jake and the rest of the family were all impressed.  All is well that ends well!

(PS – don’t tell Jake there was instant pudding in there or he would not be as enamored with the cake.)

(PPS – I use weight measurements for baking and recommend this always if they are available!)

Pistachio Bundt Cake

Yield: at least 12 pretty big servings.  We fed over 20 and no one left hungry. 

pf-icon2


Cake Ingredients
  • Nonstick cooking spray or neutral oil (my paste or Bakers Joy)
  • 2¾ cups/351 grams all-purpose flour
  • 1(3.4-ounce) package instant pistachio pudding mix
  • 1 tablespoon plus 1 teaspoon baking powder
  • ¾ cup plus 1 tablespoon/195 milliliters whole milk
  • ¾ cup plus 2 tablespoons/205 grams full-fat plain Greek yogurt
  • 1 tablespoon vanilla bean paste or vanilla extract (I don’t have vanilla bean paste)
  • 9 large egg whites
  • A little less than 1 tsp sea salt
  • 2 ½ cups plus 2 tablespoons/528 grams granulated sugar
  • 1 ¼ cups/300 milliliters avocado oil(or grapeseed or canola)
  • ⅔ cup/85 grams shelled pistachios, coarsely chopped: mine were salted but raw pistachios  would work too.
Whipped Ricotta Ingredients (see NOTE)
  • 1⅓ cup/328 grams whole-milk ricotta
  • 1 teaspoon vanilla extract
  • 1 teaspoon olive oil
  • Confectioners’ sugar to taste (personally I prefer less sweetness and didn’t add any so my ricotta whip  was thick)
  • Pinch of sea salt

NOTE: I would  add very little confectioners’ sugar.  For me, I like it thicker and not too sweet. Cooks choice.

Glaze Ingredients
  • 2¼ cups/230 grams sifted confectioners’ sugar, plus more as needed
  • SEE NOTE: ¼ cup/60 milliliters fresh lime juice (from about 2 medium limes), plus more as needed
  • ½ cup/64 grams unsalted roasted shelled pistachios, sliced or coarsely chopped
  • Flaky sea salt, for garnish
  • 2 tsp grated lime zest for garnish

NOTE: I just sifted what appeared to be 1 ½  cups of powdered sugar to my eye, then added enough lime juice until it was able to be put into a plastic bag to pipe on the cake. I needed less than 1 lime

Instructions

Heat oven to 350 degrees with the shelf in the middle of the oven,  and coat the inside of a 12-cup (or larger) Bundt pan with nonstick cooking spray or my baking mix for coating pans. The cake will come to the very top of the pan while baking then shrink back a little.

In a medium bowl, whisk together the flour, pistachio pudding mix and baking powder (I sifted all 3 together too). In a second medium bowl whisk together the milk, yogurt and vanilla until smooth.

Combine the egg whites and salt in the bowl of a stand mixer fitted with a whisk attachment (or in a large mixing bowl if using a hand mixer). Beat on medium speed until frothy, 1 to 2 minutes. Add the sugar, increase the mixer speed to high, and beat until the egg whites are marshmallowy with firm peaks that form when the beater is lifted, 4 to 5 minutes.

Remove the bowl from the stand mixer, add the flour mixture and canola oil, and gently mix them into the egg whites using a rubber spatula until smooth and no pockets of unincorporated flour remain. Gently mix in the milk mixture until completely smooth, and then stir in the chopped pistachios until evenly distributed throughout the batter.

Pour the batter evenly into the prepared Bundt pan, smooth into an even layer and tap the pan on the counter several times to remove any large air pockets. Bake until the top of the cake is lightly browned and a skewer or cake tester inserted into the center comes out with just a few moist crumbs attached, 60 to 75 minutes: NOTE: mine took less than 60 min, about 55 min.  Let cool for 10 minutes, then flip the cake out onto a wire rack and let cool completely before glazing. I DID THIS THE DAY BEFORE and wrapped the cake well so it wouldn’t dry out.

While the cake is cooling, make the whipped ricotta: transfer the ricotta to the bowl of a food processor fitted with the blade attachment and add the olive oil, vanilla, and salt. Add a little powdered sugar if you wish.  (SEE MY NOTES ON INGREDIENTS) Process until the mixture is completely smooth, stopping and scraping down the sides of the food processor as needed, 40 to 60 seconds total. Transfer to a bowl, cover with plastic wrap and refrigerate until ready to serve. Makes about 1⅔ cups. Note: my plain ricotta was very smooth and I could have done this with a food processory, using just a whisk. Also – the whipped ricotta can be made up to a week in advance and stored in the fridge tightly covered with plastic wrap.

Once the cake is completely cooled, and the day you plan to serve it, make the glaze: In a large mixing bowl whisk together the confectioners’ sugar and lime juice until the sugar is completely dissolved. I used a lot less sugar and less lime juice too, so go slowly. The glaze should be very thick yet pourable. If the glaze is too thin, whisk in additional powdered sugar one tablespoon at a time. If it’s too thick, whisk in additional lime juice one teaspoon at a time. Transfer the glaze into a piping big or a large zip-top bag with the corner cut off and drizzle the glaze over the top of the cooled cake, allowing it to drip down the sides. Immediately garnish the top with the sliced pistachios and sprinkle with just a touch of flaky sea salt and/or  grated lime zest. Let stand until the glaze has set, about 20 minutes, and serve with the whipped ricotta.

Share
Posted in Cakes & Pies | Tagged | 1 Comment

Egg Bites

Click here to view recipe.

Perfect Egg Bites

We always seem to hit the ground running these mornings!  I am not a morning eater but when I start to get hungry a bit later on, I don’t have the patience nor the time to figure out a healthful breakfast.  Toast just doesn’t cut it.  Fruit is great but not quite enough.  And then I discovered how easy and satisfying  it is to quickly make these Egg Bites.  Now I grab a couple with a napkin and a wet wipe in case they make my hands greasy.  

This is my new favorite breakfast and I have now tried them with varied vegetables and fillings.  Mediterranean style (feta cheese, sliced kalamatas and dried tomatoes) and  Spanish style (black beans, cheese and pickled jalapenos) are my faves to date.  Make it yours!

Egg Bites

Makes 12 cupcake sized servings

pf-icon2


Ingredients 
  • ½ cup grated sharp cheese (I use extra sharp white cheddar but feta is good too)
  • 1 onion, chopped fine
  • 1 tablespoon extra-virgin olive oil
  • Sea salt
  • Fresh ground pepper
  • 8 ounces broccoli flowerettes, chopped fine 
  • 12 small cherry tomatoes
  • Handful of chopped herbs-dill or basil or whatever you have
  • 8 large eggs
  • ¼ cup milk
Instructions

Adjust oven rack to lower-middle position and heat oven to 425 degrees. Grease or spray a nonstick cupcake tin with Pam or oil.

Toss onion and broccoli with oil, ⅛ teaspoon salt, and pepper and herbs and saute in a fry pan until the broccoli is softened a bit. about 2 minutes. Stir in tomatoes

Divide sauteed vegetables between the 12 cupcake holders, stick in two halves of cherry tomato and top with the grated cheese.

Whisk eggs and milk in a large bowl until well combined and a uniform yellow color; do not overbeat. evenly distribute egg mixture over filling over the  muffin cups.

Bake until the egg bites are slightly puffed and just set in center, 15 to 20 minutes. Transfer muffin tin to a wire rack and let cool slightly, about 5 minutes. Run a butter knife around the edges of the little cups  to loosen, then gently remove from the muffin tin. Eat or cool and store for up to four days in the fridge.

Share
Posted in Breakfast | Tagged | 2 Comments