Click here to view recipe.
Bright & Beautiful Broccoli Salad
You know me. Whenever I stumble upon a soup or a salad or a dessert I love, I immediately want to try to make it in my own kitchen. Recently I was visiting my middle sister in Santa Cruz and we stopped for lunch at Gayles – my favorite bakery. Don’t tell anyone but on the way home we ate a mid-afternoon snack there too.
In the display case were a multitude of amazing looking salads! We shared a few things and ordered a pint of this broccoli salad which blew me out of the water. It was so so good: crispy, sweet from the apples, tangy from the vinegar, crunchy from toasted pecans and salty with Gruyère cheese. The dressing was barely there and added just a little richness with specks of poppyseed to the salad. I jotted down what we could identify, looked at the listed ingredients and when I returned to Seattle I went to work.
I made this twice in the matter of one week and I will probably make it a third time. The only thing I would change would be to use a red skinned apple for color. The second go around I lightly blanched the broccoli so it would be more vibrant. Done. And – everything can be mixed or chopped by hand.
As an aside (also called flight of ideas) I have some previous trauma surrounding broccoli. When my middle son was young he only loved “brown” foods. Meat, fish, bagels, potatoes, no vegetables. I think he did this to put a knife in my heart since he realized I loved vegetables, and a variety to boot. Broccoli was an exception to his general disdain of all things green – so I served broccoli more times than you want to know when I was young. I still love it but it does give me pause.
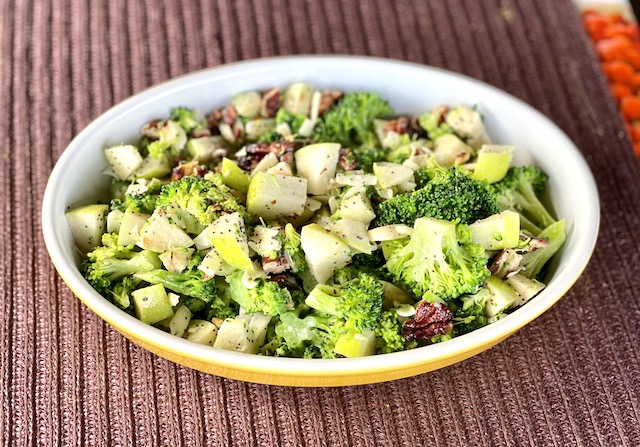
Broccoli Pecan Salad
Serves 6
![]()
Salad Ingredients
- 6 cups broccoli flowerets
- 1 cup grated good quality Gruyère cheese
- 1 ½ cups apple (IMHO – an apple with some red on the skin would be prettiest) (my photo is with a green apple because that is what I had)
- 1 cup toasted pecans, coarsely chopped
Dressing Ingredients
- ½ cup mayonnaise
- 1 ½ Tbsp apple cider vinegar
- 2 Tbsp avocado oil or another neutral oil
- 2 tsp honey
- 3 Tbsp Poppy Seeds
Instructions
Chop broccoli into smallish, ½ inch pieces. Drop into about 2 inches of boiling water in a pot, stir it around and leave it with the lid off for no more than 1minute, stirring constantly. Remove the broccoli with a strainer and immediately put the flowerettes into an ice water bath. After they cool down, remove any excess water by drining well then rolling the broccoli in a dry towel. By the way, this makes the broccoli vibrant green and even a day later it maintains its color.
Prepare the apple by removing the core and dicing into ¼ inch pieces.
Combine all dressing ingredients in a bowl – whisk and taste, add more vinegar or honey to your taste.
Lightly fold most of the dressing into the ingredients listed above. The dressing will seem to disappear. The salad can be refrigerated, covered, for a few hours before eating. Before eating, add the remaining dressing to moisten it up. The next day I will say that the salad held up just fine. Day 3, not so much.
And you know what? I am making this for our family Thanksgiving. I sent this photo of my salad to my sister and she said “Oh, are you going to write that on your blog, a hack?” Yes, I answered. You better believe it! She also told me that my broccoli was a little more chunky than Gayles. So be it!