No Cream Cauliflower Soup

Click here to view recipe.

Cauliflower Soup with Croutons

Cauliflower is my friend and one of my “go to” vegetables – I prepare something cauliflower centric at least once a week.  When I saw a similar recipe to what is here in the New York Times Food section, I put it in my “to make” folder.  No cream but it tastes creamy!  I loved it and will make it again time and again.

I didn’t add fresh rosemary to the olive oil – to me, rosemary has such an overpowering flavor.  BUT I might  infush the olive oil with a little saffron next time to liven up the color and drizzle on top at when serving. This was a hit with the adults and kids in our family!  Make it this winter before you move on to summer vegetables.  You won’t regret it.

No-Cream Cauliflower Soup

Serves 6

pf-icon2


Ingredients
  • 2 Tbsp fruity extra virgin olive oil – I use the oil I brought back from Tuscany
  • 1 medium yellow onion, skinned and diced ½ inch
  • 2 cloves garlic, minced
  • 1 quart chicken broth (Better Than Bouillon but I make it a little more dilute than suggested on the jar)
  • 2 ½ lbs cauliflower, cored and broken into 1 ½ inch florets
  • 1 tsp sea salt
  • 1 tsp fresh ground black pepper
  • Juice of one lemon
  • Wedges of lemon to serve
  • Good olive oil to drizzle on top for serving
Instructions

In a heavy soup pot or Dutch oven, heat two tablespoons of olive oil over medium low.  Add the onion and slowly cook until tender – about 6-8 minutes.  Add the garlic and cook a half minute, being sure the garlic does not burn.

Add the stock, cauliflower, salt and pepper and bring to a boil.  Lower the heat, cover and cook for 20 minutes until the cauliflower is very tender.

Remove from the heat and reserve a few cooked pieces of cauliflower for serving. 

I usually blend the soup with an immersion blender right in the stock pot.  Transferring it to a blender is too much effort and mess!  The soup thickens as it cools.  Taste and season with additional salt/pepper.  

Serve hot, swirling a bit of olive oil on top and a piece or two of cooked cauliflower that you reserved.  I pass lemon wedges and accompany this with a nice salad and rustic bruschetta.  Cauliflower soup keeps in the refrigerator, covered, for a week.  

Share
Posted in Soups | Tagged | Leave a comment

Thai Quinoa Vegetable Salad

Click here to view recipe.

Colorful Thai Quinoa Vegetable Salad

In mid-September, I helped plan a stick-to-your-ribs kind of salad as an accompaniment to fish and Lemony Red Lentil Soup for the evening meal prior to Yom Kippur.  The original quinoa side dish appeared on one of the pressure cooking sites I like to frequent, and it seemed intriguing.  I love edamame beans, this seemed easy and could be made one day ahead of the meal.  

The directions seemed fairly straightforward and simple, although I had never cooked quinoa in a pressure cooker.  The recipe stated that the quinoa would cook in one minute.  I measured the water and rinsed the quinoa, sealed the cooker but put a silicone sling and bowl to hold the quinoa inside.  (Full disclosure, the recipe did not call for this modification but I figured I was the Queen of Pressure Cookers and the sling and bowl would make cleanup a snap).  It seemed to be taking a long time to have quinoa come to full pressure…and then my smoke alarm went off with the “lady” saying there was smoke in the kitchen.  I took the cooker off the stovetop and opened it (it hadn’t started to pressurize).  The silicone ring had burned and the bottom of my pot was blackened and a mess.

Not to worry, between baking soda and salt and Oxiclean, I got the pot back in tip top shape. I regrouped and made the quinoa the old fashioned way and it was simple.  Everything else came together easily and the result was more than I hoped for.  My three grandkids and the five adults loved this dish, and I will be making it many more times this fall and winter.

Thai Quinoa Vegetable Salad

Makes 10 servings

pf-icon2


Salad Ingredients
  • 1 cup quinoa, rinsed well until the water runs clear
  • 1 ½ cups water
  • ½ tsp table salt
  • 1 cup frozen shelled edamame beans, defrosted and dried  
  • 1 large carrot, peeled and shredded on a box shredder
  • ½ English cucumber, peeled, seeded and diced the same size as the edamames
  • 1 bunch (5-6) green onions, cleaned and sliced thinly – use the white and light green parts only
  • 2 ½ cups finely shredded raw red cabbage
Dressing Ingredients
  • 1 Tbsp Tamari sauce
  • ¼ cup fresh squeezed lime juice
  • 2 Tbsp granulated sugar
  • 1 Tbsp peeled and grated ginger
  • 1 Tbsp toasted sesame oil
  • 1 Tbsp avocado oil
  • Pinch of red pepper flakes
  • Garnish Ingredients
  • ½ cup roasted salted peanuts
  • ⅓ cup fresh chopped herbs-we used basil, dill and cilantro combined 
Instructions:

Combine rinsed quinoa and water and salt to a saucepan.  Bring to a boil, then lower the heat to simmer and cover for 20 minutes until water is absorbed.  Take off the heat, fluff and let cool

Add the rest of the ingredients to the cooled quinoa.  Gently add the dressing and taste to see if you want it spicier or sweeter.  You can stop here and keep the salad in the refrigerator for a day before serving. 

Top with chopped herbs and salted peanuts right before serving.

Cooks note:  I really thought this was going to be a salad much like the broccoli cabbage salad I recently posted.  It is quite different and for me, a little more unusual.  

Share
Posted in Salads & Dressings | Tagged | Leave a comment

Bubbie’s Famous Chocolate Cake

Click here to view recipe.

Piece of Cake!

Bubbie is the Yiddish word for Grandmother, and the nickname my children used to call their paternal Grandmother.  Bubbie was quite a character: she was a red headed Iowa born girl with long long slim legs and movie star looks.  She was difficult, messy and a true character.  

Bubbie wasn’t an adventurous cook. In fact I cannot remember any cookbooks she owned other than a paperback Joy of Cooking.  She made the same meals over and over: pot roast, chicken soup, chopped liver and poppyseed cookies.  She managed to add a lot of Crisco and butter to every single dish, and of course everything tasted delicious and was presented in a beautiful way.

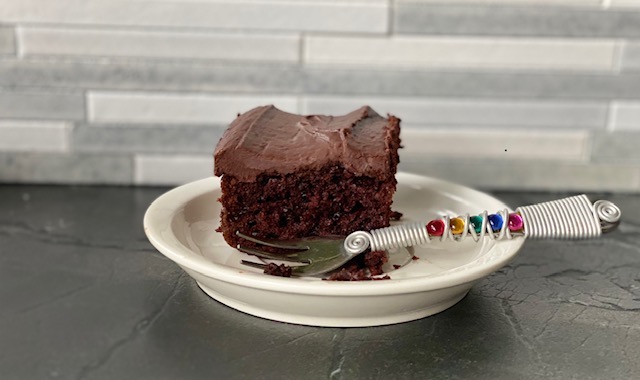
Like most of us, Bubbie had a signature dish.  Hers was chocolate cake.  Every special occasion such as a birthday, a trip or a visit to her in Palm Springs she would end the meal with her chocolate cake.  Her four kids and later the grandkids would devour said cake with gusto accompanied by a tall glass of milk.  She would kind of sort of measure everything, dump it all into a stand mixer, turn the speed to “high” with flour and cocoa flying through the air.  Then she would proceed to talk on the phone for a few minutes and voila, the cake was done.

The devil was in the details as they say.  In this case the “details” happened to be the frosting.  Because she did not measure but rather dumped in powdered sugar and then milk the frosting came out a little different every time.  Everything was stirred wildly in an old metal saucepan.  The frosting was good but not consistent, and a lot of sighing and moaning happened.  It always tasted great but the frosting at times was soft, sometimes it was too solid…and by chance it was often just right.

I watched her make this cake a couple of times and I did take a few notes but the frosting was an enigma.  I should have weighed the box of powdered sugar and the milk, but what did I know?  Fast  forward to the past few years, where my kids and husband demand Bubbie’s Chocolate Cake for various occasions.  I always get very nervous when it comes to the frosting, but this December when I made the cake for my Grandson and his friends I did a lot of searching on the internet, and I have it down.  By the way, my awesome daughter and son-in-law let my 13 year old and his three buddies ate the remaining chocolate cake for breakfast!  I highly approve.

Perfect for Breakfast

Bubbie’s Famous Chocolate Cake

Makes 12 really big servings

pf-icon2


Cake Ingredients
  • 2 cups sugar
  • 2 cups flour
  • 1 tsp. baking powder
  • 2 tsp. baking soda
  • ¾ C cocoa (sift first) – I used Hershey’s justs like Bubbie
  • 2 eggs
  • 1 cup 2% milk
  • 1 cup boiling water 
  • 1 stick melted butter 
Frosting Ingredients
  • 5 squares unsweetened melted chocolate (Hershey’s or Bakers is old school fine)
  • ¾  stick melted butter
  • 2 tsp. vanilla
  • About ¼ cup milk 
  • 2 ½ cups powdered sugar to start PLUS another cup for later (sift before measuring)
Cake Instructions

Preheat the oven to 350 with the rack in the center of the oven.  Use my special nonstick goop or Pam to spray a 9 x 13 metal pan.   

Place sugar, flour, baking powder, baking soda, cocoa, eggs and milk in a mixing bowl. Mix then add boiling water and melted butter. 

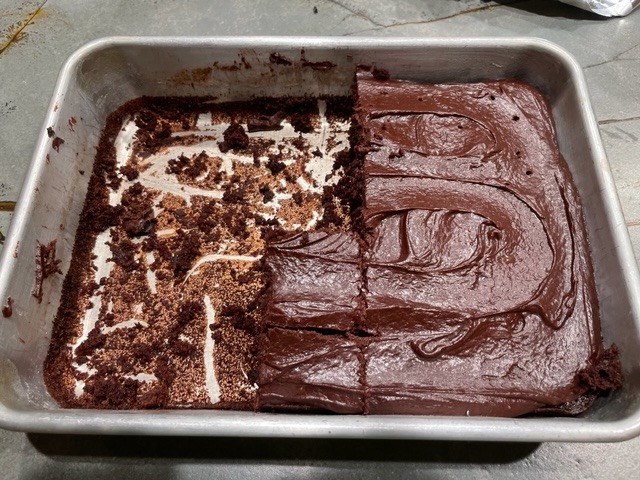
Using a stand mixer or handheld mixer, beat on medium for three more minutes.  Pour into a 9 x 12 prepared pan (the batter is very runny).  

Bake for 35-40 minutes in the middle of the oven.  (I needed 40 minutes).  Remove to a rack and partially cover with a dish towel while it cools so it stays moist.  You can frost the cake after two hours and it may seem a little warm which is OK.  Personally I wait three hours until it is totally cooled down before frosting.

Frosting Instructions

Melt chocolate and melted butter  together slowly in a saucepan, then remove from heat for five minutes.

Meanwhile combine the vanilla, milk and powdered sugar (sift another cup or so to add later if needed) together with a spatula until smooth. I discovered this method when I was trying to make the frosting less daunting!

Add this powdered sugar/vanilla/milk mix to the barely cooled chocolate/butter and beat by hand with spatula or whisk.  Add ¼ more cup sifted powdered sugar at a time until it is loose but tastes good. For me, I had a total of about three cups of powdered sugar.  The frosting should be shiny.

Spread on the cake, covering the entire top.  Cool before covering.  The frosting layer here will be about ⅓ inch thick…it is intense!

Keep at room temp for up to five days.  This recipe also makes 24 cupcakes that will take about 25 minutes to bake.

Share
Posted in Cakes & Pies | Tagged | 2 Comments

Steelhead and Brown Rice Bowl

Click here to view recipe.

Simple & Delish Steelhead Salon & Brown Rice Bowl

This “recipe” came to me at a time when I had all the components in my fridge, and had frozen a side of steelhead that I wanted to quickly use. It hit the spot, and I ate this for lunch three days in a row, sharing only one time. Marinating the veggies is easy and different!

Steelhead and Brown Rice Bowl

Serves 4

pf-icon2


Main Ingredients
  • ¼ cup tamari
  • 1 ½ Tbsp unseasoned rice vinegar
  • 2 Tbsp honey (taste and add more if you want more sweetness)
  • 4 6-ounce servings of skin-on steelhead
  • 1 cup thinly shredded carrots
  • 1 cup persian cucumbers (baby cucumbers, skin on but sliced the long way thinly
  • 1 cup red onion, peeled and sliced into half moons then separated
  • 1 cup thinly sliced colored sweet peppers (red, yellow, or a combo)
  • 1 cup thinly sliced radishes (optional)
  • 1 cup pea pods, optional
  • 2 cups cooked brown rice
  • 2 Tbsp Furikake, optional
  • Black and white sesame seeds for garnish
  • Green onions for garnish (optional)
Vegetable Marinade Ingredients
  • 2 large limes
  • 1 tsp sea salt
  • 2 tsp granulated sugar
Instructions

Combine tamari, rice vinegar and honey in a bowl and whisk. Put half this mixture in a zip lock bag that will hold the salmon and add the fish (pat with a towel first so it is dry). Squish it around to coat the fish and put the sealed bag in the refrigerator for at least 15 minutes or for a few hours if you are rushed. Save the other half to pour over the steelhead once it is cooked.

To marinate the carrots, cucumbers, onions, peppers and radishes, I use the same instructions for my Lime-Infused Bermuda Onions. Shake the mixture and pour a little over the veggies (I do the onion separately so it doesn’t “bleed” onto the other veggies). Put in the fridge and let it marinate a bit, then drain before using.

Remove fish from the tamari mix and discard the marinade. Heat a fry pan or grill and cook the steelhead flesh side down for a few minutes, then flip over so the skin is at the bottom and cook to your liking. Remove the fish from the pan.

To serve: combine brown rice with a little Furikake, which is roasted sesame and seaweed. The furikake is optional but I happen to love the flavor. Cover with the fish and drain the marinated veggies and make sections of each on top of the rice, leaving room for the steelhead. Drizzle the remaining reserved marinade over the fish, sprinkle with sesame seeds and serve.

Share
Posted in Fish & Seafood | Tagged | Leave a comment

Smoke Alarm Steak Salad

Click here to view recipe.

Smoke Alarm Steak Salad (AKA Superfood Bowl)

We have been traveling to Antigua Guatemala fairly frequently over the past several years.  Six weeks in Seattle, a month in Antigua…it is a nice routine that allows me time at home with my family and friends combined with another life of speaking Spanish, sunny weather, volunteering, and living a simple life.

Before each trip I play a game with myself to see if I can use all the fruits, vegetables and perishable/non-freezable items in my refrigerator and cupboards.  There are potatoes and sweet potatoes to deal with, lemons and limes (I zest and squeeze and freeze these), etc. By the time I leave I am generally down to the bare nubbins and I give the remaining usable items to my kids.  

This is how my deconstructed salad came to be.  I had walked the Greenlake path with my friend Barri a couple days before, and we had lunch at Retreat.  I ordered a Chicken and Greens superfood bowl that was really good and contained a lot of the ingredients I ended up using to create my own version at home.  This turned out to be spectacular, if I do say so myself! 

I used sliced steak since I hadn’t had a speck of meat in months, and I had a tiny bit of meat in my freezer.  This is where the title of this recipe comes in. I pulled out my trusty cast iron pan to grill up the steak and, for the first time in recent memory, set off my smoke alarm. Which wouldn’t be such a big to do. However … my daughter in law was here when I made this salad and she told my son Jake about it. So he decided to try it out and wouldn’t you know it – he set off his smoke alarm as well. So – voila … “Smoke Alarm Steak Salad.” but I digress…

If you don’t have (or eat) steak, leftover grilled chicken would be more than fine as well.  Pickled onions and roasted sunflower seeds are always in my fridge, cherry tomatoes came from Jakey Boy’s garden, arugula had been hanging out in my vegetable drawer and I had an odd sweet potato that I peeled, cubed small and tossed with olive oil and chili powder.  

This balsamic salad dressing is one that I make often, here and away from home.  It makes a lot and is simple (requires no kitchen equipment) and the balsamic vinegar doesn’t need to be top drawer.  Keep this dressing recipe handy in your fridge because it keeps for weeks on end.  In fact, I always make a batch at the beginning of a stay in Antigua.  

Accidental Superfood Bowls

Per person for a superfood bowl

Salad Ingredients:
  • Sliced steak or sliced grilled chicken, hot or cold-a handful
  • 2 handfuls of fresh arugula
  • ¾ cup fresh cherry tomatoes, cut in half
  • About 1 tablespoon pickled red onions 
  • ¼ cup roasted sunflower seeds (toasted chopped nuts would also work here)
  • ½ raw sweet potato 
  • 1 Tbsp extra virgin olive oil
  • ½ tsp ground chili powder
  • ½ tsp salt
  • Fresh ground pepper
  • 2 Tbsp chopped fresh herbs (this could be cilantro, dill, basil, tarragon, whatever your heart desires)
Balsamic Dressing Ingredients
  • ¼ cup balsamic vinegar
  • 2 Tbsp honey
  • ½ teaspoon fine salt
  • ¼ tsp fresh ground black pepper
  • 1 Tbsp stone ground mustard
  • ¾ cup extra virgin olive oil
Instructions

For the sweet potatoes – peel and cut into ⅓ inch cubes then toss with olive oil, chili pepper and salt.  Roast at 425 degrees on a foil-lined cookie sheet in your toaster oven for 15 minutes or until brown and soft in the center.  Cool. 

For the dressing, whisk all ingredients together, taste and add more honey or vinegar if needed.  Store in a jar in the fridge for up to a month.  Makes about 1 ¼ cups.

I combine the salad ingredients in sections and toss it together as I eat it.  Drizzle with the dressing.

Share
Posted in Meat, Salads & Dressings | Tagged | Leave a comment

Baked Oatmeal

Click here to view recipe.

Baked Oatmeal

I am always on the lookout for “make ahead” breakfast items.  This includes scones, breads, refrigerated Muesli, egg bites, etc. And then I happened upon a recipe for Baked Oatmeal. I looked further at many different versions of this dish and settled on a recipe in the Joy of Cooking.  It seemed intriguing and within the span of a week I have made it twice, just for the two of us.

I must admit I have eaten this not only for breakfast, but as an afternoon snack when I craved something chewy, healthful and filling.  And today I am taking half my batch to my youngest Seattle grandsons to see how they like it!

Hot Out of the Oven!

Baked Oatmeal

Makes 6 servings

pf-icon2


Ingredients
  • 2 cups old-fashioned rolled oats
  • 2 cups coconut milk – I have made this with regular cow’s milk too but I love coconut milk
  • 1 cup frozen berries or fresh berries if you have them in summer-no need to defrost them if frozen but be sure they aren’t sticking together
  • ½ cup of combined sunflower seeds, pumpkin seeds, and chopped toasted walnuts or almonds.  I used a combo of sunflower, pumpkin seeds and toasted pecans but you could do all nuts or all seeds, your call. 
  • 3 Tbsp pure maple syrup – honey would work too
  • 2 Tbsp shredded unsweetened coconut – optional
  • 4 tablespoons (½ stick) melted butter
  • 1 large egg
  • 1 teaspoon ground cinnamon
  • 1 teaspoon pure vanilla extract
  • ½ teaspoon sea salt
  • 2 tsp sparkly white sugar to sprinkle on top
Instructions

Preheat the oven or toaster oven to 375 degrees and butter an 8-by-8-inch baking dish.

Begin by adding the coconut milk to the oats, stirring and letting them soak while you get the other ingredients ready.  Combine all the remaining ingredients (except the sparkling sugar) in a medium bowl, add to the soaked oats and be sure everything (especially the frozen berries) are evenly dispersed, then pour into the baking dish. Sprinkle top with sparkling sugar if desired.  

Bake until the top is golden and the oats are set, about 25- 30 minutes.

Leftovers can be kept refrigerated for up to five days.  To serve, reheat slightly in the toaster oven or microwave.  I do not add syrup or milk but some might prefer this..

Share
Posted in Breakfast | Tagged | Leave a comment

Pad Kee Mao

Click here to view recipe.

Comforting Pad Kee Mao

You might have ordered Pad Kee Mao, aka “drunken noodles,” at a Thai restaurant, but I’m here to tell you that it is simple to make at home.  In fact, my daughter’s kids did all the chopping and herb stem removal the last time I made this…lucky me. AND they sent me home with a bottle of dressing and all the ingredients prepped and ready to cook.  Let me tell you, that was one of the nicest things anyone has done for me, and I will pay it forward to someone who has no time to shop or prep.

Mark Bittman published the starting point of my recipe in the New York Times and I expanded it and made it to my taste.  In southeast Asia, Pad Kee Mao refers to a mixture of  stir-fried rice noodles, vegetables, and meat, seafood, or tofu, served with a spicy sauce. I have made this with ground lamb, ground beef and ground chicken.  IMHO, Chicken wins…I like the light flavor and we are trying to eat little if any beef in our family.  Because…climate change.  

I also cheat and make extra dressing since I also add more vegetables than the original recipe calls for which soak up more of the sauce  

Huge bonus – this reheats really well if you have leftovers.  In fact, I now keep extra rice stick noodles and prepared dressing on hand so I can whip this up easily when I am in the mood for something salty, sweet and delicious.

Pad Kee Mao, Reconfigured

Serves Four

pf-icon2


Sauce Ingredients
  • ¼ cup fish sauce (Red Boat is my go-to)
  • 1 tsp unseasoned rice vinegar (regular rice vinegar that is seasoned is OK too)
  •  2 tablespoons dark sweet soy sauce (kecap manis) – Uwajamaya has this in Seattle, but my sister made it and here is a recipe I found.
Main Ingredients
  • 6 garlic cloves, peeled and chopped by hand
  • 5 bird’s eye chiles (I used a jalapeno in place of this or just 1-2 chilis since we are spice wusses) Cut the little peppers in half, remove the seeds and mince.  Wear gloves because these are spicy chilis
  • 3 tablespoons avocado oil 
  • ½ cup sliced brown or red onion 
  • 1 pound ground chicken
  • 1 cup very thinly sliced red or orange bell peppers (we use the mini peppers that come in a bag)
  • 2 cups broccoli flowerettes or pea pods (slightly cooked)
  • 12 ounces dried rice noodles (I buy the ones that look like linguini, flat and about ⅓ inch wide.  I cook them in a pot of water until they are al dente, then I rinse and drain.) 
  • 2 handfuls holy basil leaves (or Thai basil, in a pinch)
Instructions 

To make the sauce, place all 3 sauce ingredients in a jar with a lid, and shake, shake, shake. Shake. Note you can make 1 ½ times this if you are worried about it being a little dry.

Roughly chop the garlic and the chiles together. Avoid touching your eyes and wash your hands immediately after chopping chilis or wear disposable rubber gloves to chop them. 

Heat a large straight sided saute pan over medium-high. When it’s hot, add the avocado oil, the slivered sweet peppers, and the onion. Cook, stirring constantly, for a few minutes until everything cooks down.  

Add the ground meat/chicken and a splash of the fish sauce mixture. Cook, stirring to break up the meat, until it is cooked through, about five minutes. 

Add the hot peppers and garlic and stir for about 30 seconds.

Ready to Serve!

Add the noodles, turn the heat to high and add almost all of the sauce (save a spoonful or two to add later). Cook, tossing everything together and separating the noodles if necessary, until the noodles are coated in sauce. Taste, and add more sauce if needed. Toss in the basil and serve.  

Share
Posted in Poultry | Tagged | Leave a comment

The Basic Brownie, Redux

If you know me at all – you know of my love of chocolate. So it shouldn’t come as a surprise that I make these brownies all the time. ALL THE TIME, people. Which caused me to want to share this recipe again after so many years. The smell of the house filling with the smell of chocolate alone is ample reason to whip up a batch. Plus – yet another reason to use my home-made Pam! So easy. Enjoy!

*~*~*~*~*~*~*~*~*~*~*~*~*~*~*~*~*~*~*~*~*~*~*~*~*~*~*~*~*~*~*~*~*~~*~*~

Click here to view recipe.

The Basic Brownie – Beautiful!

I was recently in Portland, Oregon visiting old friends and having dinner, and, in order to prepare dessert, my hostess pulled out a box of brownie mix. “STOP!!!” I screamed. I started rooting around in her cupboard and refrigerator and quickly collected all the ingredients needed to make brownies from scratch. Hallelujah!

For the life of me I don’t understand why anyone would use a brownie mix. By the time you go to the store, buy the packaged stuff with all kinds of additives, then add eggs and oil…you might as well bake with real ingredients and have a fresh, wonderful pan of decadent, chocolaty brownies.

This is a perfect beginner’s baking project – it requires just a few ingredients and a bit of elbow grease – no mixer, just a large bowl and spatula. Brownies can be simple or provide a base for more elaborate desserts – think a scoop of ice cream on top, hot fudge or caramel or peanuts sprinkled about – even some coarse fancy salt on top of the caramel. Now we’re talking!!! Even a little crème fresh and sliced berries alongside is nice…endless possibilities!

I hope you’ll take the challenge and even do a little side-by-side taste test. You’ll never go back to the box!

Basic Brownies

Ingredients:
  • 2 ounces unsweetened chocolate
  • 1 stick butter (1/2 cup)
  • 1 cup less 2 Tbsp granulated sugar
  • 2 eggs
  • ½ tsp pure vanilla extract
  • ¼ c regular flour
  • ¼ tsp salt
  • 1 cup coarsely chopped walnuts (optional)
Instructions:

Grease an 8 x 8 x 2 brownie pan (remember the homemade PAM? Use it!). and preheat oven to 325 degrees with the rack in the middle of the oven.

Cut one stick of butter into 6-8 pieces and put in a 2 quart glass bowl with the two squares of chocolate. Melt in microwave 45-60 seconds, stopping every 20 seconds to stir well. At the end you’ll have to stir vigorously for a few minutes to dissolve the chocolate. If you don’t have or want to use a microwave, melt slowly in a double boiler or pan on very, very low heat so you don’t burn the chocolate.

Crack eggs and beat with vanilla in a separate bowl. Then stir into the melted chocolate/butter mix. Stir in sugar and combine well.

Mix salt with flour to disburse, and then dump into the liquid mix. Use spatula to blend. Stir in nuts.

Place brownie batter into the greased pan, even the top with a table knife and bake for 35 minutes or until done. Cool on rack, and once they are totally cooled sift powdered sugar over the top before serving.

My mom used to cut and wrap these brownies individually in waxed paper, and then put them into a sealed container — perhaps it was a coffee can with a lid? That way, we could take a brownie without a lot of fuss and bother and didn’t get our fingers all over the rest of the batch!

You can easily double this recipe and bake them in a 9 x 12 pan too.

It doesn’t get much easier than this, folks.

Share
Posted in Cookies | Tagged | Leave a comment

One Pot Chicken & Rice Bowls with Peanut Sauce

Click here to view recipe.

Comforting Chicken & Rice with Peanut Sauce

Anytime I see a “one pot” or “one sheet pan” main dish recipe, I am enticed and intrigued.  The original recipe from Bon Appetit piqued my interest – it is hearty, filling, easy and filled with ingredients I love in the fall/winter.

This recipe makes a very large amount of rice, so I saved the leftover rice to use for a stir fry dish.  You will also have lots of extra peanut sauce, but that will keep for a month or so and it is so good as a dip, for chicken kebabs, to drizzle on grains or veggies, etc. I did the garlic and ginger chopping by hand just because I didn’t want to do extra cleanup!

I doctored up my original peanut sauce recipe to make this less sweet and a little more spicy, which I like.  

One Pot Chicken & Rice Bowls with Peanut Sauce

4 servings

pf-icon2


Chicken & Rice Ingredients
  • 6 small skin-on, bone-in chicken thighs (about 3 lb.)
  • ¾ tsp. Sea salt, plus more
  • 2 large shallots, finely chopped or ½ cup of diced red onion
  • 8 garlic cloves, finely chopped
  • 2″ piece ginger, peeled, finely chopped
  • 2 cups high-quality basmati rice, rinsed
  • 2 whole star anise
  • 1 Tbsp. soy sauce
Peanut Sauce Ingredients
  • ½  cup creamy peanut butter like Jif or Skippy
  • 2 Tbsp. soy sauce
  • 2 Tbsp. unseasoned rice vinegar
  • 1 Tbsp Sriracha (You can add more at the end if you wish)
  • 1½ tsp. honey
  • 1 tsp sesame oil
  • 1 Tbsp chili ½sauce (Heinz is fine)
  • Juice of ½ lime
  • About ¼ cup warm water
Salad/Topping Ingredients 
  • 1 English hothouse cucumber, halved lengthwise, thinly sliced on a diagonal
  • 2 carrots, peeled and cut into 3 inch x ½ inch batons
  • 1 cup cilantro leaves with tender stems
  • 2 Tbsp toasted sesame seeds
  • 1 lime, cut into 6 wedges for serving
Chicken & Rice Instructions

Pat the chicken thighs dry on both sides. Trim off any extra fat that hangs down from the edges of the thighs.  Season the skin side with salt and pat it into the skin.  Arrange, skin side down, in a cold, dry medium Dutch oven and set over medium heat. Cook, undisturbed, until the skin is golden brown and crisp and easily releases from the pot, 8–10 minutes. Slide thighs around to different spots (this will ensure even browning) and continue to cook until deeply browned, 3–5 minutes longer. Transfer chicken to a plate. Let the pot cool for about two minutes. Save the drippings to add to the pot when you put the chicken back in.  

Set pot over medium-low heat; add shallots, garlic, and ginger and cook, stirring constantly, until very fragrant but not browned, about two minutes. Stir in rice and star anise and cook, stirring constantly, for about one minute. Stir in soy sauce, ¾ tsp. salt, and three cups of water. Nestle chicken back into rice mixture in pot, arranging skin side up. Increase heat to medium and bring liquid to a simmer. Immediately cover the pot, reduce heat to low, and cook for 25 minutes. Remove from heat and let chicken and rice sit for ten minutes.

Peanut Sauce Instructions

This can be made three days ahead of time – just cover and chill.

While the chicken and rice are cooking, make the sauce. Whisk all the sauce ingredients together until smooth and pourable. You can add more lime juice if the sauce still looks too thick (it should be the consistency of something you can drizzle over the rice and chicken).  

To Serve

When the rice and chicken have been cooked for 25 minutes and rested for 10 minutes, remove the lid from the pot and fluff rice with a fork. Find and discard the star anise. 

Serve the chicken and on top of the rice along with the cucumber and cilantro. Have a wedge of lime for each serving bowl. Drizzle with a good amount of peanut sauce and sprinkle each bowl with about one teaspoon of sesame seeds.  Have extra peanut sauce for guests to add if needed.  

Cook’s note:  I made this to take to my daughter’s family of five – they are huge eaters, and so I bought five pounds of chicken thighs.  I made the recipe as written using five thighs, and I seasoned and roasted the other five thighs in the oven at 425 degrees for 40 minutes.   There is enough extra rice in the recipe as written for the additional thighs.  Easy peasy lime squeezy!

Share
Posted in Poultry | Tagged | Leave a comment

Cauliflower Onion Kugel

Click here to view recipe.

Comforting Cauliflower Onion Kugel

Kugel is a common Ashkenazi Jewish side dish and usually refers to a baked pudding or casserole, most commonly made with egg noodles or potatoes.  The noodle kugel I make most often is sweet and cheesy, but when I was young my mom used to make a noodle kugel with schmaltz (chicken fat) and eggs.  Truth be told, I always choose savory dishes over sweet, unless you are talking about chocolate!

This cauliflower “kugel” is more of a frittata type dish.  It caught my eye because it doesn’t contain any milk, butter or eggs.  I love cauliflower in every form and I love lots of oniony flavor as well, so I decided to try to create a baked cauliflower dish.  

I tweaked the number of eggs, and I had to reduce the amount of olive oil since the first run through seemed a bit too greasy.  

What I ended up with here suits me just fine.  It is good hot, cold out of the fridge and it reheats well for a few days after making it.  

Cauliflower Onion Kugel

Serves 8

pf-icon2


Ingredients
  • 2 cups peeled and diced white onion, finely chopped
  • 1 medium cauliflower (approximately 1.5-2 lbs)
  • 5 large eggs 
  • ½ tsp black pepper
  • 1 ½ tsp sea salt 
  • ½ tsp smoked paprika
  • ½ cup olive oil
  • 2 Tbsp olive oil  to drizzle on top
Instructions

Preheat the oven to 400 degrees with the oven rack in the center.

Remove the outer leaves from the cauliflower and discard. Cut off the tough, round stem at the bottom of the cauliflower and discard.  Wash the cauliflower well so no dirt remains, and dry it well.

Slice the entire cauliflower very thinly (approx. ¼ inch). Most of it will crumble into small pieces, but there should be a few slices for the top of the kugel. Save the more intact pieces of cauliflower, then run a knife through the rest to make the pieces a little smaller.

Combine the onion and crumbled cauliflower in a large mixing bowl. Mix the eggs and ½ cup olive oil along with the black pepper, sea salt, and paprika in another small mixing bowl. Pour the egg mixture over the cauliflower mixture and combine well, so the cauliflower mixture is thoroughly coated in the egg/oil/spice mix.

Transfer to an 8 x 10″ oven safe casserole dish. Place the reserved thin slices of cauliflower on top. Drizzle with the remaining 2 Tbsp olive oil.

Bake for 20 minutes at 400 degrees or until golden. Then cover the dish tightly with aluminum foil and lower the temperature to 325 degrees.  

Share
Posted in Side Dish, Vegetables | Tagged | 9 Comments