Italian Wedding Soup

Click here to view recipe.

Warm & Soothing Italian Wedding Soup

I have been making Italian Wedding Soup for a long, long time and yet, until today, I’ve forgotten to post it here.  Over the years I have changed it a lot; I usually use ground chicken instead of ground beef.  And I add a lot more vegetables than the original recipe to make it more healthful.

This is a very simple, very filling, very beloved soup in our family.  It takes just a few minutes to make, a short time to cook, and it is a “Happy Meal”.  I put enough vegetables in the soup along with orzo and protein which makes it a home run.  

My Italian Wedding Soup

Serves 6

pf-icon2


Ingredients
  • 1 lb ground chicken (or extra lean ground beef)
  • 1 large egg
  • ¼ cup bread crumbs (I often add more if the mixture seems too loose)
  • 2 Tbsp. grated fresh Parmesan cheese (optional) 
  • 1 tsp. dry basil
  • 2 Tbsp finely diced shallot or 4 cloves peeled minced garlic
  • ½ tsp sea salt
  • ½ tsp pepper
  • 8 cups chicken stock (homemade, boxed broth  or Better Than Bouillon is fine, but do not oversalt)
  • 1 cup uncooked orzo pasta
  • 5 large thinly sliced carrots
  • 1 peeled sliced parsnip
  • 1 cup fresh green beans, trimmed and cut into 1 inch pieces-frozen peas would be good too
  • 1 cup peeled and cubed butternut squash, about a cup (optional)
  • 3 cups thinly sliced fresh baby spinach (stems removed before slicing)
Instructions

In a medium bowl, combine ground chicken, egg, breadcrumbs, basil, Parmesan and shallot or garlic.   Form into ¾ inch meatballs and place on a tray.

Boil chicken broth, add all the vegetables except spinach, then put in meatballs and gently stir.  Return to the heat until it boils, reduce to medium heat, cover and cook on medium low for 10 minutes or until orzo is done.  Stir to keep from sticking.  When the time is up, turn off the heat and add the spinach which will wilt nicely.

One Pot Wonder!

Serve with rustic crusty bread!

Note: the orzo will continue to expand and thicken the soup a lot, so if you reheat it you might need to add additional broth or even water.  Taste for seasoning.

Share
Posted in Soups | Tagged | Leave a comment

Greek Style Pasta with Lamb and Bechamel

Click here to view recipe.

Savory Greek Style Pasta with Lamb and Bechamel

Years and years and years ago (my memory fails me here, but probably 40 years ago?) I took a cooking class here in Seattle at Mr. J’s Kitchen Gourmet (may she rest in peace) and learned to make Greek Pastitsio.  I have searched high and low, and probably in one of my moves I tossed the recipe.  

All the cooking gurus I like or follow have their own version.  There was a simple recipe in my tiny Greek cookbook, and Ina, Martha, all the gang have their renditions.  Nothing looked exactly right to me, so I got the urge to make this in the cold, dark winter and just went with it.  I know, that might make some of you uncomfortable but I am in my “happy place” when I can improvise.

Greek Pasticcio traditionally has a substantial layer of tubular pasta, a deep simmered delicious beef ragu and is topped off with a thick and velvety béchamel sauce.  So mine is not traditional and I wouldn’t label it Pasticcio because mine is far from the mark, but the flavors in my dish are amazing in my opinion.  I combined the cooked penne with the meat sauce (I used ground lamb because I do not eat beef) and topped the whole thing with béchamel sauce that wasn’t as thick a layer as most.  Nonetheless, I am very happy with my results.

I ended up making a double recipe of this and browned the meat and onions outside in my electric skillet to keep the fumes out of the house and the spattering and mess happens outside, not in my kitchen.  This recipe is not hard to make but it does involve lots of pots and pans and bowls. And it takes time to prepare each part (boil the pasta, make the meat sauce and make the béchamel) and then assemble the final dish. But people … SO worth it.

I gave a hefty portion to each of my in town families and kept a smaller amount for their parents (me and my husband).  We served ours with a greek salad and some cut up fruit and ate leftovers for a couple of days. I had rave reviews from the adults, teenagers and babies alike!

Greek Style Pasta with Lamb and Bechamel

Serves 8-10

pf-icon2


Main Dish Ingredients
  • 1 lb dried penne pasta
  • 2 pounds of ground lamb
  • 2 cups diced brown onions
  • 4 cloves minced garlic
  • ½ cup red wine (I just used leftover wine)
  • 6 oz can tomato paste
  • 2 cups water (option to add 1 tsp beef Better Than Bouillon optional – I like the additional salty flavor hit) 
  • 1 tsp ground cinnamon
  • ⅛ tsp fresh ground nutmeg
  • 1 tsp dried oregano
Béchamel Sauce Ingredients
  • 6 Tbsp salted butter
  • ½ cup all purpose flour
  • 3 cups whole milk (warmed so it is like baby formula)
  • 2 pinches cayenne pepper
  • ¾ cup grated high quality parmesan/reggiano cheese
Instructions

Preheat the oven to 375 degrees with the rack in the center. 

NOODLES:

Boil a large pot of salted water and cook the penne about a minute less than the package directions.  Drain in a large colander and dump into a large bowl. 

MEAT SAUCE:

In a large straight sided fry pan, cook the ground lamb, breaking it up with a wooden spoon until it is no longer pink, about six minutes.  Add the onions and garlic and cook for another five minutes, stirring once or twice.  Drain this mixture into the same colander in which you cooked the pasta.

Return the drained lamb/onion mixture to the saute pan.  Add the wine and cook until most of the liquid is gone.  Add hot water mixed with Better Than Bouillon if using that, and tomato paste, cinnamon, nutmeg and oregano.  Simmer, stirring occasionally, until it is thick, about 15-20 minutes.  Season with salt and fresh ground black pepper to taste.

FOR THE BECHAMEL TOPPING: 

In a medium sized saucepan, melt butter over medium heat.  Whisk in flour and let it cook for a couple of minutes whisking constantly.  Slowly pour in the milk a little at a time, whisking so it mixes well with the flour/butter.  Cook until mixture thickens and bubbles, about six minutes.  Stir in cayenne and grated cheese.  Set aside.

TO ASSEMBLE:

Combine cooked penne and meat sauce and mix well.  Place in the bottom of an oiled 9 x 13 inch ceramic dish  Pour the béchamel sauce on top and even it out with a knife.  Bake until lightly browned in spots, about 35 minutes.  

Remove from the oven and let it cool for 15 minutes before serving.

Share
Posted in Meat, Pasta | Tagged | Leave a comment

Winter Cranberry Bread

Click here to view recipe.

Wonderful Winter Cranberry Bread

I know, I know…  I posted a previous Cranberry Bread recipe that I used to think was the bee’s knees and I was content. Then the other weekend, my daughter was at my home and showed me the Smitten Kitchen recipe for cranberry bread.  We were both intrigued and that same night, I made this recipe.  

It blew my sox off people.  It is loaded with cranberries and is a bit of a pain to make because one has to slice those little fresh round berries in half.  Let me tell you, it is worth it.  Totally.  I pretty much stuck to the original Smitten recipe other than using less salt, subbing in regular salted butter (it’s all I had) and topping it with sparkling sugar.  

I am making this over and over and if anyone moves in next door (they will) or has a baby or retires, this is what I am bringing.

Quick tip: I slice the cranberries in half the night before and toast/chop my pecans too.  That way it isn’t so daunting to actually make this.  

Winter Cranberry Bread

Makes One Loaf

pf-icon2


Ingredients*

¾ cup (85 grams) raw pecans (put in a preheated to 350 degree toaster oven or regular oven for five minutes.  Cool and coarsely chop)

2 cups (8 ounces or 225 grams) fresh or frozen cranberries, halved

6 tablespoons (85 grams) salted butter, melted and cooled to body temperature 

1 cup minus 2 Tbsp (180 grams) granulated sugar

2 medium-to-large oranges, any variety

½ to ⅔ cup (120 to 160 grams) plain unflavored yogurt (mine is always whole milk

1 large egg

½ teaspoon fine sea salt

1 teaspoon baking powder

½ teaspoon baking soda

2 cups (260 grams) all-purpose flour

Sparkling sugar (about 2 tablespoons), to finish.  I found this with the colorful sugars and such in the baking aisle

*I always weigh my baking ingredients when possible

Instructions

Heat oven to 350°F. 

Coat a loaf pan (8½ by 4½ or 6-cup volume) with my homemade Pam or nonstick spray. For easier removal, you can line the bottom and two long sides with a sling of parchment paper. Note – I shmeared the entire inside of the bottom and sides and corners liberally with my nonstick mixture and it came out of the pan like a dream. No parchment needed.

Toss the halved cranberries and the chopped roasted pecans together.

Place sugar in a large bowl and zest oranges into it. Use your fingertips to massage the zest into the sugar, breaking it up a bit and releasing more fragrance.

Cut these same oranges in half and juice them into a 1-cup measure; you should end up with between 1/3 and 1/2 cup. Spoon in the plain yogurt until the juice reaches the 1-cup line; whisk to combine.

Whisk cooled, melted butter and egg into zest-sugar mixture. Whisk in the orange juice-yogurt mixture. Sprinkle salt, baking powder, and baking soda on top of this batter and and whisk thoroughly into the batter. Scrape the bowl down. Stir in cranberries and pecans. Stir in flour until it is barely mixed in. 

With a rubber spatula, place batter into the prepared loaf pan and smooth out the top with a knife.   Sprinkle the top with sparkly sugar.

Ready for the oven!

Bake mid oven for  60 minutes or longer until a toothpick inserted into the loaf comes out batter-free. Leave it in the pan on a cooling rack until lukewarm, or at room temperature. Gently shake the pan to release the sides and remove the bread to the rack.  Slice into ½ inch pieces to serve.

Share
Posted in Breads | Tagged | Leave a comment

Mile High Pumpkin Bread

Click here to view recipe.

Marvelous Mile High Pumpkin Bread

Some members of my family love everything pumpkin: pumpkin scones, pumpkin muffins, pumpkin pie, pumpkin risotto and of course pumpkin bread.  

When I saw Smitten Kitchen’s pumpkin bread recipe, which uses an entire can of pumpkin, I was intrigued because most pumpkin breads with canned pumpkin never use the entire 15 ounces, and I end up with just a little puree leftover that I often toss out.  This recipe produces a tall TALL cinnamon-crusted bread that looks like you baked it in a too-small pan.  I changed the recipe and like my version, of course.

I should mention that I brushed my Pan Release Mixture into the bread pan, especially the corners and even the top rim since the bread rises tall and proud and would most likely stick without a good coating.  

In the original recipe, Deb says “You can also make this as muffins. It should make about 18 standard ones and you can distribute the cinnamon sugar (perhaps make 1 ½ tablespoons sugar and 1 ½ teaspoons of cinnamon worth) across the tops before you bake them. They should bake for 25 to 30 minutes.”  I have not tried muffins since I only own a 12 muffin pan!

Mile High Pumpkin Bread-see notes if you prefer to make cupcakes plus a nice loaf of bread!

Serves 10

pf-icon2


Bread Ingredients
  • 1 15-ounce can pumpkin puree (NOT pie filling) 
  • ½ cup avocado oil 
  • 3 large eggs
  • 1 ½ cups (300 grams) granulated sugar (I did the sugar by weight)
  • 1 ½ teaspoons baking powder
  • ¾ teaspoon baking soda
  • ¾ teaspoon fine sea or table salt
  • 1 teaspoon ground cinnamon
  • Heaped ¼ teaspoon fresh grated nutmeg
  • Heaped ¼ teaspoon ground ginger
  • 2 ½ cups (295 grams) all-purpose flour (I always measure flour by weight)
Topping Ingredients
  • 1 tablespoon granulated sugar or sparkly sugar (I prefer a coarser sugar)
  • 1 teaspoon ground cinnamon
Instructions

Heat oven to 350 degrees F.   Brush a 6-cup loaf pan (9 x 5 at the top) with my Pam recipe or coat it with nonstick spray. NOTE: my pan release mixture works wonders here!

In a large bowl, whisk together pumpkin, oil, eggs and sugar until smooth. Sprinkle flour, baking powder, baking soda, salt, cinnamon, nutmeg, ginger over batter and whisk until well-combined. 

So easy!

Scrape into the prepared pan and smooth the top. In a small dish, or empty measuring cup, stir sugar and cinnamon together. Sprinkle over top of batter.  I kind of pat the cinnamon sugar mix into the batter with my hands. 

Bake bread for 65 minutes until a tester poked into the top and center of the bread comes out batter-free.  I have a long metal cake tester for this purpose.  

I cool this in the pan for an hour, and then carefully remove it onto a cooling rack.  Some cinnamon sugar will fall off, but do not worry. 

The cake/bread keeps at room temperature , wrapped in foil or waxed paper for a few days or you can freeze or gift half!

PS: The last time I made this, I added 1 cup of cooled toasted coarely chopped pecans.  I love this version too.  And finally, I took an ice cream scoop to fill a 6 unit muffin tin , each 2/3 full.  The rest went into the loaf pan.  Much easier and honestly better for me. The cupcakes took 25 minutes to bake and the loaf pan took around an hour!

Share
Posted in Breads, Breakfast, Dessert | Tagged | Leave a comment

Homemade “Pam”

Click here to view recipe.

Magical Homemade “Pam”

For a long time, I used to rub Crisco and then shake a bit of flour on the insides of my cake pans and bread pans so the final product would easily release after the baking was finished.  It was kind of a mess, and I graduated to Pam in a spray can.  If you know me, you might know that I dislike aerosol anything — hairspray, spray oils, spray deodorant… just STOP.  Something about it, besides not being good for the environment, creeps me out.

Then along came a recipe for a mix that acts as a paste to brush on bundt pans, cake pans and bread pans.  Yes please!

This mixture keeps at room temperature for up to three months.  The ratio is 1:1:1 and I make a small amount at a time.  I am so happy to have this, particularly for intricate bundt pans or cake pans where the batter is very sweet and sticky.  So far, nothing has been even a bit hard to remove from the pan and I never worry about a cake or bread crumbling or sticking, ever. 

Homemade “Pam”

pf-icon2


Ingredients
  • ⅓ cup avocado oil
  • ⅓ cup Crisco (I used the Crisco sticks since they are pre-marked with how much to slice off)
  • ⅓ cup all purpose flour, sifted 
Instructions

Heat oil and crisco slightly in a small pan over low heat and stir in flour.  Whisk together until well combined and pour into a glass jar with a lid to store in your baking cupboard.  

Using a pastry brush, stir the mix and brush this liberally to coat the pans when you bake cakes or muffins or sweet breads in lieu of Pam.  You will thank me later!

Share
Posted in Odds & Ends | Tagged | Leave a comment

Lemony Red Lentil Soup

I decided to post this one again because I’m just starting to feel Fall in the air and I’ve been cooking this up to stave off the cold. Enjoy!

Super Easy Mise en Place for Red Lentil Soup

~*~*~*~*~*~*~*~*~*~*~*~*~*~*~*~*~*~*~*~*~*~*~*~*~*~*~*~*~*~*~*~*~*~*~*~*~*~*~*~*~*~*

Click here to view recipe.

Luscious Lemony Red Lentil Soup

In February, I returned to Seattle after spending a month in Guatemala.  36 hours later, I flew to meet my sisters in the Northern Territory of Canada to see the Aurora Borealis, then returned home five days later to cold, snowy winter weather.

I live on a very long, steep hill which for days has been used as a ski slope!  Snow is a rare occurrence in Seattle, and everyone gets very amped up about winter weather–at least initially.  We don’t have a lot of snow plows or salt to melt the ice, so aside from the streets with bus routes, the majority of our roads are filled with snow.

Snowy Seattle Streets

Me?  I don’t love the snow or cold so much.  That said – I know how to maneuver. I grew up in Iowa and experienced my share of snowy winters, so I am perfectly capable of driving and surviving the cold.  Even so, I find most Seattleites aren’t such terrific drivers on snow and ice, and it worries me to attempt to drive most places. But even had I wanted to try to get behind the wheel, I awoke to find my hill blocked off.  Of course I considered walking, but even schlepping around with yak tracks on my shoes on my steep hill was challenging. Meanwhile, my condo neighbor was outside shoveling every few hours, taking care that we would all be safe.  He skied down our hill and then dropped off a bag of oranges for me.

I figured I had enough food and provisions to get by until it warmed up and, after foraging through my cupboards and fridge,  I decided to make a pot of lemony red lentil soup. The ingredients are all things I keep around my kitchen. All I lacked was stuff for the garnish (cilantro, avocado, tomato) which is why my photo doesn’t look so pretty.  Use your imagination – it would look nice with some green and red on top.

And of course, I shared some of this delicious soup, along with my homemade seeded crackers, with my kind neighbor to show my appreciation for his hard work.


Lemony Red Lentil Soup

Serves 4-5

pf-icon2


Ingredients
  • 3 tablespoons olive oil
  • 1 large brown skin onion, peeled and chopped ¼ inch
  • 3 garlic cloves, peeled and coarsely minced by hand
  • 1 tablespoon tomato paste  (remember the tube?)
  • 1 teaspoon ground cumin
  • ¼ teaspoon sea salt
  • ¼ teaspoon freshly ground black pepper
  • Pinch of ground chili powder
  • 1 quart chicken broth-I had some homemade stock in the freezer but Better than Bouillion is fine too
  • 2 cups water
  • 1 ⅓ cup red lentils
  • 2 large peeled carrots, diced  ¼ inch
  • Juice of 1 lemon (about 3-4 tablespoons)
  • 3 tablespoons chopped fresh cilantro to garnish
Instructions

In a large soup pot, heat three tablespoons oil over high heat until it shimmers.   Add onion and garlic, and sauté until golden, about four minutes.

Stir in tomato paste, cumin, salt, black pepper, and chili powder and keep on the heat, stirring, for two minutes more.

Add broth, two cups water, lentils, and carrots. Bring to a simmer, then partially cover pot and turn heat to medium-low. Simmer until lentils are soft, about 30 minutes. Taste and add salt if necessary.

Turn off the heat.  Use an immersion blender right in the soup pot and pulse the soup so that some smoothes out and the rest remains chunky so you have a little texture.

Add in lemon juice first and taste to see if it needs more salt.  Have some garnishes on the side: diced avocado, halved cherry tomatoes, chopped cilantro, sour cream or Greek yogurt…use your imagination.   You can drizzle a little olive oil at the end as well. Serve with a nice salad and some bread or crackers. MMMMMMMMMMMM

Share
Posted in Soups | Leave a comment

Sesame Cookies

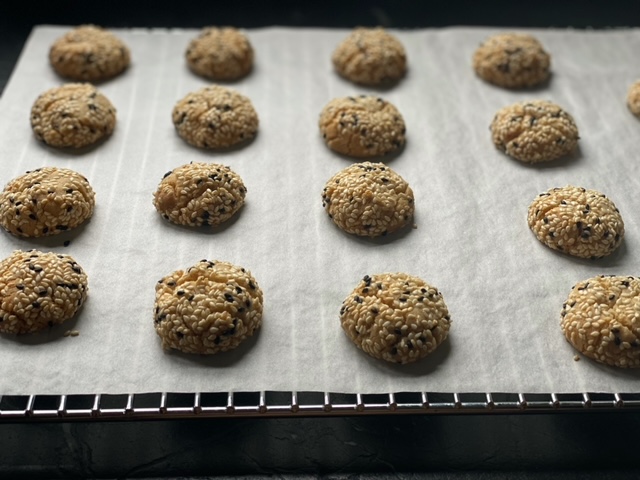
I originally posted this recipe back in October of 2012! They came to mind because I love baking them for the Jewish holidays so my house has been smelling of sesame of late. This time I mixed black and white sesame seeds, which is a lot prettier, especially on a cookie platter.  I also skipped the first refrigeration step and just balled them and rolled them in the seeds, put them on a quarter sheet pan in the fridge for an hour then baked.  Voila! Delicious.

Sensational Sesame Cookies – with black and white sesame seeds.

~*~*~*~*~*~*~*~*~*~*~*~*~*~*~*~*~*~*~*~*~*~*~*~*~*~*~*~*~*~*~*~*~*~

Click here to view recipe.

Marilyn at Jaffa with Tel Aviv in the background

Our airplane bound for Israel this past September landed in the beautiful capital of Tel Aviv. I had never really spent much time in this cosmopolitan city so we quickly checked into our little hotel near Dizengoff Square and started on foot to explore the area. Around the corner was Amelia, a wonderful cafe serving delicious, traditional Israeli fare. We walked along the beach to Jaffa, an ancient port city and the place where “Jonah and the Whale” purportedly transpired – although we didn’t see whales. The sun was blistering and hot, and for the two weeks we vacationed in Israel I lived in tank tops, sun dresses and sandals.

The food in Israel? Let’s just say (and I am whispering this) … it is my favorite food of all time and of all places. Yes, I love it even more than Italian food. I mean, oranges being squeezed and sold as juice to passersby, vegetables of every shape and size – prepared in countless ways, fresh chopped salads and cheese for breakfast. Oh yeah, I loved it. And, to my delight, we found sesame seeds everywhere and in many dishes – sesame sauce, humus or just sesame seeds sprinkled about. I love sesame in all its forms: sesame oil, sesame seeds plain or roasted and sprinkled on top of olive oil coated vegetables, Halvah , Tahina (a traditional paste made from sesame seeds – commonly called “Tahini” in the United States )… you name it.

Halvah at a Jerusalem market – a local sesame seed/honey confection (pistachio is my favorite!)

In the upper Galilee (that you will read about in next week’s post), we saw Tahina being made up close and personal – watching toasted sesame seeds transformed before our eyes into the most decadent paste – we even tasted it as it dripped off the machine. All I can say is: wow. Intense. Tahina by itself is a little bitter tasting so it needs added sweet or savory items so that it can be the star.

I happen to also love peanut butter cookies, so I resurrected this recipe that originally came from Gourmet Magazine before it’s premature demise. As usual I have rewritten the directions and tweaked the quantities. I find that these tahina and sesame seed-laden little gems add some interest and beauty to a traditional cookie platter. As I have written before I am not one to make a fuss or take a long time to make or bake a thing. And these happily fit into my parameters: they are easy, different and fun to make. Who says? I says!

Says-a-me Cookies

Says–a–me Cookies

Yield: almost 2 ½ dozen. OK, I ate some of the raw dough … forgive me. After all, it doesn’t contain raw egg.

pf-icon2

Ingredients:
  • 1 stick (1/2 cup) salted butter, room temperature
  • 1/2 cup granulated sugar
  • 1/2 cup well-stirred Tahina – room temperature (I use Joyva brand roasted Tahina)
  • 1 teaspoon vanilla extract
  • 1 1/4 cups all-purpose unbleached flour
  • 1/2 teaspoon baking powder (aluminum free double acting)
  • ¼ teaspoon salt
  • ½ cup or a little more sesame seeds to roll the cookies
Instructions:

In a small bowl, whisk together flour, baking powder, and salt.

With an electric mixer, beat the butter until light and fluffy, about one minute. Add the sugar and keep mixing for another two minutes until pale yellow. Add vanilla and Tahina and continue beating for another 30 seconds.

Reduce speed to low and add flour mixture in two batches, mixing until combined. Transfer dough to a sheet of plastic wrap and press into a disk–cover with plastic wrap. The dough should come together well and feel like soft playdough. Chill the mixture for 15 minutes in the refrigerator.

Remove the saran wrapped packet from the refrigerator and form smooth, 1-inch balls of the dough and roll each ball in sesame seeds – ensuring each cookie is coated all over. Place the formed, rolled balls onto a waxed paper lined small tray, cover well with foil and refrigerate another hour.

Preheat oven to 350°F. Line two large baking sheets with parchment paper.

Place dough balls (they will now be firm) onto the cookie sheets, leaving three inches between the balls. I fit 12-15 on each cookie sheet.

Bake, with racks in the middle of the oven and switch the position of the two sheets halfway through baking. The cookies should be puffed and starting to crack, 12 to 15 minutes total.

Remove from the oven and cool on cookie sheets 10 minutes (cookies break easily), then transfer from parchment to a rack to cool completely. Eat and enjoy.

Notes:

These taste like halvah so if you are a halvah lover MAKE THEM!!

If you have a convection mode on your oven, bake the cookies at 330 convection for 14 minutes. You won’t need to switch the position of the cookie sheets with this feature.

The cookies keep for up to five days in a sealed container at room temperature or can be frozen for up to two months.

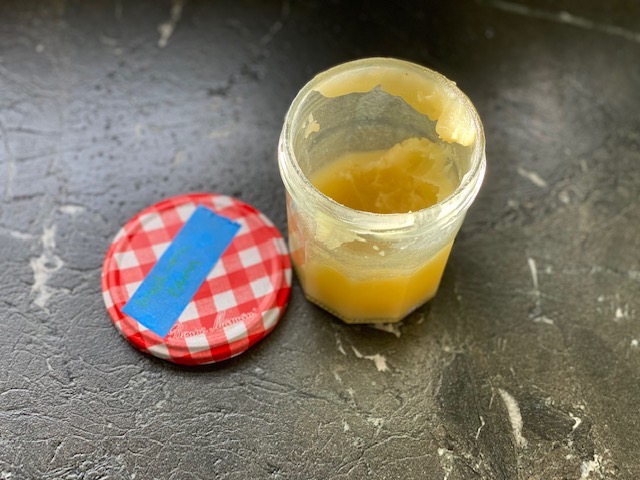
If the Tahina has separated when you open the jar or can, try to whisk it to emulsify. If you are impatient (like me) you can also dump the contents of the can into the food processor to combine. Scoop back into the can or jar and measure away.

For added depth of flavor, toast the sesame seeds before rolling the cookies.

Share
Posted in Cookies | Leave a comment

Broccoli Cabbage Salad

Click here to view recipe.

Broccoli Cabbage Salad

If you are Jewish, the fall season brings a lot of holidays and family meals.  Here in Seattle, the large meals usually take place at my daughter’s home since she has a large eating area and a lot of chaos on a good day.  She loves hosting the family no matter what the occasion.

This year, though, she was in the middle of a remodel, there were concerns about gathering indoors, and the bottom line is that I ended up hosting one of the family dinners.  We scaled it back to a smaller number and felt pretty good since everyone eligible is fully vaccinated.  

I made the main course, side dishes and cookies but sent the following recipe – a riff on a restaurant salad we once had – to Rachel and asked her to make it.  Because it contains broccoli and both red cabbage and arugula, it checked the boxes for both salad and vegetable!

This turned out to be the perfect salad for our meal.  I will keep it in the queue for winter since all the ingredients are easily available then.  The extra miso dressing is excellent along with any type of green salad or even drizzled over fish.

Broccoli Cabbage Salad

Serves 6

pf-icon2


Salad Ingredients:

5 cups broccoli florets, approximately the same size

2 tablespoons extra virgin olive oil

1 clove of garlic, grated (use your microplane!)

Big pinch of red pepper flakes or more depending on your heat tolerance

Salt and pepper

¼ of a medium-small head of red cabbage, very thinly sliced so it appears shredded

2-3 big handfuls of baby arugula

½ cup dry roasted roasted salted peanuts, roughly chopped (I used dry roasted)

2 large scallions, thinly sliced, just the white part

About 4-5 Tbsp miso dressing below (keep the rest on the side)

Miso Dressing Ingredients:

2 tablespoons white miso

1 tablespoon avocado oil

1 tablespoon pure maple syrup

2 tablespoons unseasoned rice vinegar

2 tablespoons fresh lime juice

1 teaspoon sesame oil

2 teaspoons tamari sauce 

Instructions:

Preheat oven to 425°F with the oven rack in the middle.

Place the broccoli florets on a parchment-lined rimmed cookie sheet.  Toss together (use your hands) with the olive oil, garlic and red pepper flakes to coat and add about ½ tsp salt and ¼ tsp fresh black pepper.

Roast the broccoli etc. for 25 minutes – the broccoli should still have a little “al dente” feel to it even though it has brown edges. Let it sit at room temperature.

In a large salad bowl, combine the cooked broccoli, raw arugula and raw red cabbage.  Add about two tablespoons of the dressing and gently toss to coat. Taste it and add more dressing as needed.  Serve at once sprinkling the top with the roasted peanuts, sliced scallions, and more dressing on the side.

PS: Even though the peanuts get soggy and the salad wilts, it still tasted mighty fine the next day for lunch!


Share
Posted in Salads & Dressings | Tagged | Leave a comment

One Bowl Bittersweet Chocolate Bar Cookies

Click here to view recipe.

Wonderful One-Bowl Chocolate Chip Bars!

It is summer and I seem to eat fewer baked goods – choosing instead a lot of fresh local fruit.  However, at times a girl has to have her chocolate.  And this girl doesn’t like to fuss with baking sheets of cookies.  Therefore, I went on a hunt for some chocolate chip bar cookies so everything could be baked in one fell swoop.  Along came this Allrecipes “Kirsten’s Dark Chocolate Chip Cookie Bars”, and I went for it since the entire batter can be made in one bowl.

Kirsten, your basic recipe sounded enticing but I couldn’t help changing things up ever so slightly.  The main difference is that I browned my butter to give the final bars a more interesting flavor.  

I baked these in a 9 x 12 cake pan and ended up with 24 pretty large bars, half to keep and half to gift.  

One Bowl Bittersweet Chocolate Bar Cookies

Makes 24 pieces

pf-icon2


Ingredients
  • 2 sticks melted salted butter, browned 
  • 1 cup dark brown sugar
  • ½ cup granulated sugar
  • 2 large eggs, beaten
  • 1 tsp pure vanilla extract
  • 2 cups all purpose flour
  • 1 tsp baking soda
  • ¼ tsp baking powder
  • 1 tsp fine salt
  • 2 cups (1 package) bittersweet chocolate chips (I used Ghirardelli)
Instructions

Preheat the oven to 350 degrees  with the oven rack in the center.  Spray a 9 x 13 inch cake pan and line the bottom with parchment paper.

To make perfect brown butter – here’s a YouTube video that teaches you all the tricks!

Mix melted browned butter with brown sugar and white sugar in a bowl.  Add the eggs and vanilla.  Stir until creamy.  Stir flour, baking soda, baking powder and salt together well and combine with the creamy butter mixture until well combined.  Fold in chocolate chips.  

Scrape the batter into the prepared cake pan and even out the top.  Bake in the preheated oven for 35-40 minutes until a cake tester or toothpick comes out clean  Cool well.

Easy Peasy Cutting

I then loosen the edges with a spatula and cover the cake pan with a cutting board, then flip the entire pan upside down so when you lift up the cake pan the bottom side of the bars are facing up.  This is a much easier way to cut bar cookies!  Carefully cut into 24 pieces.  

Bars can be covered well and kept at room temperature for three days or frozen for up to two months in a sealed container. 

Share
Posted in Cookies | Tagged | Leave a comment

The New Lunch Box

The Perfect (anti-pandemic) Sandwich

I don’t know a single soul whose life has not changed the past year and a half due to the global pandemic. That is intentionally typed out in light grey letters because my husband and I have chosen not to dwell on all the changes and negatives, but instead to just try to live our lives – albeit vaccinated.

Some of the ways our daily routines have been impacted?  I have resorted to a delivery service for many of my heavy grocery items such as milk, eggs, juice…things I don’t feel like hauling up the steps to my front porch.  At first delivery was out of precaution but now it is part of my routine. From time to time, I do go to farmers markets and my neighborhood small grocery store – I just can’t help getting my hands on fresh produce and the like..

Amazon?  I loved it before 2020 and I love it even more now.

Personal beauty needs?  I have never been a person consumed with my looks or with having facials, manicures and the like. I don’t wear pretty nail polish on my hands anyway and I file and paint my own toenails.  Haircuts have become few and far between – and that is OK. I love feeling self-sufficient.

Customer service?  I am talking about help from places such as my bank or from the airlines.  I don’t like it one bit, but I now expect to be called back hours later or not at all, and the representatives who are there to answer phones do not seem motivated to do a good job.  Yesterday my husband called to schedule a cardiology appointment and was told he would get a call back, and that he was the 10th person in line.  Sheesh.

Meals?  I really do not miss restaurants at all in Seattle (shhh).  A few places I used to go closed their doors over two years ago anyway, and now prices have become so high that the few times I have picked up or had food delivered, I couldn’t help but think how I don’t like paying, say, $50 including tip for grilled cheese sandwiches and a tiny cup of soup for two.  Yes, I feel awful for restaurant owners!  I feel horrible for all the small businesses here and elsewhere who have been forced to close as well.  Not buying prepared food from restaurants means that we are making three meals a day, seven days a week for the two of us – not to mention extra food I deliver to family and friends.  For me, it isn’t work.  For me, cooking is a pleasure and I am pretty efficient and creative to boot. 

Which brings me to the lunch box.  For a long time now, when we are in and out of the house, I’ve made a container of lunch food early in the day to grab on the go.  Usually there are sandwich halves, some type of yogurt or cottage cheese, fruit, cut up vegetables, homemade treats…you get the picture.  In all fairness, my husband does most of the clean up and all the household repairs as well so we are equal opportunity.

Last week I was feeling more creative than usual.  I took some sweet, dark, store-bought bread and slathered one half with grainy mustard.  I topped that with three slices of extra thick sliced Tillamook sharp cheddar cheese and covered it with thinly sliced dill pickles and caramelized onions I made earlier in the week.  Topped with another slice of bread, this concoction was grilled on the stovetop until the cheese was melty and the bread was crunchy.

Let me tell you, this is worth repeating.  Plus, it’s nice to know that good things do come out of a challenging year and a half.

Share
Posted in Odds & Ends | Tagged | Leave a comment