Baked Greek Gigante Beans

Click here to view recipe.

Glorious Greek Gigante Beans

Years ago, I can’t recall exactly when, there was a good Greek restaurant called Plaka near my home. The owner of said restaurant was part of a large Greek family who all worked at the place, making authentic Greek food. One of the items on their menu, Greek Lima Beans, turned out to be one of my favorites and I vowed that someday I would try my hand at recreating this dish.

Fast forward to June of 2021.  For the past year and a half, I have cooked more than ever, more than I would care to admit.  And during one of my cooking sprees, I picked up some Butter Beans, another name for Large or Gigante Lima Beans.  I read the directions for Greek Baked Lima Beans on the back of the package, pulled up a couple of recipes I saved on my computer and started in.  I combined recipes of course, following the package but adding some warming spices and extra tomato and lemon and a dab of honey as suggested on various other sites.  

Such Simple Ingredients!

Version 1.0 ended with beans too soft because I made the beans in my pressure cooker to save time, and they overcooked so the entire dish was mushy but with good flavors. Version 2.0 ?  I followed the cooking instructions but changed the flavor profile a little and added a bit more juice.  Verdict? It is good!  My husband/chief food critic said I hit the mark and not to change a thing.

If you are a bean aficionado like me and like Mediterranean flavors, add this to your repertoire.   It is rich enough to count as a main dish, especially if you serve it with some good crumbled feta cheese and a drizzle of fruity olive oil at the end.  It is more of a thickened bean/vegetable stew! If you do not like beans, forget it.  Move on to something else!

Baked Greek Gigante Beans

Serves 4-6

pf-icon2


Ingredients
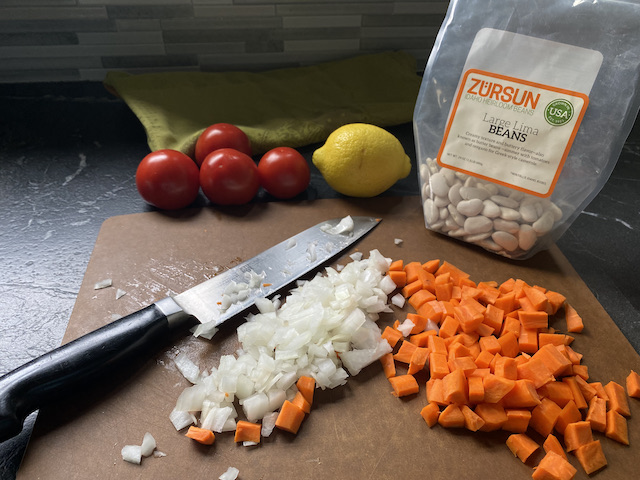
  •  8 ounces dried, large lima beans
  • ¼ cup extra virgin olive oil
  • ½ of a large brown skinned onion diced ¼ inch
  • 1 large peeled carrot diced ¼ inch
  • 4 Campari tomatoes diced ½ inch (no need to seed or skin the tomatoes)
  • About 1 ½ tsp sea salt and ½ tsp fresh ground black pepper
  • Juice of half a lemon
  • 2-3 Tbsp chopped fresh parsley
  • 1 tsp dried oregano
  • 1 tsp honey
  • ¼ tsp ground cinnamon
  • 1 pinch of ground cloves
  • Crumbled feta
  • High quality olive oil 
Instructions

Soak the beans overnight – covered by about three inches of water – in a large enough pot to hold the final dish, hopefully one that is stovetop and oven safe.  Mine was 3-4 quarts.  The next morning discard any of the papery membrany outsides that float to the top then drain and rinse the beans with cold water.  Cover the drained beans with cold water two inches above the surface of the beans.  Bring to a boil, turn down the heat so it is barely simmering, uncovered.  Continue to cook without covering the pot for 30-40 minutes until the beans are soft but not overcooked.  Reserve ¾ of a cup of liquid in which you cooked the beans.  Drain the beans and set aside while you continue in this same pot.  Wash and dry the pot. 
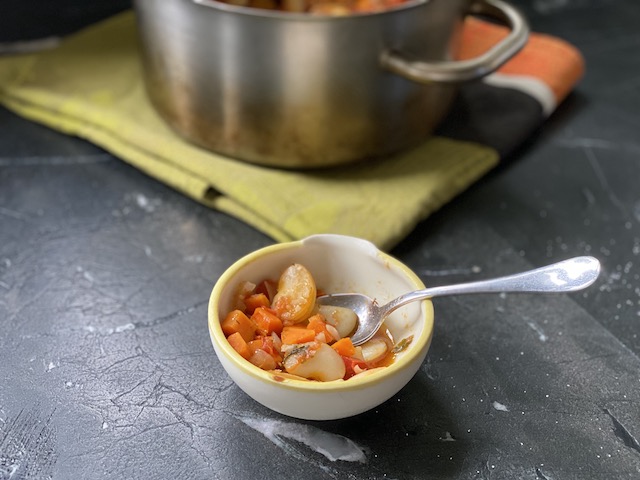
Ready to Eat!

Preheat the oven to 325 degrees with the rack in the center of the oven.  

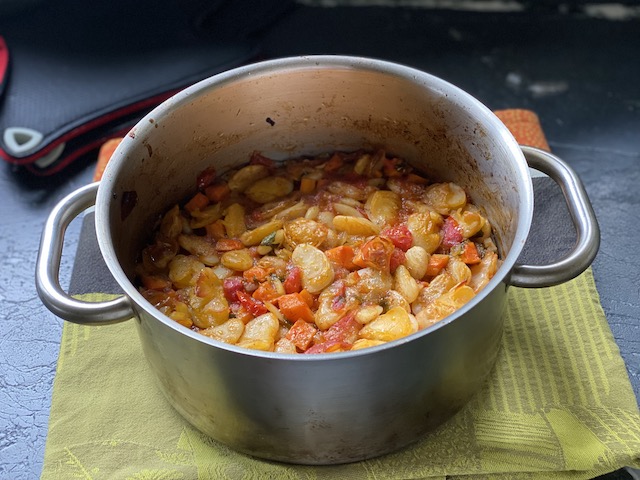
Heat the same (now clean) 3-quart pot (as long as it’s oven safe) and then add the olive oil.  Add the onion and carrot and slowly sauté for five minutes.  Add the diced tomato and cook slowly for another five minutes.  Add in the drained beans along with the reserved bean liquid.  Add the lemon juice, parsley, oregano, honey, cinnamon and ground cloves.

Stir to mix everything together. Place the pot without a lid into the preheated oven for 75 minutes.  The top will form a “skin” and you will notice some bubbling as it thickens.  Remove from the oven and stir after 15 minutes, correct the salt and pepper if needed.  Serve warm in a sauce dish topped with feta cheese and good olive oil. 


Share
Posted in Side Dish | Tagged | Leave a comment

Stovetop Fish Cakes

Click here to view recipe.

Fabulous Fish Cakes

I don’t know about you, but I love fresh fish.  Seattle is the right place for me — it is easy to find seasonal fresh fish in the fish markets here.  When I have my family for dinner, I usually prepare some type of seafood since none of us eat pork, we eat very very little red meat and we are sick of chicken.  

This past week I had my two kids who live here along with their households for Friday night dinner.  There were six adults, four kids who could feed themselves and 10 ½ month old twins who eat but need to have food cut up in tiny pieces.  My daughter came over in the morning and showed me how to sous vide the halibut I bought, then arrived early for dinner to demonstrate the searing of said fish.  Let me tell you, it was really buttery and moist!  I made six pounds of fish and thought I would have a lot left over, yet when all was said and done I had less than a pound of halibut left (the 5-year old girl ate three servings of fish, the babies did pretty well too, and the older kids ate like they had never seen food before). 

For the leftover fish, I pulled out my recipe for crab cakes, substituted shredded halibut chunks and in 10 minutes the patties were resting in the refrigerator, ready to be floured and fried and eaten with either a squeeze of lemon, some homemade aioli or homemade blueberry salsa from the night before.  

This basic recipe can be used with previously cooked salmon, crab meat (it is horribly expensive here so that is a non starter) or any other pre-cooked white fish that is a little firm.  

Stovetop Fish Cakes

Makes 4-6 cakes

pf-icon2


Fish Cake Ingredients
  • 1 lb halibut, shredded a bit with a fork 
  • 1 large leek, chopped into ¼ inch pieces (½ cup). You could use shallots but Jake had leeks growing in his garden!
  • 1 Tbsp fresh minced dill, parsley, basil  or cilantro (your choice)
  • 1 ½ tsp Old Bay seasoning
  • 2-4 Tbsp dry bread crumbs – start with 2 Tbsp and add more if you need the mix to stay firmer
  • ¼ cup mayo (mine is homemade)
  • Salt to taste but I didn’t add any
  • fresh ground white pepper
  • 1 whole egg
Frying Ingredients
  • ¼ cup flour
  • ¼ cup extra virgin olive oil
Instructions

Mix halibut, leeks, fresh herbs, Old Bay, bread crumbs and mayonnaise in a small bowl – leave the lumps of fish a little intact.  Season with salt if needed and pepper to taste.  Carefully add one beaten egg just until the mix stays together.

Divide the mixture into 4-6 patties, about 3 inches across by 1 inch thick.  Put on a waxed paper lined rimmed tray and place in the refrigerator, covered with plastic, for  30 minutes or as long as 24 hours.

Ready for cooking

Put flour on a dinner plate. Lightly dredge each side of the fish cakes. Heat oil in a large nonstick fry pan over medium-high heat until hot but not smoking. Gently lay the chilled fish cakes in the skillet; pan-fry until the outsides are crisp and browned, 4 to 5 minutes per side. Serve hot, with or without salsa or aioli or sauce of your choosing.

Share
Posted in Fish & Seafood | Tagged | Leave a comment

Fantastic Farro Fruit Bowls

Click here to view recipe.

Four Fantastic Farro Fruit Bowls

Seattle’s average summer temperatures hardly ever reach 80 degrees, so in June when it was reported that we expected daytime heat to the tune of 95-110 degrees over a three to four day period, I couldn’t believe it.  But, knowing how crazy the weather is around the world, I finally did believe it and initially panicked that we didn’t have air conditioning in my 110 year old house, that we only had one medium sized fan and that there was no way I was firing up the oven or stovetop.  

I decided to plan ahead and to cook whatever we might need for a four-day period here.  A little grilled chicken, some egg bites, lots of fruits and vegetables that could be eaten at room temperature, grab and go breakfast bowls, beans…and then I had an idea. 

I remembered a recipe from about five years ago written by Ellie Krieger for a Layered Farro salad, aso I searched through my documents and was happily able to find it pretty quickly. Her formula included grapes for the fruit, and I chose to use Rainier cherries since our CSA box had arrived with a lot of this local delicacy.  I switched out the original kale with arugula since my husband is not a kale fan and we happened to have fresh arugula.  I used marinated red onions because I always avoid raw onions.  

Finally, I cooked the farro in my pressure cooker because who wants to spend an hour toiling over a hot stove when this took 12 minutes?  I made one cup of dried farro and set aside half of it when it was cooked; I used the remaining farro to compose four salads to “grab and go”, our new phrase for ready made food in the fridge.  Farro is one of my favorite grains and I will use the other half that I made as a side dish, adding sauteed mushrooms, cubed cooked squash and whatever I have that needs a home.

Fantastic Farro Fruit Bowls

Serves 4 

pf-icon2


Ingredients
  • 1 cup farro  
  • 2 Tbsp Italian parsley leaves, chopped
  • About 1 ½ cups arugula, roughly chopped  
  • ¼ cup diced marinated red onion (see link
  • 2 Tbsp extra virgin olive oil
  • 1 ½ Tbsp lemon juice (fresh)
  • ⅛ tsp salt
  • A few grinds of fresh ground black pepper
  • 3 oz chopped feta cheese
  • 1 cup rainier or other fresh cherries – pitted and cut into 4 pieces
  • ¾ cups walnuts, lightly toasted
Instructions

Such Simple Ingredients

To cook the farro – rinse and make this in your Instapot or Pressure Cooker with three cups of water with a teaspoon of salt and a dash of oil for 12 minutes after it reaches pressure.  Release the steam, remove the farro, drain  and refrigerate until cooled off. Or you can make the farro stovetop according to the package directions.

Once the farro is cooled, reserve half for this recipe and save the remaining half for another time.

Meanwhile – roast your walnuts. I bake mine in a 350 degree oven until barely brown and fragrant, about five minutes. Cool to room temperature and chop into ¼ inch pieces. 

Whisk together olive oil, lemon juice, salt and pepper.

Combine one half of the cooled farro, arugula, chopped onion, parsley and the lemon juice dressing

Find four clean 1 ½ cup wide mouth jars or containers.  First divide the farro mixture into fourths and put ¼ in the bottom of each jar. Next add the feta cheese, ¼ of the total to each jar.

Follow with cherries in each jar, and top each jar with ¼ of the toasted walnuts.

Put lids on these jars and refrigerate for up to three days.  When ready to eat, stir well to combine and enjoy the saltiness, the sweetness, the crunch and the chew.  Add more olive oil or lemon juice to taste.

Share
Posted in Salads & Dressings | Tagged | Leave a comment

Sesame Salmon Pasta Salad (one more time)

I first posted this recipe over three years ago! But with the official start to our summer just a few days away – I thought this would be a great recipe reminder. It’s the perfect cool, colorful and comforting dish for this time of the year!

~*~*~*~*~*~*~*~*~*~*~*~*~*~*~*~*~*~*~*~*~*~*~*~*~*~*~*~*~*~*~*~*~*~*~*~

Click here to view recipe.

Sumptuous Sesame Salmon Salad

Sumptuous Sesame Salmon Salad

The other morning while drinking my morning latte, I was flipping through old recipes — well, not actually flipping since my recipes are all on my computer.  Surfing.  Surfing through recipes.  And up popped this salad that was on my “list” during the 1990s when my middle son Daniel played high school baseball.  Potluck meals were de rigeur back then since games began late in the afternoon and often ended well after dinner.  Although there was a snack stand with hot dogs, chips and soda, some of us baseball moms brought more tasty, healthful dishes to share amongst ourselves.

This hearty “salad” was always a hit with the other parents – but also the kids!  And this week I resurrected the recipe for friends and family – serving it for a late Sunday lunch/dinner.  I didn’t mention to anyone that I was going to assess their feedback to test if this dish is still popular – but I’m happy to report that everyone raved about it. Just like back in the good old days…

Warning – I am well aware that some of you are mayonnaise averse.  Well, this custom-made mayo barely, barely coats the salad and tastes so different from the store bought stuff.  Give it a try.

Ladies and Gentlemen, I present…..drum roll….Sesame Salmon Vegetable Pasta Salad. The nice thing – or I should say one of the nicest things – here is that the recipe makes a pretty large quantity.  Since I often eat lunch at home or pack it to go, nothing could be better.  Pair this with some fruit salad and marinated asparagus or broccolini and you will be happy campers. A couple of days later I was pressed for time and scooped a nice amount of this atop an arugula salad.  Divine!  Oh, and you can use leftover cooked chicken in lieu of salmon if you prefer.

Salmon Pasta Salad with Sesame Dressing

Makes almost 2 quarts, enough for 6-8 people

pf-icon2


Salad Ingredients
  • 1-2 cups poached, grilled, or sauteed salmon (leftovers work great)
  • 2 cups raw rotini pasta, cooked, cooled and drained (spiral tricolor pasta is visually great)
  • 1 ¼ c diced celery
  • 2 average carrots, peeled, matchstick-cut and blanched
  • ½ lb green beans, trimmed and blanched
  • 6 red radishes, cut into 8 wedges each (like you would cut an apple)
  • 1 cup toasted almonds, chopped or slivered
  • 12 cherry tomatoes, halved
Sesame Mayo Ingredients
  • 1 raw whole egg, room temperature
  • 1 Tbsp unseasoned rice vinegar
  • 1 Tbsp soy (I use GMO free Tamari)
  • 1 ¼  Tbsp Dijon
  • 1 Tbsp + sesame oil
  • 1 cup canola oil
Instructions

Combine all the salad ingredients, leaving out the tomatoes and almonds.  They should be added at the end along with the below recipe for sesame mayonnaise, salt and pepper.  Note I only used about half the Sesame Mayo – but you can use more if you like.

For the dressing – I make this exactly like I do homemade mayonnaise – instructions are here. A few extra notes though… Have all the ingredients at room temperature (this is very important).  Combine all the ingredients in a tall, narrow container.  Use an immersion blender and begin at the bottom, slowly bringing the wand to the top of the mix.  You will instantly have mayonnaise!

To serve the salad, if you want to look impressive, line a large platter with purple or curly kale.  Mound the salad in the middle and garnish the platter with hard boiled egg wedges, chopped parsley and extra almonds. I am sorry my picture isn’t what I am describing but by the time I had a chance to snap a photo a huge amount of the salad had been consumed!

The salad stays perfectly well in the refrigerator for up to four days if it lasts that long!

The leftover sesame dressing makes a fantastic dip for blanched or raw veggies too.


Share
Posted in Pasta, Salads & Dressings | Tagged | Leave a comment

Berry Cornmeal Pancakes

Click here to view recipe.

Berry Berry Good Cornmeal Pancakes

I have decided that soft, warm pancakes are the perfect food for babies who are trying to feed themselves.  I tried this Smitten Kitchen recipe the other week to use up some nearly over ripe strawberries, and I loved that the pancakes were barely, barely sweet, that they had a nice texture from the cornmeal and that they were a little different.  They don’t look so pretty – it is hard to make them evenly round because of the chunks of strawberries (or other berries). Nonetheless, I marched up the hill and brought these to my son’s family of three boys, ages 3 , 10 months and 10 months.

I can tell you they were a hit with both the adults and their three sons.  So much so that I repeated this recipe the following weekend and delivered yet another batch of pancakes. 

These stand alone just fine, but can be topped with some plain yogurt, fruit syrup or maple syrup.  And I am thinking when corn season hits I will use the same formula, subbing corn kernels for berries.  Ditto zucchini season when I plan to shred, dry and add this to the pancakes.  Oh, and lots and lots of fresh garden herbs.  We have an abundance of fresh basil, tarragon and Italian parsley for heaven’s sake. Color me inspired!

Berry Cornmeal Pancakes*

Yield: 14 3-inch pancakes

pf-icon2


Pancake Ingredients
  • ¾ cup (95 grams) all-purpose flour
  • ¾ cup (105 grams) medium grind yellow cornmeal
  • 2 tablespoons (25 grams) granulated sugar
  • ½ teaspoon baking powder
  • ½ teaspoon baking soda
  • ¼ teaspoon fine sea or table salt
  • 3 tablespoons (45 grams) salted butter
  • 1 cup (235 ml) plain kefir or buttermilk, well-shaken
  • 2 large eggs
  • 1 cup (about 140 grams or 5 ounces) roughly chopped strawberries (I cut mine pretty tiny so they wouldn’t be a choking hazard)
Frying Ingredients
  • 2 Tbsp butter for the skillet
  • 2 Tbsp avocado oil for frying the pancakes

*From Smitten kitchen with some changes, of course. And I used the weight measurements since that is always easier to clean up for me. 

Instructions

Melt the three tablespoons of butter in a 2-cup glass dish and set aside

In a large bowl, combine flour, cornmeal, sugar, baking powder, baking soda and salt with a whisk. 

To the melted butter, whisk in kefir or buttermilk, followed by the eggs. Gently stir in strawberries. Pour strawberry-buttermilk mixture into dry ingredients and stir until just combined.

In a large preheated cast iron skillet over medium low heat, put about two teaspoons of avocado oil and two teaspoons of butter and stir them together to combine.  Pour a scant ¼ cup of batter into the skillet for each pancake. I do three at a time.  

Fry them until the bottoms are golden and bubbles appear on top, about 1 to 2 minutes. Carefully flip pancakes and cook them until the second side is golden, about another minute. If there is some raw batter drifting out the  sides of the pancake when you first flipped it, flop it over again to the first side for another 30 seconds to ensure the extra batter cooks. Repeat with remaining oil/butter combo and add pancake batter.   If the skillet gets too hot or the butter browns too quickly, reduce the heat to low.

These can be put on a cookie sheet after they are made. To keep warm, cover them and place in a 200 degree oven.

Serve with a sift of powdered sugar, maple syrup or fruit topping.

Share
Posted in Breakfast | Tagged | Leave a comment

Rhubarb Raspberry Cobbler

Click here to view recipe.

Rhubarb Raspberry Cobbler – Ready for the Oven

I go a little crazy when it’s rhubarb season in Seattle!  It’s a limited time when these beautiful, crimson, celery-like shards of deliciousness show up in farmers markets and stores, and during the month or so when I can find young, tender rhubarb I take advantage of this tart fruit.  

Last week we walked to my son Jakey boy’s home to see his three sons before dinner, and Jake made a lovely rhubarb raspberry cobbler, topped with rounds of cornmeal biscuits.  It looked very professional, and I was duly impressed because Jake is an amazing cook but not typically enamored with baking desserts.  He doesn’t crave sweets, yet he tried this Melissa Clark iteration. Fortunately, he served us dessert before his chicken dinner and dished up bowls of this cobbler topped with decadent vanilla bean ice cream.  Between the sweet raspberries, tart rhubarb and textured topping it was sheer perfection.  

Needless to say, I went home and made this exact recipe two days later.  I served it to my two grandsons for dinner and when their parents returned from a date night they helped themselves to dessert as well.  All of us were so happy with the results that it will now have an honored spot in my rhubarb recipe rotation for the future.  

It’s Just THAT Good!

I had a leg up since Jake was the first to make this recipe.  He told me the amount of sugar was just right (I often back off on sugar) and suggested I put a cookie sheet under the baking dish since his cobbler overflowed in the oven.  In addition, I didn’t have finely ground cornmeal and he advised me to just whirl the coarse cornmeal in the food processor for a bit to break it down into finer granules. Genius!

The result was otherworldly.  If you can find fresh rhubarb in your neck of the woods, make this as soon as possible.  I admit that this became my breakfast the following morning as well. And truth be told, this was my main course for dinner … you only live once!

Rhubarb Raspberry Cobbler

Serves 8

pf-icon2


Filling Ingredients
  • 2 pounds rhubarb, trimmed and cut into 1/4-inch pieces (about 6 cups)
  • 2 ½ cups fresh raspberries (or one 10-ounce package frozen raspberries, defrosted if you’re in a pinch – but I did not try this) 
  • 1 cup plus 2 tablespoons sugar
  • 2 ½ tablespoons cornstarch
Biscuit Ingredients 
  • 1 cup all-purpose flour, more as necessary
  •  ⅔ cup fine cornmeal (or process coarser cornmeal for 15 seconds)
  • ¼ cup granulated sugar
  • \1 ½ tablespoons baking powder
  • ¼ teaspoon sea salt
  • 6 tablespoons cold salted butter, cut into 1/2-inch cubes
  •  ⅔ cup heavy cream, more for brushing (I forgot to brush the tops)
Instructions

Preheat the oven to 350 degrees. 

For filling, in a large bowl, toss together rhubarb, raspberries, sugar and cornstarch. Allow the mixture to stand while preparing biscuit dough.

To prepare the biscuits, place flour, cornmeal, sugar, baking powder and salt in a food processor and pulse to combine (or whisk everything together in a bowl).

Add butter and pulse until mixture resembles coarse meal (or use two knives to cut butter into flour mixture). Pour in cream and continue pulsing (or stir) until dough starts to come together, scraping down sides of bowl if necessary.

Turn dough onto a lightly floured surface (I did have to add a little more flour to make it easier to handle) and gently pat it together. Divide it equally into eight balls, then flatten them slightly into thick rounds. Biscuit dough can be made up to a day in advance and refrigerated, covered, until needed.

Scrape filling and accumulated juices into a 2 ½ -quart gratin or baking dish (9 by 12 inches). Arrange biscuits on top of filling and brush with cream. Place a rimmed cookie sheet underneath the pan containing the cobbler, and Bbake for 40 to 45 minutes, or until the filling is bubbling and biscuits are golden.

Let it cool for at least 30 minutes or longer, and dish into a bowl.  Top with ice cream or whipped cream or plain yogurt.  This thickens up a lot when left to cool completely.

Share
Posted in Cakes & Pies, Dessert | Tagged | 2 Comments

Easy Bean & Squash Stew

Click here to view recipe.

Sumptuous Black Bean & Butternut Squash Stew

For some reason, I have become enamoured with butternut squash. Readily available at my local grocery store, it stays fresh for a long long time on the kitchen counter so it has become one of my pandemic staples.  These days I try to get all my meals planned and food delivered or purchased just once a week — and I happened to have all the ingredients already for this dish.

Beans are a food group that I try to eat multiple times a week.  I rarely buy canned beans since I am at home so much now, and I can go from dried black beans to flavorful, plump cooked beans in 50 minutes thanks to my trusty pressure cooker.  If you want to try making beans from scratch, send me a note and I will send you detailed instructions on how to do this.  Remember, leftover beans freeze beautifully too.

When I saw this recipe in the Washington Post Food Section last December, I decided to make it pronto. I ended up with so much stew that I took half of the pot to my son and his family. I should add that leftovers are fantastic here, but I love to share my food with friends and family. 

Black Bean and Butternut Squash Stew. Adapted from Ruth Terry in Istanbul!

Serves 6-8

pf-icon2


Ingredients
  • 4 cups (26 ounces) peeled, seeded and diced butternut squash (3/4 inch)
  • ¼ cup good olive oil, divided, plus more as needed
  • 1 large yellow onion, diced (about 11 ounces which is big)
  • ½ teaspoon sea salt, plus more to taste
  • 1 large red bell pepper, seeded and diced ½ inch (about 1 ¼ cups)
  • ½ large bunch (2 ounces) fresh cilantro leaves and stems, plus more for garnish (optional)
  • 8 cloves garlic (I didn’t have any, but I am sure it would be good)
  • ¾ teaspoon dried basil
  • Three (15-ounce) cans black beans (about 5 cups), drained and liquid reserved (instead I did 1 ½ c black beans in my Pressure Cooker with 5 cups water and vegetables.  Send me a note if you want exact directions) 
  • One (28-ounce) can tomato sauce
  • 2 tablespoons tomato paste
  • Freshly ground black pepper
  • Cooked rice, quinoa or couscous, for serving (optional)
Instructions

Position a rack in the middle of the oven and preheat to 400 degrees.

In a large bowl, combine the squash, 2 tablespoons olive oil and the salt and toss to combine. Spread over a rimmed baking sheet and roast for about 15 minutes, or just until the squash can be easily pierced with a fork. Remove from the oven and set aside.

In a large heavy-bottomed pot over medium-high heat, heat the remaining 2 Tbsp olive oil until shimmering. Add the onions and cook, stirring until the edges start to brown, about 5 minutes. Reduce the heat to medium-low and cook, stirring occasionally, until the onions turn light brown, about 10 minutes.

While the onions are cooking, in a bowl of a food processor, combine the bell pepper, cilantro and garlic in a nutribullet or blender and pulse until very finely chopped and uniform but not fully smooth — this is your sofrito.

Add the sofrito to the pot and raise the heat to medium. Add the dried basil and stir until aromatic, about 1 minute. Add the beans, roasted butternut squash and stir to combine.

Add the tomato sauce, tomato paste and 1 scant cup bean cooking liquid or water.  Taste and add more salt, if needed. Bring the stew to a simmer, then reduce the heat to medium-low, cover and cook until slightly thickened, 7 to 10 minutes. If you prefer a thicker stew, simmer, uncovered, for a few more minutes, until your desired consistency is reached.

To serve, ladle the stew into shallow bowls or over couscous, quinoa or rice, and garnish with cilantro, full fat yogurt and a drizzle of fruity olive oil.

Share
Posted in Soups | Tagged | Leave a comment

Chicken Stew My Way

Click here to view recipe.

Couldn’t-Be-Easier Chicken Stew

At the risk of sounding boastful, I am the queen of leftovers (or previously served/prepared food) meal preparation.  While in Seattle, I make three meals a day, seven days a week except the occasional times we are invited to dine with members of our “bubble”, aka family.  It’s nice to have a brief respite, but unlike most of you during this “stay at home” time, I do not miss restaurants at all.  Cooking is my stress relief, my creative time.  Bring it on.

If there were a TV show where a fridge could be loaded with normal fruits, vegetables and condiments and contestants could create a meal, I would win hands down.  I hate to brag, but that is my superpower: to be able to create delicious and beautiful meals with ordinary ingredients.  

This chicken stew came to be because I decided to try to make due with the ingredients in my freezer and refrigerator/cupboards rather than buying more food.  I had a pack of frozen boneless/skinless chicken thighs that needed to be used.  For the record I prefer chicken thighs with the bone in and skin on, but whatever.  

I also had half an onion, a parsnip, some crimini mushrooms, a bit of yellow pepper and about a quart of butternut squash chunks I saved while dicing the rest for risotto.  Oh, and fresh dill and limes and just a few cherry tomatoes.  And some cooked brown rice.

I decided not to use potato or carrots or garlic, because these veggies are way overdone in my opinion. 

I am pretty pleased with how this turned out and I’ll make it again and probably add some different vegetables (green beans?  Sweet potato?)  The sweetness of the squash complimented the other veggies beautifully and the colors looked appealing. 

Here is what I did, if memory serves me correctly:

Pressure Cooker Chicken Stew

Serves 3-4


pf-icon2


Ingredients
  • 1 ½ Tbsp avocado oil
  • 1 ½ lb (about 5-6) boneless skinless chicken thighs, dried and seasoned with salt, pepper and smoked paprika
  • ½ onion, peeled and thinly sliced
  • 10 large crimini mushrooms cleaned, destemmed and sliced into 6 chunks each
  • ¼ yellow pepper, sliced
  • 1 large parsnip, peeled and coarsely chopped into large pieces-about 1 inch thick
  • Handful of fresh dill, stems and all
  • 4 cherry tomatoes, cut in half
  • Juice of one lime
  • 1 cup chicken broth  (I cheated and made this with Better than Bouillon)
  • ½ Tbsp dry vermouth, which I always keep in my fridge to use when white wine is called for in recipes
Instructions

Dry the chicken thighs and season with a bit of salt, fresh ground black pepper and smoked paprika.

Heat the pressure cooker, then add the oil and wait until it is hot  Sear the chicken thighs a couple minutes on each side until browned a bit.  Remove the thighs with tongs to a rimmed plate so juices can collect.

Add the onion, mushrooms, pepper  and parsnip and saute five minutes.  Top the veggies with the chicken thighs and pour any juice that has collected into the pot. Top with the cherry tomatoes and dill, pour broth and vermouth over the top.

Pressure Cooker Ready!

Secure the lid and bring to high pressure for nine minutes. Manually release the pressure and remove the top, placing the chicken on one end of the platter and the veggies on the other end.

There will be some amazing juice left over in the pot, at least a cup.  You can serve this as is but I thickened mine a titch with a teaspoon of cornstarch whisked into two tablespoons of cold water

I then poured this slurry into the hot juice l while it was still on low heat to thicken it .  I served the juice in a gravy boat but it could be combined with the stew.  Oh, and I put a scoop of heated brown rice on the bottom of my stew and had some fresh challah to dip in the juice too.  It tastes like a four star meal. 

Share
Posted in Soups | Tagged | Leave a comment

Mint-Stuffed Brownies

Click here to view recipe.

Moist, Marvelous Mint-Stuffed Brownies

This week I really had a craving for mint brownies, but the thought of making a buttercream and then waiting to top the pan of brownies with ganache seemed like too much work.  And then a lightbulb went off!  I remembered a Cooks Illustrated brownie recipe from long ago that incorporated York Mints in the center.  I happened to have a bag of York MInts in my candy drawer (yes, I have a dedicated candy drawer for my grandkids …and for me) so this was very, very easy and really good.  I still prefer my original mint brownies, but I’ll make these again on the fly.

Mint Stuffed Brownies (Adapted from Cook’s Illustrated)

Makes 16 pretty nice sized brownies

pf-icon2


Ingredients
  • 1 stick salted butter (¼ lb)
  • 2 ounces unsweetened chocolate
  • ¾ cups regular flour
  • ½ tsp baking powder
  • ¼ tsp fine sea salt
  • 2 large eggs
  • 1 cup minus 1 Tbsp granulated sugar (measure 1 cup and remove 1 Tbsp)
  • 1 tsp pure vanilla extract
  • 16 York Peppermint Patties, unwrapped (1 ½ inch diameter)
Instructions

Preheat the oven to 350 degrees with the rack in the center.  Line an 8-inch square baking pan with aluminum foil, making sure it is tucked into the corners and has at least one inch sticking up all around. Spray the foil with Pam.

Melt butter and chocolate together in a saucepan over low heat.  Set aside to cool for 10 minutes.  

In a small bowl combine flour, baking powder and salt.  Stir to combine.

Whisk eggs, sugar and vanilla together.  Add cooled butter/chocolate mixture. Stir in flour mixture.  Do not overmix!

Pour about half of the batter into the foil-lined pan.  Top with the peppermint patties, having the flat side facing up so the top is even.  Pour the rest of the brownie batter over the patties and smooth it out.

Almost ready for the oven!

Bake 30-35 minutes until just set (Because of the candy, a toothpick won’t tell you if it is done.)  Remove to a cooling rack for two hours until cool.  Grab foil and remove from the pan to a cutting board.  Cut all the way through into 16 brownies and serve.  (Brownies will keep in an airtight container for up to three days or can be frozen for two months.)

Share
Posted in Dessert | Tagged | Leave a comment

Shirazi – AKA Chopped Vegetable Salad

Click here to view recipe.

Sublime Shirazi

My daughter-in-law invited our family (all adults are vaccinated!) to their home today for breakfast and to celebrate the Persian New Year, Nowruz.   Nowruz means “New Day” and features many lovely traditions including celebrations, parties and food – LOTS of food.   It’s not a religious holiday but a universal celebration of new beginnings: wishing prosperity and welcoming the future while saying goodbye to the past.  That’s why families use this time to deep clean their homes and closets and to purchase new clothes. Nowruz is a month-long celebration, filled with festivities, craft-making, street performances and public rituals. So having a Persian breakfast and gathering around the table with our Seattle family felt right.

Our Nowruz Celebratory Spread

My assignment was to bring a “chopped Israeli” salad.  I did a little research and am calling it Shirazi in honor of my amazing Persian daughter in law and to honor the Persian New Year. I ended up kind of winging it and keeping the ingredients simple and limited to what I had in my house.  

Shirazi or Chopped Vegetable Salad

Serves 10-12

pf-icon2


Ingredients
  • 3 pints of red cherry tomatoes – cut into 8 pieces
  • 2 English cucumbers – unpeeled, seeded and chopped finely, same size as tomatoes
  • 1 medium red onion – peeled and diced the same size as tomatoes
  • 6 radishes – chopped same size as tomatoes (not in most recipes but I had 6 hanging out in my fridge)
  • 1 ½ green peppers – seeded, chopped same size as the tomato
  • ¼ cup finely chopped cilantro (can substitute parsley or mint)
  • ¼ cup finely chopped dill 
  • Juice of 2 ½ large limes
  • ¼ cup extra virgin olive oil
  • Sea salt and fresh ground black pepper to taste-it takes a lot of salt so add slowly and taste
Instructions

Dice cherry tomatoes by cutting them in half, then each half into fourths.  I use a small serrated knife for this.  Put the tiny pieces of cut tomatoes in a colander while you chop and prep everything else.  Keep shaking the strainer to get rid of extra juice and seeds.  Once you add the tomato to the salad ½-1 hour later – watch carefully and discard seeds that have accumulated at the bottom if you can toward the end. It should be the last thing you add.

Wash the cucumber (do not peel).  Cut the cucumbers in half longitudinally, remove the seeds and make cuts the long way, about four per half.  Then dice finely and put in a large bowl.  

Peel and dice the purple onion the same size as the cucumbers.

Seed and remove the core and inner membrane from the green peppers.  Finely dice the same size as the cucumbers.

De-stem and dice the dill, and chop the cilantro (you can include the stem with cilantro).

Finally, add the drained tomato pieces and gently mix everything together.

A half an hour or less before serving, add the lime juice, olive oil, salt and pepper.  Taste and adjust the salt or pepper or add more herbs if you feel it is necessary.

A couple of notes:
  1.  The only hard part of this salad prep is chopping the vegetables uniformly and smallish. We are talking about ¼ inch.  I have made this type of salad many times and to me it is easier to start with cherry tomatoes than with other types.
  2. This salad does not keep well once dressed.  The lime juice and salt draw a lot of juice from the vegetables and it looks less appealing.  If you have leftovers, drain them and keep in the refrigerator, then add more lime juice and olive oil if needed. 
Share
Posted in Salads & Dressings | Tagged | Leave a comment